|
Play
by Play - Fighter's Fight Commentary
|
Event:
WCA: Monday Night Wrestling
Date: May 30, 2022 |
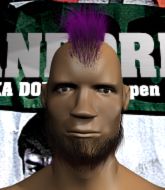
This TWGC bout is 1 fifteen minute round in the super heavyweight division. Introducing today's competitors. In the red corner, competing out of Hilo, with a TWGC record of 1 wins and 0 losses; Santos Fontes! And in the blue corner, fighting out of Hilo, with a TWGC record of 0 wins and 2 losses; Seth Palmer!
The judges for this bout are Chris Saunders, Josh West and Colin Fray.
The fighters bow as they face eachother in the middle of the mat and we are under way.
Palmer shoots in for a double leg but Fontes sprawls well. That's going to sap some energy.
Fontes wants to clinch up but Palmer keeps it at a distance.
Fontes is looking to clinch.
Palmer tries a counter takedown but it's more of a dummy move, and he uses it to push himself away.
Palmer closes this distance looking for a takedown but Fontes circles away.
Palmer tries to shoot in for a takedown. He's got hold of a leg but Fontes swivels and escapes.
Santos Fontes has stuffed three takedown attempts in the round now. That's going to take a lot out of Seth Palmer.
Palmer darts in looking for a takedown but Fontes gets double underhooks and turns Palmer into the ropes.
Fontes wants to take advantage of his opponent's missed offense by moving into the clinch.
Fontes tries to close the distance and clinch but Palmer swats him to one side with an open hand palm strike and circles away.
Palmer shoots for a double leg takedown but Fontes sprawls well. He's pushed Palmer's face into the mat and manages to get back to his feet relatively easily.
Palmer keeps the fight on the outside.
Palmer fails with a takedown attempt.
We've had a slow start to the round here - hopefully the action picks up.#TD#
Fontes shoots in for a takedown from distance. He catches Palmer napping and manages to drive through into side control! Score +4 for clean takedown past guard: Fontes (4) vs (0) Palmer
The fighters are trapped in the ropes so we're going to have a reposition here. The ref calls for a break and repositions the fighters in the center of the ring.
Fontes is pausing for a moment. What's he doing? It looks like he's clearing his nose. Oh dude! He's shot a load of snot all down Palmer's shoulder. That is not cool. #T1##SUB#
Fontes is looking for a kimura. He might have it! No, Palmer has escaped the position, nice work there.
Palmer seems a little lost for a moment, as Fontes dominates the positioning.#SUB#
Fontes is working for what looks like an arm triangle here. Palmer is trying to escape and Fontes transitions quickly into an armbar! He's slapped it on tight and Palmer is forced to tap! Nice work there by Fontes! Very nice indeed!
Ladies and gentlemen, after 1:47 of round 1, we have a winner by way of Submission (Armbar). Santos Fontes! |
|
|
|
Event:
WCW 2
Date: May 21, 2022 |
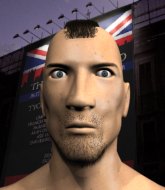
This TWGC bout is 1 fifteen minute round in the super heavyweight division. Introducing today's competitors. In the red corner, competing out of Las Vegas, with a TWGC record of 0 wins and 0 losses; Tyson II! And in the blue corner, fighting out of Hilo, with a TWGC record of 0 wins and 1 losses; Seth Palmer!
The judges for this bout are Paul Gruel, Ryoma Takatsuka and Chris Saunders.
The fighters connect hands in the middle of the mat and we are under way.
Horrible takedown attempt by Palmer or perhaps it was just good defense by II, which made it look bad.
II moves in looking to clinch but Palmer pushes him off.
Palmer misses with a takedown attempt - II sprawls well and throws a nice strike on the way out which just misses.
Palmer looks for a takedown but II sprawls well.
Tyson II has stuffed three takedown attempts in the round now. That's going to take a lot out of Seth Palmer.
Nice takedown defense from Palmer. No joy for II on that attempt.
II dives in for a single leg takedown but Palmer sprawls and the fighters end up clinched against the ropes.
Palmer is working on a leg, looking for a takedown but II is defending well.
Palmer gets underhooks to prevent II's takedown attempt.
Palmer stops a takedown attempt from II.
II is looking to take this one to the mat.
II tries to jump guard but he falls flat on his backside. Palmer smiles and moves away.
We've had a slow start to the round here - hopefully the action picks up.
II tries to clinch up.
Palmer fails miserably with a takedown attempt.
II has a takedown stuffed.
Palmer has a takedown stuffed.#T1#
Palmer misses with a takedown attempt. He shot from a bit too far out.
II closes the distance and clinches up with Palmer, looking for a takedown. II pushes Palmer against the ropes but Palmer circles to the side and manages to break the clinch.
Palmer fakes high and shoots in for a takedown but II avoids it really well and circles away.
A telegraphed takedown attempt from Palmer is defended easily by II.
Palmer circles away from the clinch attempt.
#CL#
II moves into the clinch successfully.
II is trying to pull guard but Palmer has him pressed against the ropes.
Palmer tries for a takedown but II manages to get underhooks.
II tries to take the fight to the ground by pulling guard but can't manage it.
#TD#
II decides to pull guard.
II is breathing heavily.#SUB2#
Palmer drops back for a leg but he's not going to get it - he lets go and II dives on top into guard. Score +2 for sweep to guard / half guard: II (2) vs (0) Palmer#T2##SUB2#
Palmer isolates an arm and boxes in a triangle. II stacks Palmer on his neck as he steps over and passes to the side. He's now in a much more dominant position where he can look to do some serious damage. Nice move by II! Score +3 for passing guard: II (5) vs (0) Palmer
II gets to mount! Palmer was on the offensive and wasn't defending properly. Score +2 for reaching mount: II (7) vs (0) Palmer
Palmer is looking to improve his position but II isn't that keen on the idea.
II wants to take his opponent's back but Palmer doesn't allow it. #T3#
II is working hard here to advance position.
Palmer tries to get back to half guard but can't. #T4#
Palmer wants to improve position but instead he's given up his back. Score +3 for taking back: II (10) vs (0) Palmer
Palmer can't escape the position.
#T5#
Palmer is still trying to improve position.
The fighters are trapped in the ropes so we're going to have a reposition here. The ref calls for a break and repositions the fighters in the center of the ring.
Palmer keeps trying to improve his position.#T6#
Palmer breaks II's hooks off and manages to turn into his guard.
Score +2 for sweep to guard / half guard: II (10) vs (2) Palmer#SUB2#
Palmer is trying to work a guillotine from the top, or something like that? Don't know how he thinks he's going to get a finish from there. #T7##SUB2#
Palmer is trying to work a guillotine from the top, or something like that? Don't know how he thinks he's going to get a finish from there.
II looking to control.
#SUB2#
Palmer is trying to work a guillotine from the top, or something like that? Don't know how he thinks he's going to get a finish from there. #SUB2#
Palmer drops back looking for a heel hook - he quickly realises he's not going to get it but II manages to dive on top of him before he can escape and now Palmer has II in his guard. Score +2 for sweep to guard / half guard: II (12) vs (2) Palmer#T8##SUB2#
Palmer is looking for a guillotine. You can't force these things though and II defends well.#SUB2#
Palmer is looking for a guillotine. You can't force these things though and II defends well.#T9##SUB2#
II got a little sloppy there for a moment and Palmer has worked his way into a loose triangle - can he finish it?! No, II has managed to get both his arms back between Palmer's legs - danger averted.#SUB2#
Palmer escapes his hips to the side and looks to be working for an armbar. II gives him a little smile and shakes his head. No chance. #SUB2#
Palmer has his foot on II's thigh. He's trying to push off and get in position for a triangle, I think. II works his way back into a safe position though.#T10##SUB2#
Palmer is active off his back here, looking for submissions.
II stands up and looks to throw the legs aside to pass to side control. Palmer swivels though and keeps the full guard. #SUB2#
Palmer had isolated an arm as going for a kimura. II defends it easily.#SUB2#
Palmer is looking for a guillotine. You can't force these things though and II defends well.#T11##SUB2#
Palmer had isolated an arm as going for a kimura. II defends it easily.#SUB2#
Palmer has a loose triangle. He'll be looking to tighten that up but II can see exactly what he's planning and manages to posture up and free himself. #T12#
II trying to control the position from guard on top but Palmer is wriggling around, looking for whatever he can. #SUB2#
Palmer working for a triangle but II defends it easily.
#SUB2#
Palmer had isolated an arm as going for a kimura. II defends it easily.#T13##SUB2#
Palmer isolates an arm and boxes in a triangle. II stacks Palmer on his neck as he steps over and passes to the side. He's now in a much more dominant position where he can look to do some serious damage. Nice move by II! Score +3 for passing guard: II (15) vs (2) Palmer
Palmer tries to buck II off but II is having none of it.#T14#
Palmer manages to get one leg in to regain half guard. #SUB2#
Palmer looking to work for a kimura from the bottom.#SUB2#
Palmer looking for submissions from an awkward position here.
Boooooooooooooooooooo!!! God, this has been a terrible round. Come on you two, sort yourselves out!#SUB2#
Palmer looking to work for a kimura from the bottom.
And that's the end of the fight!
II takes the fight on points by 15 to 2.
Tyson II decided to go for the less than humble approach in his post fight interview, telling everyone how he is going to conquer the world. The crowd seemed to like it when really that sort of approach could have gone either way. |
|
|
|
Event:
WCW
Date: May 14, 2022 |
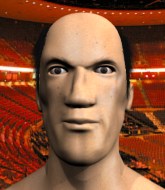
This TWGC bout is 1 fifteen minute round in the super heavyweight division. Introducing today's competitors. In the red corner, competing out of Hilo, with a TWGC record of 0 wins and 0 losses; Seth Palmer! And in the blue corner, fighting out of Hilo, with a TWGC record of 0 wins and 0 losses; Robbie Dicks!
The judges for this bout are Micheangelo Fripello, Josh West and Colin Fray.
Let's get this grappling contest under way! Who will be victorious?#CL#
Palmer has taken the fight to the clinch.
Palmer could do with losing a few pounds - he looks very soft around the mid section, to put it politely.
Dicks is pressed up against the ropes. Palmer has hold of a leg and is looking to drag Dicks down to the mat. Dicks avoids the attempt though and has circled away. We're back to striking at a distance. #TD2#
Dicks is looking for a takedown here. He's shot in and has managed to get it, finishing up in Palmer's half guard. Score +2 for takedown into guard / half guard: Palmer (0) vs (2) Dicks
Dicks passes the guard and advances to mount! Score +3 for passing guard: Palmer (0) vs (5) Dicks#SUB2#
Dicks looking for a guillotine from mount but Palmer is having none of it.
Dicks sitting in mount, just looking to control for the moment.
We've had a slow start to the round here - hopefully the action picks up.#T1#
Palmer is looking to improve his position but Dicks isn't that keen on the idea.
Dicks controlling from the full mount.
Palmer really trying hard to get back to half guard here.
Palmer is writhing around trying to get back to his feet.
Dicks content just to control the position here.
The fighters are trapped in the ropes so we're going to have a reposition here. The ref calls for a break and repositions the fighters in the center of the ring.#SUB2#
Dicks has hold of Palmer's left arm, perhaps looking for a submission. The two fighters tussle over control of the isolated limb and Palmer manages to get his arm back to his side and away from danger.
#T2#
Dicks controlling from the full mount.
The fighters are tangled up in the ropes here. We might need a restart if the fighters can't break free themselves.
Let's hope that Dicks has the urge to step up the pace any second now because for the last 15 or 20 seconds he's just been holding on tight.#SUB2#
Dicks working for a guillotine from mount but Palmer is in no mood to give up.
Dicks tucks in and makes sure he doesn't lose the dominant position. #SUB2#
Dicks goes for an armbar but Palmer turns quickly into his guard - lovely anticipation from Palmer. Score +2 for sweep to guard / half guard: Palmer (2) vs (5) Dicks
Palmer has to be careful here, sitting in the guard of a superior BJJ player.#T3#
Dicks is adopting a defensive guard.
Dicks looking for a sweep. Not yet Dicks, not yet.
Dicks pulls Palmer in close to his closed guard and prevents Palmer from doing any damage or advancing position.
Palmer won't allow Dicks to sweep him here. #T4#
Dicks manages to sweep nicely, so he's now on top. Palmer manages to get himself to full guard.
Score +2 for sweep to guard / half guard: Palmer (2) vs (7) Dicks
Dicks advances to half guard. #SUB2#
Dicks is trying for a guillotine from the top but the pressure isn't in the right place so Palmer is just riding it out for now. Dicks eventually gives up the hold.
Dicks trying to pass the guard but Palmer defending well.
Dicks content to control rather than advance.
Palmer wants to get back to full guard.#T5#
Dicks wants to pass to mount but Palmer is defending the position.
Dicks not doing much here.
#SUB2#
Dicks is looking for a kimura but he's never going to get it from there.
Dicks is controlling the pace.
#T6##SUB2#
Dicks is working for a kimura but Palmer is defending it quite comfortably.
Dicks not doing much here.
Dicks has freed up his trapped foot and advances to mount. Score +3 for passing guard: Palmer (2) vs (10) Dicks
Dicks content just to control the position here.
Dicks avoids the attempt from Palmer to control.#T7#
Dicks takes a little breather and maintains the position. The referee will be looking for him to stay active from such a dominant position though.
We're seeing a lot of stalling here from Dicks.
Dicks's corner are shouting for him to control the position and he seems happy to oblige.
Yet more stalling tactics from Dicks.
Palmer is in all sorts of trouble here.
Dicks controlling his opponent. #T8#
More stalling from Dicks.#SUB2#
Dicks looking to secure an arm triangle but Palmer defends it well.
Dicks tucks in and makes sure he doesn't lose the dominant position. #T9##SUB2#
Dicks is in full mount, looking to secure a guillotine but Palmer is surviving well by controlling Dicks's body position as best he can.
Dicks controlling the position easily from mount. #SUB2#
Dicks jumps to side control looking for an arm triangle but Palmer manages to avoid the submission attempt.
You can see the frustration on Palmer's face as Dicks controls the position.
Dicks tries to advance to mount but can't.
Dicks has knee on belly and now moves to full mount! Trouble for Palmer! Score +2 for reaching mount: Palmer (2) vs (12) Dicks#T10#
Palmer tries to hold on but Dicks postures up.
Dicks takes a little breather and maintains the position. The referee will be looking for him to stay active from such a dominant position though.
Palmer knows he needs to get back to his feet asap. He's simply no match for Dicks on the ground.#SUB2#
Dicks is working on an americana here. Ooh, that looks pretty nasty! Nope, Palmer has managed to escape the submission attempt.
Dicks takes a little breather and maintains the position. The referee will be looking for him to stay active from such a dominant position though.
It looks like Dicks might be adopting somewhat of a lay and pray gameplan here, which I'm sure won't go down too well with the paying fans in attendance... Or the ring announcers come to think of it.#T11#
Dicks with more of the same as he continues to hold on.
Dicks is continuing to stall.#T12#
The adventures of Dicks the control monster continue. Boring.#T13##SUB2#
Dicks is working for a guillotine from mount but Palmer frees his head quite easily.
Palmer tries to hold on but Dicks postures up.#SUB2#
Dicks has hold of Palmer's left arm, perhaps looking for a submission. The two fighters tussle over control of the isolated limb and Palmer manages to get his arm back to his side and away from danger.
Dicks controlling from the full mount. #SUB2#
Dicks with some aggressive grappling here. He's looking for submissions here, rather than waiting for the opportunity to counter.
Dicks sitting in mount, just looking to control for the moment. #T14##SUB2#
Dicks is in full mount, looking to secure a guillotine but Palmer is surviving well by controlling Dicks's body position as best he can.
Boooooooooooooooooooo!!! God, this has been a terrible round. Come on you two, sort yourselves out!
Dicks controlling the position easily from mount.
And that's the end of the fight!
Dicks wins on points by 12 to 2. |
|
|
|
|
|
|