|
|
PBP Commentary |
Coming up we have a middleweight MMA rules bout between Wade Anderson (ranked 0 p4p, 0 weight class) and Dorian Heyward (ranked 0 p4p, 0 weight class). Anderson comes to the cage accompanied by "Not Falling" by Mudvayne. Rumors backstage are that the fighters have been paid to keep it standing but we know that would never happen in MMA!
 |
|
 |
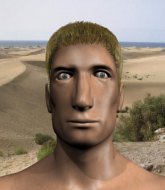
| 181 cm
32
190 lbs
5 - 11 - 1 |
|
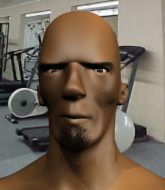
183 cm
19
190 lbs
2 - 0 - 0 |
BJJ Blue Belt
Solid boxing
Good chin |
|
BJJ White Belt
Brawler
Solid chin |
|
| |
|
Ladies and gentlemen. This fight is 3 rounds, in the middleweight division.
Introducing the fighter to my left, fighting out of the red corner.
With a record of
5 - 11 - 1, fighting out of Los Angeles, Wade Anderson!
And introducing the fighter to my right, fighting out of the blue corner.
With a record of
2 - 0 - 0, fighting out of Los Angeles, Dorian Heyward!
The judges for this bout are Timothy Bukovac, Jack Bonds and .

The bell rings for round one and we are underway!
Heyward circles away from the clinch attempt.
Heyward swings wildly with a right hand that was never going to find it's target.
Heyward looks to land a right hand but Anderson moved out of range.

Heyward closes the distance and clinches.

Anderson breaks from the clinch.
Heyward shapes like he's going to throw a leg kick but settles back down.
Anderson tries to counter by clinching up but Heyward breaks away and moves out of range.
Heyward throws a right hand that Anderson ducks under and follows up with a left that Anderson also avoids with ease.
Anderson changes levels looking for a counter takedown but doesn't commit.
Anderson ducks under a wild hook from Heyward.
Anderson throws a two punch combo that lands nicely.

It looks like Dorian Heyward has been cut.
Sloppy strikes from Heyward. Those never looked like landing.
Heyward throws a leg kick

and Anderson moves into the clinch.

Heyward breaks the clinch and we return to the middle of the mat.
Heyward tries to keep at a distance but Anderson has taken the fight into the clinch.
This has been an exciting period of action!
Anderson scores with an uppercut up the middle.
Heyward's corner calls for him to break the clinch, which he does.
Anderson misses with a jab and misses with a cross straight after too.
Anderson lands a two punch combo.
Anderson is breathing heavily.

That's one minute gone in the round.
Anderson shoots in and drives through. Heyward sprawls well.
Dorian Heyward is looking to keep the fight on the feet at all costs.
A swing and a miss from Heyward.
Anderson gets a clinch.
Heyward breaks the clinch.
Heyward missing with a left hand there. Anderson was out of range so wasted energy throwing that one.
Heyward throws a right and a left that both miss.
Heyward lunges in with swinging rights and lefts but Anderson circles away quickly and effectively.
Nice defenses there by Anderson.
Wade Anderson seems to be the more aggressive standup fighter in this bout.
Anderson dodges the punch combination from Heyward.
Heyward throws the left hand but Anderson avoids the punch easily.
Heyward throws a sloppy head kick and Anderson moves out of range easily.
Anderson closes the distance and clinches.
Heyward's corner calls for him to break the clinch, which he does.
Heyward tries to close the distance and clinch up against the cage but Anderson paws at him with a jab and circles away.
Anderson avoids the head kick by Heyward.

That's two minutes gone in the round.
Heyward throws a looping overhand right but Anderson ducks down to avoid it.
Anderson clinches.
Heyward looks more muscular than last time we saw him. He must have been on the weights.
This has been an exciting period of action!
Anderson escapes the clinch and we're back to striking.
Heyward fakes low and throws an overhand right that catches Anderson on the side of the head.
Anderson lands a two punch combo.
Heyward gets tackled into the cage by Anderson. Anderson maintains the clinch.
Anderson escapes the clinch and we're back to striking.
Heyward lands a jab-cross combination.
Anderson checks a leg kick.
Anderson closes the distance and clinches.
Heyward breaks the clinch.
Heyward stuffs the takedown.
Despite the aggression on Heyward's face he doesn't fully commit to the counter.
Heyward rushes forward with a series of wild hooks but Anderson moves out of range and avoids them all easily.
Heyward misses the shot to the body.
Anderson shoots in looking for a takedown. Heyward tries to sprawl out of it but Anderson keeps driving through. The fighters are pinned against the cage. Heyward manages to get underhooks and after a bit of a struggle, circles away and we're back to standing.
That's three failed takedown attempts in the round for Wade Anderson. That's going to take a lot out of him.

That's three minutes gone in the round.
Heyward throws a series of punches but Anderson avoids them all with ease.
Heyward throws out a loose jab but Anderson uses good head movement to avoid it.
Heyward throws a wild combination but nothing lands.
Anderson keeping a good distance there, avoiding the body shot.
Heyward's jab looks to have found its range, popping Anderson under the eye.
Heyward misses with a hook. Anderson ducked under it nicely.
Anderson clinches.
Heyward escapes the clinch and we're back to striking.
Anderson moves into range and throws a lovely three punch combination.
Anderson takes the fight into the clinch.
Heyward tries a shoulder strike but it doesn't do any damage.

That's four minutes gone in the round.
Anderson escapes the clinch and we're back to striking.
Anderson takes a shot to the eye socket. That's gotta hurt.
Fantastic stuff here - a very entertaining period of action, which has drawn cheers from the crowd.
Heyward throws a combination. Anderson tries to block but a couple of punches get through.
Heyward misses with a few strikes there.
Anderson darts in and clinches Heyward up against the cage.
Anderson jumps guard but Heyward stands there with Anderson around his waist. Anderson gives up and drops back to his feet. We remain in the clinch.
Anderson pushes off and circles away, back to the middle of the mat.
Anderson tries to bum rush Heyward with a series of wild strikes but Heyward uses good footwork to avoid the assault.
Heyward doesn't fully commit to the body shot counter.
The crowd applaud the fighters' efforts here as the round comes to an end.
Heyward throws a combination but it was largely blocked by Anderson.
Anderson defending well as Heyward loads up on a big left hand.
Anderson clinches.
Anderson can't find room to land a body shot as Heyward controls the action.
And thats the end of the round the fighters go back to their corners.
A close round but Dorian Heyward will probably get the nod.
The cut man is working on Dorian Heyward's cut.
Well, the break between rounds is over. Let's get back to the scrappin!

Anderson defending well as Heyward loads up on a big left hand.
Heyward pushing out the jab but it's not landing.
Heyward will need to tighten up his combinations if he doesn't want to gas himself out, swinging at thin air.
Wade Anderson is looking to throw some combinations by the looks of things.
Anderson has taken the fight to the clinch.
Anderson pushes off and circles away, back to the middle of the mat.
Anderson is looking to clinch but Heyward is avoiding it.
Anderson is trying hard to land a takedown here. Heyward sprawls well and keeps this one on the feet.
Heyward throws out a counter right but Anderson avoids it with no problem.
Anderson takes a body kick right on the floating rib. Ouchie.
Anderson avoids the body shot from Heyward.
We've had a slow start to the round here - hopefully the action picks up.
Heyward throws a head kick that misses.
Jab, jab by Heyward - just one landing.
Heyward avoids the clinch attempt nicely.
Both fighters are absolutely exhausted here.
Heyward throws a right hand that Anderson ducks under and follows up with a left that Anderson also avoids with ease.
Heyward circles away from the clinch attempt.
No joy there for Heyward, who threw a few shots but didn't land.
That's one minute gone in the round.
Heyward pulls out of a head kick attempt.
Heyward looking to take his opponent's legs away with the low kicks.
Heyward throws a combination but it was largely blocked by Anderson.
Anderson pulls out of a head kick attempt.
Anderson misses with a takedown attempt - Heyward sprawls well and throws a nice strike on the way out which just misses.
Heyward rushes forward with a series of wild hooks but Anderson moves out of range and avoids them all easily.
Anderson uses good head movement to avoid the hook from Heyward.
Anderson avoids a lazy jab quite easily.
A head kick misses from Heyward.
Heyward throws a combination that misses
and Anderson counters with a three punch combination, finished off with a leg kick. Nice work.
Heyward lands a jab to the head.
No joy there for Anderson, who threw a few shots but didn't land.
Heyward looks to score with a jab to the body but Anderson is just out of range.
Anderson tries to clinch up.
That's two minutes gone in the round.
Anderson shoots in for a takedown but doesn't get it.
That's three failed takedown attempts in the round for Wade Anderson. That's going to take a lot out of him.
The crowd cheering loudly, showing their appreciation for the quality fight we're seeing here.
Heyward tries to bum rush Anderson with a series of wild strikes but Anderson uses good footwork to avoid the assault.
The fighters are starting to get sweaty, which will make takedowns a bit more tricky.
Anderson shoots for a double leg takedown but Heyward sprawls well. He's pushed Anderson's face into the mat and manages to get back to his feet relatively easily.
Heyward misses with a hook. Anderson ducked under it nicely.
Anderson wants to clinch but Heyward slips to the side
and Heyward counters with a three punch combo that has Anderson backing up. Anderson nods at Heyward to acknowledge the strikes.
Anderson rushes forward with a series of wild hooks but Heyward moves out of range and avoids them all easily.
Heyward has closed the distance and engaged Anderson in a clinch.
Anderson lands a left hand.
I was talking to Anderson's coach per-fight and he was telling me that they'd been working on the clinch in the runup to this fight.
Anderson pushes off and circles away, back to the middle of the mat.
Heyward tries a head kick but it misses.
Anderson fails in his attempt to clinch.
Heyward looking to land some kicks to the body here.
Anderson rushes Heyward and pushes him back against the cage in a clinch.
That's three minutes gone in the round.
A short right from Anderson on the inside.
Anderson breaks from the clinch.
Heyward missing with a left hand there. Anderson was out of range so wasted energy throwing that one.
Anderson fails with an attempt to clinch.
Heyward lets it all go there with a big combo counter but none of the punches connected.
Heyward fakes a couple of low kicks, before throwing one on the third attempt. It connects and Anderson has to reset his feet before getting ready to engage.
Heyward throws a combination but comes up with nothing but fresh air.
Anderson moves in looking to clinch but Heyward pushes him off.
Anderson tries to clinch but is not successful on this occasion.
Heyward only half commits to the counter leg kick.
Anderson shoots in for a double leg but Heyward sprawls well. That's going to sap some energy.
Heyward misses with a straight right.
Heyward shapes like he's going to throw a leg kick but settles back down.
The fight stays on the outside here - Anderson looks like he's thinking about clinching though.
Anderson gets to the clinch - let's see what his plan is here.
That's four minutes gone in the round.
Anderson breaks the clinch and we return to the middle of the mat.
Anderson has managed to clinch.
Heyward's corner calls for him to break the clinch, which he does.
Anderson gets cracked there but stands up to it.
Heyward throws out a token jab with nothing on it.
Heyward leaves Anderson with his face pressed against the mat as he sprawls beautifully, defending against a solid takedown attempt.
This is a great period of action - very entertaining stuff!
Heyward misses with a jab, cross combination.
Heyward throws a right hand that Anderson ducks under and follows up with a left that Anderson also avoids with ease.
Dorian Heyward seems to be getting the better of the standup.
A big right from Heyward misses.
Anderson looks for a takedown here. Will he get it? Heyward is fending him off so far but Anderson persists. Nope, Heyward circles away and we're back to standing.
Some wild striking there from Heyward.
Anderson throws a series of punches but Heyward avoids them all with ease.
And thats the end of the round the fighters go back to their corners.
Dorian Heyward showed his class in that round. I'd imagine he'll take it on all the scorecards.
The cut man is working on Dorian Heyward's cut.
OK. That's time! The bell goes and we're back to the action. Let's get this one finished - here comes the final round!

Heyward keeps the fight on the outside.
Heyward scores with a head kick.
Heyward misses with a jab, cross combination.
Heyward displays good takedown defense there as he swats away a double leg from Anderson.
Heyward misses with a head kick.
Heyward misses with a double jab.
Anderson changes levels looking for a counter takedown but doesn't commit.
Heyward closes the distance and pushes Anderson back into the cage.
Wade Anderson has scored more points in the clinch so far.
Anderson's corner calls for him to break the clinch, which he does.
Heyward bobs and weaves and unloads with a good uppercut.
We've had a slow start to the round here - hopefully the action picks up.
Anderson fails with an attempt to clinch.
Heyward throws a head kick that misses and slips in the process. He scrambles back to his feet and the fighters circle.
Anderson closes the distance and presses his opponent up against the cage.
Both fighters are breathing heavily.
Heyward stalling here - the referee won't stand for too much of that.
Anderson pushes off and circles away, back to the middle of the mat.
That's one minute gone in the round.
Heyward throws a body shot but no joy.
Heyward looks to land a combination but Anderson avoids it well.
Anderson misses with a takedown attempt - Heyward sprawls well and throws a nice strike on the way out which just misses.
Anderson tries to clinch but Heyward moves out of range.
Heyward moves into range and throws a combination. A nice jab followed by a hook to the body.
Heyward lunges in with swinging rights and lefts but Anderson circles away quickly and effectively.
Heyward misses with a two punch combination.

Anderson darts in and lands a nice takedown into half guard.

Anderson decides to stand up.
Anderson closes the distance and clinches up with Heyward, looking for a takedown. Anderson pushes Heyward against the cage but Heyward circles to the side and manages to break the clinch.
A little jabbing left from Heyward on the counter but it doesn't find it's target.
Dorian Heyward is fighting for a decision - hopefully he's judged it right and he's actually winning the fight.
That's three failed takedown attempts in the round for Wade Anderson. That's going to take a lot out of him.
That's two minutes gone in the round.
Heyward swings away but doesn't land with a series of punches.
Heyward gets tackled into the cage by Anderson. Anderson maintains the clinch.
The crowd are loving this. Great action here.
Heyward breaks the clinch and we're back to striking at distance.
Anderson keeping his hands up high there, blocking the jab from Heyward.
Anderson clinches.
Heyward breaks from the clinch.
Heyward has been the more effective fighter overall so far.
Anderson is trying hard to land a takedown here. Heyward sprawls well and keeps this one on the feet.
Heyward stalks Anderson and leaps in with a furious combination of punches. Uppercuts and crosses smash into Anderson's face. Anderson staggers backwards, shaken.
Heyward stuffs the takedown.
Anderson uses good footwork to avoid the strikes from Heyward.
Anderson gets cracked there but stands up to it.
Anderson ducks under a wild hook from Heyward.
Anderson fails with a takedown attempt from distance.
That's three minutes gone in the round.
A punch combination from Heyward misses.
Anderson clinches with his opponent.
Heyward pushes off and circles away, back to the middle of the mat.
Heyward goes to the watering hole and comes back with a big thumbs up from the judges as he scores a three punch combo.
Anderson shoots in for a takedown. "I don't think so" says Heyward as he avoids it easily.
Heyward scores with a slapping inside leg kick.
Anderson fails with an attempt to clinch.
Anderson tries to drive through with a takedown attempt but Heyward defends well and Anderson ends up having to push Heyward into the cage where they will battle it out in the clinch.
Ouch! a nice leg kick from Heyward, right into the meat.
Heyward moves into range and throws a combination. A nice jab followed by a hook to the body.
Anderson clinches with his opponent.
Anderson pushes off and circles away, back to the middle of the mat.
Heyward thuds his right hand into Anderson's forehead from close range. That could be painful for both fighters.
We've seen a great period of action over the last minute or so - credit to both fighters for going all out!
Heyward gets tackled into the cage by Anderson. Anderson maintains the clinch.
That's four minutes gone in the round.
Heyward escapes the clinch and we're back to striking.
Anderson has managed to clinch.
Anderson gets through Heyward's defenses to land a nice punch to the side of the head.
Anderson escapes the clinch and we're back to striking.
Heyward jabbing away but nothing is landing.
Heyward fails to land with the punch combination there - jab, cross, hook, miss, miss, miss.
The fight moves into the clinch position.
Anderson's corner calls for him to break the clinch, which he does.
Wade Anderson has stepped it up - he knows he needs a finish here!
Anderson throws a right and a left that Heyward avoids nicely.
Despite the aggression on Heyward's face he doesn't fully commit to the counter.
Heyward misses with the combination.
Some wild striking there from Heyward.
And that's the end of the fight!
Dorian Heyward comfortably won the final round on my scorecard.
I've got Heyward winning every round here. Surely the decision will go his way and he'll pick up a well deserved decision victory. Over to the ring announcer for the scorecards.
Ladies and gentlemen, after 3 rounds of action, we go to the scorecards for a decision.
Judge Timothy Bukovac scores the fight 27:30
Judge Jack Bonds scores the fight 28:29
Judge Percy O'Donnell scores the fight 27:30
In favor of your winner, by unanimous decision... Dorian Heyward!
|
|
|
|
|
|
|
|
|
|
|
|
|
|
|
|
|
|
|
|
|
|
|
| S |
C
A |
G |
S |
C
B |
G |
|
S |
C |
G |
|
energy
A | B |
|
hype
A | B |
|
pop
A | B |
|
mgr
A | B |
|
FIGHT
RATING
70% |
|
|
|
|
|
|
