|
|
PBP Commentary |
Coming up we have a welterweight MMA rules bout between Akira Ryusendo (ranked 0 p4p, 0 weight class) and Brandon Mason (ranked 0 p4p, 0 weight class). Akira Ryusendo has the edge in experience - let's see if he can make that count tonight.
 |
|
 |
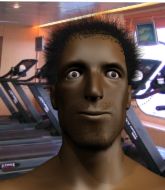
| 181 cm
19
170 lbs
1 - 1 - 0 |
|
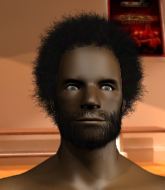
177 cm
18
175 lbs
0 - 0 - 0 |
BJJ Blue Belt
Counter striker
Good chin |
|
BJJ Blue Belt
Solid Muay Thai
Tends to cut |
|
| |
|
Ladies and gentlemen. This fight is 3 rounds, in the welterweight division.
Introducing the fighter to my left, fighting out of the red corner.
With a record of
1 - 1 - 0, fighting out of Tokyo, Akira Ryusendo!
And introducing the fighter to my right, fighting out of the blue corner.
With a record of
0 - 0 - 0, fighting out of Tokyo, Brandon Mason!
The judges for this bout are Kenichi Hosakawa, Yuuki Gou and Taro Takaoka.

The bell rings for round one and we are underway!
Mason moves in looking to clinch but Ryusendo pushes him off.
Ryusendo avoids the clinch attempt nicely.
Mason is looking to take this fight into the clinch.
Mason tries to close the distance and clinch up against the cage but Ryusendo paws at him with a jab and circles away.
Mason is looking to clinch but Ryusendo is avoiding it.
Mason tries to clinch but is not successful on this occasion.
Mason tries to close the distance and clinch up against the cage but Ryusendo paws at him with a jab and circles away.
Ryusendo closes the distance and clinches up with Mason, looking for a takedown. Ryusendo pushes Mason against the cage but Mason circles to the side and manages to break the clinch.
Mason fails with an attempt to clinch.
No joy there for Ryusendo, who threw a few shots but didn't land.
The fight stays on the outside here - Mason looks like he's thinking about clinching though.
Mason doesn't manage to clinch there - Ryusendo circles away.
We've had a slow start to the round here - hopefully the action picks up.
Mason doesn't manage to clinch there - Ryusendo circles away.
Mason doesn't manage to clinch there - Ryusendo circles away.
Mason fails with an attempt to clinch.
Ryusendo fails with the takedown.

That's one minute gone in the round.
Mason tries to clinch but is not successful on this occasion.
Mason tries to clinch there but Ryusendo circles away.
Brandon Mason is looking to keep the fight on the feet at all costs.
Mason is looking to clinch but Ryusendo is avoiding it.

Ryusendo scores a trip takedown into side control. Nice.
Check out the look on Ryusendo's face as he threw that strike - that's one determined fighter!
An elbow from Ryusendo crashes against the mat.
Ryusendo has been looking to land a fair amount of strikes on the ground. He might be looking to soften his opponent up in order to work for a submission.
Mason is not content to let Ryusendo control the position.

Ryusendo thinks about going for a far side armbar but bails out and retains the dominant position instead.
Mason is trying to get back to his feet.
Ryusendo wants to control but Mason is keeping him busy.
Ryusendo tries for a kimura. Not really close to a finish though.

That's two minutes gone in the round.
Ryusendo tries for a kimura but Mason is defending well.
Ryusendo is breathing heavily.
Mason tries to buck Ryusendo off but Ryusendo is having none of it.

The referee decides to stand the fighters back up.
Ryusendo shoots in but no luck this time.
That's three failed takedown attempts in the round for Akira Ryusendo. That's going to take a lot out of him.
Ryusendo shoots in and scores a nice double leg takedown into half guard.
Mason is trying to stand.
Mason is looking to sinch up a gullotine here but Ryusendo pulls his head out easily.
Ryusendo is thwarting Mason's attempts to control the position.

That's three minutes gone in the round.
Mason is trying to control but Ryusendo manages to pass to mount!
Mason is writhing around trying to get back to his feet.
Ryusendo has hold of Mason's left arm, perhaps looking for a submission. The two fighters tussle over control of the isolated limb and Mason manages to get his arm back to his side and away from danger.
Ryusendo looking to ground and pound but Mason is blocking nicely.
Mason really trying hard to get back to half guard here.
Mason is persisting with the attempt to improve his position.

Ryusendo gets to his feet and calls his opponent to stand. Here come the fireworks!

That's four minutes gone in the round.
The crowd are showing their displeasure at the lack of action as loud boos ring out around the arena.
Ryusendo circles away from the clinch attempt.
Mason tries to clinch up but Ryusendo circles away and keeps his distance.
Ryusendo swats away the attempt to clinch by Mason.
Mason wants to clinch up but Ryusendo keeps it at a distance.
Nice sprawl there from Mason as Ryusendo shoots in.
Ryusendo circles away from the clinch attempt.
Mason doesn't manage to clinch there - Ryusendo circles away.
Mason tries to clinch but Ryusendo moves out of range.
Mason fails in his attempt to clinch.
The crowd thankful this round is nearly over.
Ryusendo shoots for a double leg takedown but Mason sprawls well. He's pushed Ryusendo's face into the mat and manages to get back to his feet relatively easily.
Mason tries to clinch up.
Ryusendo circles away from the clinch attempt.
And thats the end of the round the fighters go back to their corners.
Akira Ryusendo dominated that round.
Well, the break between rounds is over. Let's get back to the scrappin!

Mason tries to close the distance and clinch up against the cage but Ryusendo paws at him with a jab and circles away.
Mason wants to clinch.
Mason tries to close the distance and clinch up against the cage but Ryusendo paws at him with a jab and circles away.
Ryusendo misses with a takedown attempt - Mason sprawls well and throws a nice strike on the way out which just misses.
Ryusendo circles away from the clinch attempt.
Ryusendo looking for a takedown here - he's got it.
Mason is trying to control the position but Ryusendo postures up.
Mason keeping moving, preventing Ryusendo from controlling successfully.
The ref warns both fighters not to hold the cage as they work up against the meshing.
Both fighters are absolutely exhausted here.
Mason is working actively off his back, looking to secure an arm or perhaps work for a triangle.
That's one minute gone in the round.
Mason is looking for a guillotine. You can't force these things though and Ryusendo defends well.
Mason is trying to control the position but Ryusendo postures up.
Ryusendo wants to control from the top but Mason keeps moving.
Mason looking for a guillotine here but Ryusendo defends easily.
Ryusendo sneaks a leg through and gets to half guard. That was like a knife through butter how easily he passed Mason's guard.
Mason is trying to stand back up but Ryusendo is controlling him
That's two minutes gone in the round.
Neither fighter has done anything of merit for a good minute or two here and the crowd are not happy about it.
Ryusendo is figuring out what he wants to do next.
Mason looking to work for a kimura from the bottom.
Ryusendo is trying to work for a kimura but Mason is defending well.
Ryusendo passes to side control.
Mason manages to get back to half guard.
Ryusendo decides to stand up.
Mason tries to clinch there but Ryusendo circles away.
That's three minutes gone in the round.
Mason tries to close the distance and clinch up but Ryusendo swats him away and circles back towards the center.
Ryusendo tries to bum rush Mason with a series of wild strikes but Mason uses good footwork to avoid the assault.
Ryusendo avoids the clinch attempt nicely.
Mason tries to clinch but Ryusendo moves out of range.
Ryusendo scores a trip takedown into side control. Nice.
Ryusendo creates a bit of distance and throws down some hard shots.
Mason prevents Ryusendo from moving into mount.
Mason throws an elbow to the body but it doesn't land.
Ryusendo wants to control but Mason is keeping him busy.
That's four minutes gone in the round.
Ryusendo tries for a kimura but Mason is defending well.
Mason tries to get back to half guard but can't.
Ryusendo tries for a kimura but Mason is defending well.
Mason manages to get one leg in to regain half guard.
Ryusendo seems to be working for a kimura but Mason defends the submission attempt.
Ryusendo missing with the ground and pound from half guard.
And thats the end of the round the fighters go back to their corners.
Akira Ryusendo dominated that second round.
That's time! Ryusendo's corner gives him a slap on the ass as he gets ready to fight. And we move into the final round!

The fight stays on the outside here - Mason looks like he's thinking about clinching though.
Mason tries to clinch up.
Mason tries to clinch there but Ryusendo circles away.
Ryusendo shoots in from a long way out. He's driving through with the takedown attempt and he eventually gets it, landing in Mason's guard.
Ryusendo wants to control from the top but Mason keeps moving.
Ryusendo pressing down on his opponent's thigh, looking to pass guard. Mason is keeping the position for now.
Ryusendo drops back for a leg! It's a sloppy attempt though and Ryusendo jumps back into guard quickly, to retain the dominant position.
Mason looking to try and escape his hips here, looking for a submission. It looks like he's going for a triangle but Ryusendo is defending well. Mason quickly switches to an armbar and extends the arm! Ryusendo has no choice but to tap, to a very quick submission! Wow, that was lightning fast! Mason celebrates on the cage, with the crowd.
Ladies and gentlemen, after 1:03 of round 3, we have a winner by way of Submission (Armbar). Brandon Mason!
|
|
|
|
|
|
|
|
|
|
|
|
|
|
|
|
|
|
|
|
|
|
|
| S |
C
A |
G |
S |
C
B |
G |
|
S |
C |
G |
|
energy
A | B |
|
hype
A | B |
|
pop
A | B |
|
mgr
A | B |
|
FIGHT
RATING
96% |
|
|
|
|
|
|

