|
|
PBP Commentary |
Coming up we have a super heavyweight MMA rules bout between Owen Wall (ranked 24858 p4p, 25069 weight class) and Colt Mays (ranked 148 p4p, 183 weight class). Over to our ring announcer for the fighter introductions!
 |
|
 |
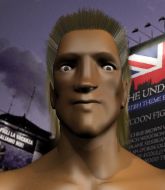
| 170 cm
24
225
5 - 18 - 0 |
|
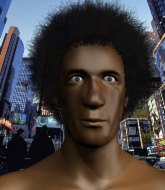
215 cm
22
268
3 - 6 - 0 |
BJJ Blue Belt
Solid Muay Thai
Experienced |
|
Good wrestler
Counter fighter
Solid chin |
|
| |
|
Ladies and gentlemen. This fight is 3 rounds, in the super heavyweight division.
Introducing the fighter to my left, fighting out of the red corner.
With a record of 5 - 18 - 0, fighting out of Montreal, Owen Wall!
And introducing the fighter to my right, fighting out of the blue corner.
With a record of 3 - 6 - 0, fighting out of Helsinki, Colt Mays!
The judges for this bout are Edson Gomes, Matheus Silva and Luis Engracia.

The bell rings for round one and we are underway!
Wall closes the distance and clinches up with Mays, looking for a takedown. Wall pushes Mays against the cage but Mays circles to the side and manages to break the clinch.
Wall is trying hard to land a takedown here. Mays sprawls well and keeps this one on the feet.
Wall tries to clinch but Mays moves out of range.
Mays lets it all go there with a big combo counter but none of the punches connected.
Wall really is a fat lump.
Wall misses with a takedown attempt - Mays sprawls well and throws a nice strike on the way out which just misses.
That's three failed takedown attempts in the round for Owen Wall. That's going to take a lot out of him.
Mays stuffs the takedown.
Mays swinging wildly here.
Mays slaps away a takedown attempt from Wall, before circling back to the center of the mat.
We've had a slow start to the round here - hopefully the action picks up.
Nice sprawl there from Mays as Wall shoots in.
Mays steps in looking to clinch after the strikes miss from Wall.
Wall changes levels and looks for a double leg takedown. Mays tries to avoid it but Wall manages to keep hold of a leg and drag Mays to the ground. Mays escapes though and pops straight back up to his feet.
Wall is breathing heavily.
Wall fails with the takedown

and Mays counters by clinching up.
Still in the clinch, Mays scores with a nice short uppercut.

That's one minute gone in the round.
Mays tried to land a shot to the body but connects with Wall's elbow.
Wall has had enough of the clinch but Mays keeps him there for the moment.
A bit of stalling here from Mays.
Mays lands with a quick shot inside that doesn't really do much damage.
Mays tries to work over Wall's body with a swooping hook but it only glances the target.
Mays tries to work over Wall's body with a swooping hook but it only glances the target.
Mays stalling.
Mays throws a head punch that misses.
Mays pushes Wall back against the cage and lands a hook to the side of the head.
Mays lands a hook to the side of the head.
Mays just leaning against Wall, taking a breather.
Mays lands a shot to the body.
Wall has had enough of the clinch and is looking to separate.
Mays lands a shoulder strike that jolts his opponent's head backwards.
Wall has had enough of the clinch but Mays keeps him there for the moment.
Mays just leaning against Wall, taking a breather.

That's two minutes gone in the round.
Mays keeps control of Wall as he tries to wriggle out of the double underhooks.
Mays keeps the fight in the clinch, despite Wall's efforts to push away.
Mays lands an uppercut.
Wall blocks a couple of punches on the inside.
Wall has had enough of the clinch but Mays keeps him there for the moment.
Mays misses with a hook from the clinch.
Mays swings away with an uppercut that misses.
Mays prevents Wall from breaking the clinch.
Mays stalls.
Wall tries a knee to the head but he's missed.
A head punch on the inside from Mays fails to land.
Wall tries to break the clinch but Mays is controlling the position.
Wall tries to circle away but Mays has him pinned against the cage.
Mays lands a hook that snaps the head of Wall backwards.

That's three minutes gone in the round.
Mays softening up his opponent with strikes, against the cage.
Mays has Wall pressed against the cage, preventing Wall from circling away and getting back to striking at range.
Mays is working Wall over against the cage.
Wall is trying to break free.
Mays lands a shot to the body.
Mays is stalling here.
Mays lands with a light punch inside.
Wall has had enough of the clinch and is looking to separate.
We've been informed that Mays has been working hard on his conditioning in the buildup to the fight.
Mays works on Wall's body with a couple of short punches.
Mays doesn't land with the attempted body shot.
Mays lands with a short punch from the clinch.
Wall prevents a body shot from Mays.
A hook to the body from Mays.
Wall tries to break the clinch but Mays is controlling the position.

That's four minutes gone in the round.
A hook to the body from Mays.
Mays lands with a left to the head.
Wall can't break the clinch.
Mays scores with a nice hook to the head.
Mays lands with a short shot to the head.
Mays throws a hook to the body. More of an arm punch but it's all scoring with the judges.
Mays tries to land a shot to the body but it's blocked.
Wall working hard to break the clinch.
A nice right hand lands inside from Mays.
This is a great period of action - very entertaining stuff!
Mays throws a punch but it's blocked by Wall.
Mays lands a right hand.
Wall blocks a body shot from Mays.
Mays blocks a knee to the body. He'll have a nicely bruised forearm in the morning.
Mays has a couple of punches blocked by Wall.
A frustrated look appears on Wall's face as he tries to break the clinch.
Mays scores with a shot to the side of Wall's head.
And that is the end of the round. The fighters go back to their corners.
Colt Mays dominated that round.
The fighters get back to their feet, the hooter sounds and we're back to the action!

Wall tries to drive through with a takedown attempt but Mays defends well and Wall ends up having to push Mays into the cage where they will battle it out in the clinch.
Wall is trying to work out of this bad position, with his back against the cage.
Mays swings away with an uppercut that misses.
Wall misses with a knee to the head.
Mays lands with a good tight uppercut to the head.
Mays working aggressively here.
Wall is trying to push Mays away but Mays has him pressed against the cage, so he's going nowhere.

Wall breaks the clinch.
Owen Wall is looking to throw some combinations by the looks of things.
A telegraphed right hand from Mays misses the target.
Wall looks to have improved his striking defense since last time we saw him fight.
Wall tries to clinch up.
Wall avoids a punch combination nicely.
We've had a slow start to the round here - hopefully the action picks up.
Wall shoots for a takedown but Mays saw that one coming a mile off and avoided it easily.
Wall misses with a takedown
and Mays counters with a three punch combo that has Wall backing up. Wall nods at Mays to acknowledge the strikes.
That's three failed takedown attempts in the round for Owen Wall. That's going to take a lot out of him.
Both fighters are absolutely exhausted here.
That's one minute gone in the round.
Wall will have to do better than that with his takedown attempts.
Mays appears to be waiting to throw a counter punch to the body.
Mays lands with a cross to side of his opponent's head.
A big left from Mays misses.
Mays misses with a wild body shot.
Nice defenses there by Wall.
Mays scores with the left hand. Wall knows he should have avoided that one.
Wall avoids a lazy jab quite easily.
Wall shoots in for a takedown. He's persisting with it as Mays sprawls well. Mays wins this battle and keeps the fight standing. Wall gets slowly back to his feet.
Wall shoots in for a takedown. "I don't think so" says Mays as he avoids it easily.
Mays lands a jab to Wall's midsection.
Mays misses with a looping right.
Wall throws a looping left and ducks down for a takedown. He's got his arms around Mays's waist but Mays gets an underhook and avoids the takedown by throwing Wall off to one side.
Colt Mays seems to be getting the better of the standup.
That's two minutes gone in the round.
Mays swings away but doesn't land with a series of punches.
Mays misses with a few strikes there.
Mays defends well against a solid takedown attempt from Wall.
A jab from Mays misses.
We've seen a great period of action over the last minute or so - credit to both fighters for going all out!
Mays scores with a crisp jab that stopped Wall in his tracks.
Wall has his takedown stuffed
and Mays counters with a lovely straight right hand!
Mays swings and misses with a hook to the body.
Wall changes levels and looks for a double leg takedown. Mays tries to avoid it but Wall manages to keep hold of a leg and drag Mays to the ground. Mays escapes though and pops straight back up to his feet.
A decent looking cross lands there for Mays.
Mays swings away but doesn't land with a series of punches.

Mays lands a left and a right that send Wall crashing to the mat, dazed. Mays thinks about following him to the mat but decides to wave him back up to his feet!

Wall is rocked!
Mays walks forward and throws a big overhand right! Wall drops to the floor like a sack of potatoes! Mays swarms on him with more punches until the referee wrestles him away from Wall's unconscious body! Wow, that was brutal!
Ladies and gentlemen, after 3:58 of round 2, we have a winner by way of TKO (Strikes). Colt Mays!
|
|
|
|
|
|
|
|
|
|
|
|
|
|
|
|
|
|
|
|
|
|
|
| S |
C
A |
G |
S |
C
B |
G |
|
S |
C |
G |
|
energy
A | B |
|
hype
A | B |
|
pop
A | B |
|
mgr
A | B |
|
FIGHT
RATING
50% |
|
|
|
|
|
|
