|
|
PBP Commentary |
Coming up we have a heavyweight MMA rules bout between Rylan Mayo (ranked 4221 p4p, 5227 weight class) and Owen Wall (ranked 438 p4p, 500 weight class). Owen Wall is the more experienced fighter, so let's see if that makes a difference tonight.
 |
|
 |
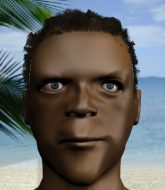
| 175 cm
25
265
1 - 1 - 0 |
|
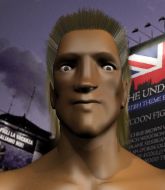
170 cm
18
225
0 - 2 - 0 |
Good takedowns
Brawler
Big heart |
|
BJJ Blue Belt
Counter fighter
Tends to cut |
|
| |
|
Ladies and gentlemen. This fight is 3 rounds, in the heavyweight division.
Introducing the fighter to my left, fighting out of the red corner.
With a record of 1 - 1 - 0, fighting out of Montreal, Rylan Mayo!
And introducing the fighter to my right, fighting out of the blue corner.
With a record of 0 - 2 - 0, fighting out of Tokyo, Owen Wall!
The judges for this bout are Paul Tew, Sam Margolis and James Glass.

The bell rings for round one and we are underway!
Wall misses with a takedown attempt. He shot from a bit too far out.
Mayo is looking to chop away at Wall's legs.
Wall steps in looking to clinch after the strikes miss from Mayo.
Wall throws a decent looking leg kick but it doesn't land clean.
Mayo throws a counter high kick but Wall was just alert enough to avoid it.

Mayo moves into range and clinches up with Wall.
Mayo tries to pull guard but Wall forces him back to his feet, against the cage.

Wall breaks from the clinch.
Mayo could do with losing a few pounds - he looks very soft around the mid section, to put it politely.
Wall dances in quickly and lands a nice inside leg kick on Mayo. That did some damage!
Wall throws a nice outside leg kick.
We've had a slow start to the round here - hopefully the action picks up.
The sound of bone on bone echoes around the arena as Mayo checks a leg kick.
Mayo stumbles momentarily as he takes a strong leg kick from Wall.
Wall throws a body kick but he wasn't in range.
Mayo shoots for a double leg takedown but Wall sprawls well. He's pushed Mayo's face into the mat and manages to get back to his feet relatively easily.

That's one minute gone in the round.
Mayo wants to clinch up but Wall keeps it at a distance.
Mayo avoids a punch combination nicely.
Wall is looking to clinch but Mayo is avoiding it.
Mayo moves out of range as Wall strikes.
Mayo has his takedown stuffed
and Wall counters with a slapping leg kick.
That's three failed takedown attempts in the round for Rylan Mayo. That's going to take a lot out of him.
Wall shoots in for a takedown but Mayo shows good takedown defense.

Wall closes the distance and clinches.
The referee is keeping an eye on Mayo - much more stalling and he will separate the fighters.
Wall lands a damaging elbow.

That's two minutes gone in the round.
Mayo misses with a punch on the inside.
Wall breaks the clinch and we return to the middle of the mat.
Wall lands three nice shots there - that looked like it hurt!
Wall throws a lazy body kick

and Mayo counters with a nice double leg into half guard.
Fantastic stuff here - a very entertaining period of action, which has drawn cheers from the crowd.
Mayo wants to take a breather but Wall is having none of it.
Wall pushes Mayo off looking to stand but Mayo dives back in and keeps control.
Mayo tries to pass to full mount but Wall defends it.

Mayo is working for a submission here. He's got hold of the far side arm and he's looking for a kimura. He's cranking on the arm and he's got it! Wall is tapping out! Ouch, that looked like it hurt!
Ladies and gentlemen, after 3:56 of round 1, we have a winner by way of Submission (Kimura). Rylan Mayo!
|
|
|
|
|
|
|
|
|
|
|
|
|
|
|
|
|
|
|
|
|
|
|
| S |
C
A |
G |
S |
C
B |
G |
|
S |
C |
G |
|
energy
A | B |
|
hype
A | B |
|
pop
A | B |
|
mgr
A | B |
|
FIGHT
RATING
45% |
|
|
|
|
|
|
