|
|
PBP Commentary |
Coming up we have a bantamweight MMA rules bout between Kay Wall (ranked 3953 p4p, 25146 weight class) and Calin Marks (ranked 243 p4p, 281 weight class). Kay Wall had a look across the cage there at his opponent. He definitely means business
 |
|
 |
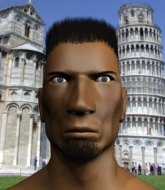
| 181 cm
18
140
1 - 0 - 0 |
|
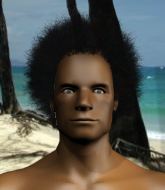
225 cm
18
130
0 - 2 - 0 |
BJJ Purple Belt
Basic striking
Big heart |
|
BJJ Blue Belt
Brawler
Tends to cut |
|
| |
|
Ladies and gentlemen. This fight is 3 rounds, in the bantamweight division.
Introducing the fighter to my left, fighting out of the red corner.
With a record of 1 - 0 - 0, fighting out of Montreal, Kay Wall!
And introducing the fighter to my right, fighting out of the blue corner.
With a record of 0 - 2 - 0, fighting out of London, Calin Marks!
The judges for this bout are Trevor Gratis, Yves DeLean and Gregory Folan.

The bell rings for round one and we are underway!

Marks looks for a takedown. He's got it. We're now in half guard.
Wall tries to kick Marks off in order to stand up. Marks Avoids the leg push though and dives into side control.
Wall is trying to control Marks's posture but Marks avoids it.

Marks stands up and beckons Wall to his feet.
Marks throws a looping left and ducks down for a takedown. He's got his arms around Wall's waist but Wall gets an underhook and avoids the takedown by throwing Marks off to one side.

Wall drives through with a takedown into guard.

Marks is edging up against the cage. He's using the cage to get back to his feet. Nice work there - the fighters are clinched.
Wooooo! Give it up for these two warriors! They are putting on a show!
Wall is trying to work for a single leg takedown but Marks pulls him back up using the underhooks.
Marks scores with a hook to the body.
Marks is defending well against a takedown attempt.
Marks is trying to work for a single leg takedown but Wall pulls him back up using the underhooks.
Marks jumps guard and drags Wall to the mat. He's obviously going to be looking for submissions off his back.
Wall really does look like a pencil wearing a pair of gloves. Let's hope he has a gameplan to suit that ridiculous body shape.
Marks trying to control the position here.

That's one minute gone in the round.

Wall drops back looking for a leg! Marks is in trouble here! The fighters roll with the hold and Marks manages to kick Wall off! Wall jumps back into Marks's guard.
Wall wants to control from the top but Marks keeps moving.
Wall trying to stand up but can't free himself from Marks's guard.
The ref warns both fighters not to hold the cage as they work up against the meshing.
Marks has control of Wall's left arm, preventing Wall from doing any damage.
Wall throws an elbow that misses. Marks uses the momentum to reverse the position. He's now in Wall's guard. Nice move by Marks!


That's two minutes gone in the round.
The crowd are starting to boo a lack of action.
Marks wants to pass the guard but Wall is keeping the position.
Wall might be looking to lock onto one of his opponent's long limbs for a submission, whilst we're on the ground.
Marks stands up from Wall's guard - Marks perhaps looking for a knockout.
Wall darts in looking for a takedown but Marks gets double underhooks and turns Wall into the cage.
That's three failed takedown attempts in the round for Kay Wall. That's going to take a lot out of him.
Kneeeeees! The crowd are calling for knees to the body. Marks obliges.
Marks jumps guard but his hands slip and he falls flat on his back. Well, he's made himself look a right mug there, as Wall walks away with a smile on his face. Marks gets slowly back to his feet and shakes his head.
Wall looks to be in better condition than last time we saw him fight. Obviously he's been working hard on his cardio.

Wall tries to keep at a distance but Marks has taken the fight into the clinch.
Wall has dropped down and is looking to force the takedown but it's defended by Marks after a bit of a struggle.
Marks is trying to work for a single leg takedown but Wall pulls him back up using the underhooks.
Marks goes for a takedown attempt but Wall pushes him away and we're back to fighting at a distance.

That's three minutes gone in the round.
Wall swings away but doesn't land with a series of punches.
Wall tries for a takedown but Marks circles away easily
and Marks connects with a straight left hand counter down the middle.
A low kick from Wall is predictable there
and Marks counters with a body kick that stops Wall in his tracks momentarily.
Wall defends well against a solid takedown attempt from Marks.
Marks looks winded!
Wall fails with a takedown attempt.
Wall throws a combination that misses
and Marks counters by moving into the clinch. Good anticipation by Marks.
Marks slowing the pace effectively.

Marks breaks from the clinch.
Wall misses with a jab, cross combination.

That's four minutes gone in the round.
Marks throws a body punch but Wall moves out of range.
Wall fakes high and shoots in for a takedown but Marks avoids it really well and circles away.
Marks tries to close the distance and clinch up against the cage but Wall paws at him with a jab and circles away.
Marks tries to sprawl but Wall drives through with a takedown into half guard.
Marks kicks off Wall and gets to his feet.
This has been an exciting period of action!
Wall takes a head kick and keeps coming.
Wall throws a one two combo.
Marks slaps away a takedown attempt from Wall, before circling back to the center of the mat.
Marks shoots in for a takedown - he's clinched up with Wall but Wall pushes him off and we're back to square one.
And that is the end of the round. The fighters go back to their corners.
Calin Marks dominated that round.
That's the end of the round. The referee orders the cornermen out of the cage so we can get back down to business.

Wall tries for a takedown but Marks sees it coming a mile off and avoids it easily.
Wall misses with a takedown
and Marks counters by moving into the clinch. Good anticipation by Marks.
Marks is working for a takedown up against the cage. He can't get it on this occasion though.
The fighters are pressed against the cage, as the pace of the fight slows.
Marks breaks the clinch and we're back to striking at distance.
Marks has been the more effective fighter overall so far.
Wall dives in for a single leg takedown but Marks sprawls and the fighters end up clinched against the cage.
That's three failed takedown attempts in the round for Kay Wall. That's going to take a lot out of him.
We've had a slow start to the round here - hopefully the action picks up.
Marks is looking for a takedown.
Marks manages to break the clinch.
Wall is trying hard to land a takedown here. Marks sprawls well and keeps this one on the feet.
Marks misses with a takedown attempt - Wall sprawls well and throws a nice strike on the way out which just misses.
That's one minute gone in the round.
Marks has a takedown stuffed.
Marks is breathing heavily.
Wall throws a right and a left that Marks avoids nicely.
Wall throws a head kick that misses.
Despite the aggression on Marks's face he doesn't fully commit to the counter.
Marks wants to clinch
and Wall counters with a nice double leg into side control. Marks won't be happy with that.
Marks throws his opponent off and manages to get back to his feet! Nicely done!
Wall takes a kick to the side of the head.
This has been an exciting period of action!
Excellent takedown into side control there by Wall.
Marks really doesn't want to stay on the ground with Wall. If he can't get it back to his feet, it's only a matter of time before he'll be tapping out.
Marks tries to buck Wall off but Wall is having none of it.
That's two minutes gone in the round.
Marks wants to escape from the position here - easier said than done!
Wall working the ground and pound but Marks is defending the strikes.
Wall tries for a kimura. Not really close to a finish though.
Wall is looking to finish here, going for an Americana. Marks knows the correct defense though, so he's OK.
Marks is trying to control Wall's posture but Wall avoids it.
That's three minutes gone in the round.
Wall cracks Marks with an elbow. That is naaassty.
Wall looking for an arm triangle but it's way too loose to do anything.

Wall decides to take the fight back to the feet.
Wall keeps the fight on the outside.
Marks turns his hip over beautifully as he lands a nice leg kick.
Nice sprawl there from Marks as Wall shoots in.
Kay Wall is looking to throw some combinations by the looks of things.
That's four minutes gone in the round.
Marks closes the distance and presses his opponent up against the cage.
Marks looking for a takedown.
Wall goes for a takedown attempt but Marks pushes him away and we're back to fighting at a distance.
Wall shoots in and drives through. Marks sprawls well.
Wall shoots for a takedown but Marks saw that one coming a mile off and avoided it easily.
Wall misses with a takedown
and Marks counters with a kick to the head that grazes his opponent. Wall is lucky that one didn't land flush.
Marks misses with a series of wild punches.
Marks closes the distance and clinches.
And that is the end of the round. The fighters go back to their corners.
Calin Marks showed his class in that round. I'd imagine he'll take it on all the scorecards.
OK. That's time! The bell goes and we're back to the action. So, we enter the final round. Let's see if either fighter can bring us a finish, or whether we're going to the judges scorecards.

Well, he's not going to score with shots like that. A lazy body kick attempt from Wall.
Nice uppercut there from Marks.
Marks has closed the distance and engaged Wall in a clinch.
Marks is defending well against a takedown attempt.
Marks is trying to work for a single leg takedown but Wall pulls him back up using the underhooks.
Marks gets double underhooks to prevent a takedown attempt from Wall.
Marks manages to break the clinch.
We've had a slow start to the round here - hopefully the action picks up.
Marks closes the distance and gets a double leg, slamming Wall to the mat! Wall manages to get full guard.
Both fighters are breathing heavily.
Wall avoiding any damage from the ground and pound.
Marks won't allow Wall to get back to his feet.
Wall is trying to keep Marks in close.
That's one minute gone in the round.
Marks avoids a guillotine attempt easily.
Wall trying to strike from the bottom but really, it's not the best position to be doing that from!
Marks stands and throws Wall's legs to the side, diving into side control.
Wall is trying to get back to his feet.
Marks in side control, just content to control the action for now.
Wall tries to bench press Marks off him but Marks keeps the position.
Wall manages to get one leg in to regain half guard.
That's two minutes gone in the round.
Wall is working for an escape here. He's hooked one of Marks's legs and he's managed to sneak out and take Marks's back!
Wall is looking for the choke from the back position but Marks is controlling his hands well.
Marks has his hands over his head blocking the strikes from Wall.
Marks is trying to break free.
Calin Marks has got the better of the ground game so far.
Wall is working on the RNC. He looks like he's got it but Marks won't tap... Oh, he's out! The ref rips Wall off his unconscious opponent!
Ladies and gentlemen, after 2:43 of round 3, we have a winner by way of Submission (RNC). Kay Wall!
|
|
|
|
|
|
|
|
|
|
|
|
|
|
|
|
|
|
|
|
|
|
|
| S |
C
A |
G |
S |
C
B |
G |
|
S |
C |
G |
|
energy
A | B |
|
hype
A | B |
|
pop
A | B |
|
mgr
A | B |
|
FIGHT
RATING
60% |
|
|
|
|
|
|

