|
|
PBP Commentary |
Coming up we have a light heavyweight MMA rules bout between Jason Knight (ranked 1590 p4p, 1215 weight class) and Eron Saunders (ranked 223 p4p, 169 weight class). Both these guys have solid standup skills and neither is particularly fantastic on the ground, so let's hope for a nice standup war!
 |
|
 |
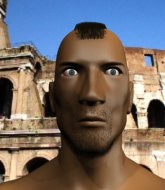
| 188 cm
32
215
11 - 9 - 0 |
|
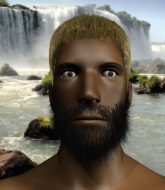
194 cm
25
215
8 - 2 - 0 |
Good wrestling
World class boxer
Granite chin |
|
Decent wrestler
World class MT
Good gas tank |
|
| |
|
Ladies and gentlemen. This fight is 3 rounds, in the light heavyweight division.
Introducing the fighter to my left, fighting out of the red corner.
With a record of 11 - 9 - 0, fighting out of London, Jason Knight!
And introducing the fighter to my right, fighting out of the blue corner.
With a record of 8 - 2 - 0, fighting out of Las Vegas, Eron Saunders!
The judges for this bout are Illya Tyunina, Aleksandr Martynov and Viktor Lagutenko.

The bell rings for round one and we are underway!
The bell rings for round one and we are underway!
Saunders throws a hook but Knight avoids it easily.
Saunders lands a jab.
Saunders takes a jab on the nose. He smiles like he loves it and keeps coming.
Saunders takes a shot to the body in his stride.
Saunders jabs Knight right on the nose. Knight blinks but takes it well.
Knight misses the shot to the body.
We've been informed that Saunders has been sparring a lot of Muay Thai in the buildup to this fight so let's see if that has an impact on the result.
Saunders lands a powerful looking uppercut that connected with his opponent's jaw.
Knight gets cracked with a nice right hand there by Saunders.
Knight steps to the side to avoid the strikes from Saunders.
Knight throws a wild combination but nothing lands.
Saunders takes a punch right to his stomach. That took the wind out of him momentarily.
This is a great period of action - very entertaining stuff!
Nice cross by Saunders.
Nice straight punches there by Saunders. You know Roy Jones Jr respects the hands of Saunders.
Saunders swings wildly with a right hand that was never going to find it's target.
Knight throws a hook to the body but it doesn't connect.
Saunders displays some good footwork, moving neatly out of range as Knight throws out the jab.
Knight avoids a punch combination nicely.

That's one minute gone in the round.
Saunders swings and misses with a hook to the body.
Knight displays some good footwork, moving neatly out of range as Saunders throws out the jab.
Knight throws a hard body shot but it just misses.
Saunders steps in looking to clinch after the strikes miss from Knight.
Knight connects with a lovely right hand, straight down the pipe.
Saunders throws a big shot that misses.
Knight throws a nice looking combination but Saunders bobs and weaves to avoid any damage.
Saunders displays some good footwork, moving neatly out of range as Knight throws out the jab.
Saunders clobbers Knight with an overhand right that has the crowd gasping. That made a horrendous noise.
A looping hook to the body misses from Knight. Saunders does a little dance to reset his feet.
Saunders steps in looking to clinch after the strikes miss from Knight.
Saunders keeping a good distance there, avoiding the body shot.
Knight takes a jab right on the kisser.
Saunders throws a jab but it's blocked by Knight.
Saunders tries to close the distance and clinch up but Knight swats him away and circles back towards the center.
Knight misses with a straight left.
And an attempted straight right on the counter from Saunders! But no joy.
Knight misses with a body shot.
Saunders stuns Knight with a nice body shot, before stepping back out of range.
Knight has been working on his boxing with his coaches at London MMA Club in the buildup to the fight.
A big left from Knight misses.

That's two minutes gone in the round.
Knight misses with a wild body shot.
We've seen a great period of action over the last minute or so - credit to both fighters for going all out!
Nice defenses there by Saunders.
Saunders showing good head movement there, avoiding the strikes from Knight.
Knight just misses with a punch to the body.
Knight takes a hook to the side of the head. I wonder if that's got his ears ringing.
A big right from Saunders misses.
Saunders misses with a body shot. Nice footwork from Knight.
Knight circles away from the clinch attempt.
Saunders fakes high and swings low for a body shot but Knight manages to avoid it.
Saunders might want to mix his strikes up a bit more. He's just going for head shots at the moment and that can become a bit predictable.
Saunders on the wrong end of a nice jab.
Knight lands with a nice combination. Saunders backs away looking to recover.
Saunders is landing a lot of head punches in this opening round! Knight had better start moving his head a bit unless he wants his face to turn into p�t�.
Saunders ducks right into an uppercut from Knight.
Saunders moves away from the strike by Knight.
Knight looks to land a combination but Saunders avoids it well.
Saunders takes a step towards his opponent and connects with a left hand, before circling away.
Knight misses with a few strikes there.
Knight getting the better of the striking in that exchange.

That's three minutes gone in the round.
Saunders moves away from the strike by Knight.
Saunders throws a combination but comes up with nothing but fresh air.
Saunders misses with a wild body shot.
A swing and a miss from Saunders.
Knight takes a body punch that cleary hurt but he's trying not to show any weakness.

Saunders has managed to clinch.
With the fighters clinched against the cage, Knight creates a bit of distance for himself and scores with a nice uppercut.
Saunders misses with a body punch.

Knight breaks from the clinch.
A big left from Saunders misses.
Knight jabs at Saunders's body.
Saunders blocks a jab.
Saunders darts in and out, connecting with a jab.
Saunders lands with a two punch combination before moving back out of range.
Wooooo! Give it up for these two warriors! They are putting on a show!
Saunders takes one on the chin but keeps coming.
Knight misses with a right hand
and Saunders counters with a good right hand that lands right on the jaw.
Saunders fails to land with a series of punches.

That's four minutes gone in the round.
Saunders ducks down and throws a hook to the body but Knight moves away.
Knight tries to land with a swinging hook to the body but Saunders was well out of range. Poor timing from Knight.
Knight throws out a token jab with nothing on it.
Saunders looked like he wanted to counter with a punch but didn't throw it.
Knight ducks down and throws a hook to the body but Saunders moves away.
Knight misses with a wild combination.
Knight throws a combination but it was largely blocked by Saunders.
Knight connects with a body shot.
Knight misses with a body shot.
Knight misses with a body shot. Nice footwork from Saunders.
Knight misses the shot to the body.
Saunders closes the distance and pushes Knight back into the cage.
Knight can't find room to land a body shot as Saunders controls the action.
The crowd applaud the fighters' efforts here as the round comes to an end.
Knight wants to strike at distance but he can't break free of the clinch.
Knight pushes off and circles away, back to the middle of the mat.
Saunders takes a swing at Knight's ribcage but misses.
Knight was looking to counter that move with a punch but didn't quite pull the trigger.
Nice body punch from Saunders.
And that�s the end of the round � the fighters go back to their corners.
A close round but Eron Saunders will probably get the nod.
That's time! Knight's corner gives him a slap on the ass as he gets ready to fight.

Saunders just misses with a punch to the body.
Knight keeping a good distance there, avoiding the body shot.
Saunders throws a combination but comes up with nothing but fresh air.
Knight misses with the combination.
Knight misses with a series of wild punches.
Knight connects with a single shot there.
Saunders dodges the punch combination from Knight.
Knight slips a jab from Saunders.
We've had a slow start to the round here - hopefully the action picks up.
Knight rushes forward with a series of wild hooks but Saunders moves out of range and avoids them all easily.
Knight stuns Saunders with a nice body shot, before stepping back out of range.
Saunders misses with a looping left.
Saunders loads up on a big right hand but Knight slips the punch.
Knight misses the jab.
Saunders avoids the body shot from Knight.
That's one minute gone in the round.
A punch combination from Knight misses.
Saunders throws a right hand that Knight ducks under and follows up with a left that Knight also avoids with ease.
Knight on the wrong end of a nice jab.
The fighters circling - Knight throws out the jab but it was never going to land.
Knight lands an overhand left. A wild punch that just about connected.
Saunders closes the distance and clinches.
Saunders lands a damaging elbow.
Knight tries to work over Saunders's body with a swooping hook but it only glances the target.
Knight goes for a body shot but it's blocked.
Saunders blocking some punches.
Saunders creates a bit of space for himself and sneaks an elbow through Knight's defenses.
A nice right hand lands inside from Saunders.
Knight misses with a body punch.
A frustrated look appears on Knight's face as he tries to break the clinch.
Saunders lands a shoulder strike.
Wooooo! Give it up for these two warriors! They are putting on a show!
Saunders swings away with an uppercut that misses.
Saunders throws an elbow that misses.
That's two minutes gone in the round.
Saunders makes some space for himself and lands an uppercut.
Knight prevents a body shot from Saunders.
Knight is trying to break the clinch but Saunders is controlling him.
Saunders lands with a short punch from the clinch.
Knight is looking to break free of the clinch but Saunders has double underhooks.
Knight gets through Saunders's defenses to land a nice punch to the side of the head.
Saunders misses with a body punch.
Knight misses with a punch to the body.
Nice body punch from Saunders - that landed with a thud.
Knight lands a right hand that snaps the head of Saunders backwards.
Saunders misses with some punches.
Saunders goes for a body shot but it's blocked.
Knight has had enough of the clinch but Saunders keeps him there for the moment.
Saunders blocks a body shot from Knight.
Saunders lands with a light punch inside.
Knight is trying to work out of this bad position, with his back against the cage.
A nice left hand lands by Knight.
That's three minutes gone in the round.
Knight's head jolts backwards as he takes an uppercut right on the button!
Saunders prevents a body shot from Knight.
Knight breaks from the clinch.
Saunders misses with a hook.
It looked like Knight was looking amped, ready to throw a big counter but didn't commit.
Knight throws a hook but Saunders blocks it.
Saunders lands a really nice looking cross but Knight seems unphased.
Saunders swings wildly with a hook that is half blocked by Knight.
Knight misses with a body shot. Nice footwork from Saunders.
Knight circles away from the clinch attempt.
Knight is looking for a counter combo.
Knight looks to throw the jab but Saunders is out of range.
Saunders displays some good footwork, moving neatly out of range as Knight throws out the jab.
Eron Saunders seems to be getting the better of the standup.
Knight misses with a straight left.
Saunders wants to counter with a clinch but Knight pushes him away.
Saunders misses with a wild body shot.
Jab by Saunders.
Knight missing with a left hand there. Saunders was out of range so wasted energy throwing that one.
Knight fails to land with the punch combination there - jab, cross, hook, miss, miss, miss.
A cross from Saunders lands.
That's four minutes gone in the round.
This is a great period of action - very entertaining stuff!
Nice defenses there by Saunders.
Jab by Knight.
Saunders avoids a punch combination nicely.
Saunders tries to counter by closing the distance.
Knight connects with a body shot that sends Saunders's belly button to the back.
A combination from Saunders does no damage.
Saunders looks to land a left hand but Knight moved out of range nicely.
Saunders connects with a lovely right hand, straight down the pipe.
Saunders misses with a series of wild punches.
Saunders swings for the body but Knight moves out of range.
Saunders throws a shot from downtown. Knight moves away and avoids it.
Knight is looking to counter with a shot to the body.
Knight connects with a lovely right hand, straight down the pipe.
Saunders connects with a nice looking jab.
Knight is pinned up against the cage taking some big shots here. The referee is looking closely deciding whether he should stop the fight.
And that�s the end of the round � the fighters go back to their corners.
Eron Saunders showed his class in that round. I'd imagine he'll take it on all the scorecards.
The minute break is over - no more time for sponges and pep talks - back to the action! So, we enter the final round. Let's see if either fighter can bring us a finish, or whether we're going to the judges scorecards.

Knight misses with a straight left.
Saunders throws a hard body shot but it just misses.
Knight has not gone for a single takedown so far in this fight, which seems like a very strange tactic when you consider that he has the superior wrestling and BJJ.
Knight misses with a hook. Saunders ducked under it nicely.
Knight walks into a left hand.
Saunders defending well as Knight loads up on a big left hand.
Saunders throws a couple of head shots and lands with the final one - a decent hook, which struck Knight on the side of the head.
Saunders tries to clinch up against the cage, rushing in to close the distance. Knight manages to break the clinch and circles back to the middle of the mat.
An attempted straight right counter from Knight misses the target.
Knight takes a punch right to his stomach. That took the wind out of him momentarily.
Nice shot by Saunders.

Knight is rocked!
A big left from Saunders misses.
Saunders uses good footwork to avoid the strikes from Knight.
Saunders scores with a jab to the jaw of his opponent.
Oh Knight is still all over the place! His legs are completely gone! Will he be able to recover?!!
Knight misses with a hook.
Saunders wants to counter the offense by Knight and move into the clinch position.
Saunders drops Knight with a big left hand! Knight is injured, injured bad! Saunders jumps in and finished him with strikes! The fight is over!
Ladies and gentlemen, after 0:51 of round 3, we have a winner by way of TKO (Strikes). Eron Saunders!
After the fight, Eron Saunders was humble in paying tribute to his opponent but made it clear he wants to go on to bigger and better things. It seemed to go down well with the crowd who cheered him loudly.
|
|
|
|
|
|
|
|
|
|
|
|
|
|
|
|
|
|
|
|
|
|
|
| S |
C
A |
G |
S |
C
B |
G |
|
S |
C |
G |
|
energy
A | B |
|
hype
A | B |
|
pop
A | B |
|
mgr
A | B |
|
FIGHT
RATING
84% |
|
|
|
|
|
|
