|
TWGC 40 (185lbs, D3): Rio de Janeiro Qu - R2 PBP Commentary |
Co-main event
|
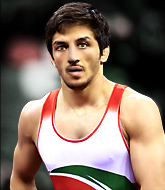
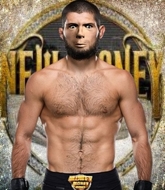
This TWGC bout is 1 fifteen minute round in the middleweight division. Introducing today's competitors. In the red corner, competing out of London, with a TWGC record of 1 wins and 0 losses; Shahriyar Chai! And in the blue corner, fighting out of New York, with a TWGC record of 1 wins and 0 losses; Khabib Nurmagomedov!
The judges for this bout are Emerson Jorge, Alexandre Firmino and Matheus Silva.
The official calls the fighters to the middle and the contest is under way.#CL#
Chai darts in and clinches Nurmagomedov up against the cage.
Nurmagomedov goes for a takedown attempt but Chai pushes him away and we're back to fighting at a distance.
#CL#
Chai clinches with his opponent.
Nurmagomedov is pressed up against the cage. Chai has hold of a leg and is looking to drag Nurmagomedov down to the mat. Nurmagomedov avoids the attempt though and has circled away. We're back to striking at a distance. #CL#
Chai moves into the clinch.#TD#
Chai lands a takedown into guard.
Score +2 for takedown into guard / half guard: Chai (2) vs (0) Nurmagomedov
Nurmagomedov wants to sweep but no luck.
Nurmagomedov controlling Chai's posture.
We've had a slow start to the round here - hopefully the action picks up.
Chai controls the pace of the fight for a moment.#T1#
Chai trying to pass the guard but can't manage it just yet.
Nurmagomedov wants to sweep here but Chai controlling him for the moment.
Nurmagomedov trying to control the position here.
Chai pressing down on his opponent's thigh, looking to pass guard. Nurmagomedov is keeping the position for now. #T2#
Nurmagomedov wants to control here, rather than go for any submissions from the bottom. At least for now.
Chai stays in close to Nurmagomedov's body and controls the position.
Nurmagomedov working a defensive guard here.
Chai passes Nurmagomedov's left leg - he's now in half guard. #T3#
Nurmagomedov wants to improve his position but Chai is controlling well.
Chai wants to pass to mount but Nurmagomedov is defending the position.
Nurmagomedov is not content to let Chai control the position.
Nurmagomedov regains full guard. Nicely done.
Chai wants to control from the top but Nurmagomedov keeps moving.
Chai is fighting to break Nurmagomedov's control of his arms but Nurmagomedov is doing a good job of controlling the position at the moment.#T4#
Chai looking to sit in guard and control but Nurmagomedov gets the butterfly guard and sweeps. He's now in the guard on the top. Score +2 for sweep to guard / half guard: Chai (2) vs (2) Nurmagomedov
Chai is pulling down on Nurmagomedov's head to control his posture.
Nurmagomedov postures up.
Nurmagomedov stays in close to Chai's body and controls the position. #T5#
Nurmagomedov is fighting to break Chai's control of his arms but Chai is doing a good job of controlling the position at the moment.
Nurmagomedov is stalling in the full guard.
The ref warns both fighters not to hold the cage as they work up against the meshing.
Chai looking to hit a scissor sweep but Nurmagomedov is one step ahead there. #T6#
Chai controls Nurmagomedov momentarily but Nurmagomedov frees himself.
We could do with one of the fighters taking the initiative a bit more on the ground - they're both waiting to capitalize on a mistake.
Chai wants to improve his position but instead Nurmagomedov has moved into half guard.
Chai wants to get back to full guard.#T7#
Chai is positioning himself well to prevent Nurmagomedov advancing to mount.
Chai is looking to improve his position.
Nurmagomedov seems content to maintain position for now, rather than mounting any offense.
Chai tries to roll over but Nurmagomedov keeps him under control.#T8#
Nurmagomedov perhaps working for something from half guard, or maybe not. It looks like he's just sitting there.
Chai has no desire to be mounted, so is trying to control. Nurmagomedov is working away from the top position though.
Nurmagomedov prevents Chai from improving his position.#T9#
Nurmagomedov wants to pass to mount but Chai is defending the position.
Chai slips a foot under and gets full guard. Nice work.
Chai not looking particularly offensive just at the moment.
Chai pulls Nurmagomedov in close to prevent any damage. #T10#
Chai wants to sweep here but Nurmagomedov controlling him for the moment.
A real slowdown in the pace of the fight for a moment, as Chai holds on and takes a little breather.
Chai continues to stall.
Nurmagomedov's corner is telling him to maintain position.#T11#
Chai wants to sweep but no luck.
Nurmagomedov stands up and looks to throw the legs aside to pass to side control. Chai swivels though and keeps the full guard.
Chai has Nurmagomedov pulled in close to control his posture.
Nurmagomedov is taking a break and basically stalling. The referee will not allow him to do that for long.
Chai looking to sweep here. No luck so far. #T12#
Nurmagomedov pressing down on his opponent's thigh, looking to pass guard. Chai is keeping the position for now.
Chai is avoiding any damage by keeping wrist control.
Nurmagomedov slows down the pace of the fight, as he sits in guard. #T13#
Nurmagomedov being controlled here momentarily.
Nurmagomedov preventing the sweep. #T14#
Chai looking to control the pace of the fight rather than finish it.
Nurmagomedov stays in close to Chai's body and controls the position.
Chai looking to control.
Boooooooooooooooooooo!!! God, this has been a terrible round. Come on you two, sort yourselves out!
Nurmagomedov stopping the sweep attempt from Chai.
Chai is working hard here to advance position.
And that's the end of the fight!
As we have tied on points and both fighters attempted the same number of subs, we will decide the bout based on the toss of a coin! Chai is heads and Nurmagomedov is tails.
The coin is in the air and it lands... tails!
Nurmagomedov wins on points by 3 to 2.
Khabib Nurmagomedov decided to thank the fans in attendance for making a great atmosphere. It seemed to go down pretty well. |
|
|
|
Main event
|
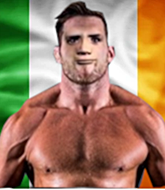
This TWGC bout is 1 fifteen minute round in the middleweight division. Introducing today's competitors. In the red corner, competing out of Montreal, with a TWGC record of 1 wins and 1 losses; Cathal Doherty! And in the blue corner, fighting out of Amsterdam, with a TWGC record of 1 wins and 0 losses; Ant Thrax!
The judges for this bout are Felipe Paraventi, Daniel Cesar and Emerson Jorge.
The fighters connect hands in the middle of the mat and we are under way.
Doherty fails miserably with a takedown attempt.
Thrax drops down looking to force a counter takedown but Doherty defends it well.
Doherty looks for a takedown but Thrax sprawls well.
Thrax closes the distance and clinches up with Doherty, looking for a takedown. Thrax pushes Doherty against the cage but Doherty circles to the side and manages to break the clinch.
Thrax shoots in but Doherty avoids the takedown attempt easily.
Doherty shoots in for a double leg but Thrax sprawls well. That's going to sap some energy.
That's three failed takedown attempts in the round for Cathal Doherty. That's going to take a lot out of him.
Thrax fails to land the takedown.
Doherty shoots in but Thrax avoids the takedown attempt easily.
We've had a slow start to the round here - hopefully the action picks up.
Doherty darts in looking for a takedown but Thrax gets double underhooks and turns Doherty into the cage.
Thrax is defending well against a takedown attempt.
Thrax looking for a takedown.
Doherty can't get the takedown.
I was talking to Doherty's coach per-fight and he was telling me that they'd been working on the clinch in the runup to this fight.
Thrax jumps guard but Doherty turns him against the cage and keeps the fight standing.
Thrax fails to pull guard.
#T1#
Doherty has dropped down and is looking to force the takedown but it's defended by Thrax after a bit of a struggle.
Doherty has hold of a leg and is looking for a trip takedown. Thrax avoids it nicely though and we remain in the clinch.
Thrax wants a takedown but no success here.
Thrax wants a takedown.
Doherty has hold of a leg and is looking for a trip takedown. Thrax avoids it nicely though and we remain in the clinch.
Thrax has a body lock and is looking for a takedown. Doherty is bouncing around trying to prevent the takedown and somehow he has indeed managed to stay on his feet.
Thrax is looking to take this one to the mat.
Thrax is defending well against a takedown attempt.
Thrax tries for a takedown. No joy.
Doherty has dropped down and is looking to force the takedown but it's defended by Thrax after a bit of a struggle.
Thrax gets underhooks to prevent Doherty's takedown attempt.
Thrax gets double underhooks to prevent a takedown attempt from Doherty.
Thrax has Doherty pressed up against the cage and is working for takedown. Doherty manages to improve position though and keeps the fight standing.
Thrax jumps guard but his hands slip and he falls flat on his back. Well, he's made himself look a right mug there, as Doherty walks away with a smile on his face. Thrax gets slowly back to his feet and shakes his head.
Doherty leaves Thrax with his face pressed against the mat as he sprawls beautifully, defending against a solid takedown attempt.#T2#
Thrax closes this distance looking for a takedown but Doherty circles away.
Doherty tries to shoot in for a takedown. He's got hold of a leg but Thrax swivels and escapes.
Thrax drops down looking to force a counter takedown but Doherty defends it well.
Ant Thrax seems to be the more aggressive standup fighter in this bout.
Doherty slaps away a takedown attempt from Thrax, before circling back to the center of the mat.
Doherty shoots in for a takedown but Thrax shows good takedown defense.
Thrax shoots for a double leg takedown but Doherty sprawls well. He's pushed Thrax's face into the mat and manages to get back to his feet relatively easily.
Doherty shoots in looking for a takedown. Thrax tries to sprawl out of it but Doherty keeps driving through. The fighters are pinned against the cage. Thrax manages to get underhooks and after a bit of a struggle, circles away and we're back to standing.
Doherty fails with a takedown attempt.
Doherty shoots in for a takedown. He's persisting with it as Thrax sprawls well. Thrax wins this battle and keeps the fight standing. Doherty gets slowly back to his feet.
Doherty tries for a takedown but Thrax sees it coming a mile off and avoids it easily.#T3#
Thrax shoots in but no luck this time.
Doherty looks for a takedown but Thrax sprawls well.
Thrax feints the counter takedown.
Thrax goes for a double leg but Doherty avoids the attempt and the two fighters end up clinched against the cage as Doherty continues to drive forward.
Doherty shoots in for a takedown but Thrax shows good takedown defense.
Thrax tries to shoot in for a takedown. He's got hold of a leg but Doherty swivels and escapes.
Doherty stuffs the takedown attempt from Thrax. Thrax gets slowly back to his feet.
Thrax stuffs the takedown attempt from Doherty. Doherty gets slowly back to his feet.
Thrax shoots in looking for a takedown but Doherty manages to keep the fight standing, pushing Thrax's face into the canvas for good measure before circling away.
Doherty shoots for a takedown but Thrax saw that one coming a mile off and avoided it easily.
Thrax shoots in and drives through. Doherty sprawls well.
Thrax shoots in for a takedown. "I don't think so" says Doherty as he avoids it easily.
Thrax looks winded!
A really sloppy takedown attempt there from Doherty.#T4#
Doherty shoots in but no luck this time.
Thrax shoots in for a takedown. "I don't think so" says Doherty as he avoids it easily.
Doherty feinted with a counter takedown.
Thrax shoots in for a takedown but Doherty shows good takedown defense.
Thrax darts in looking for a takedown but Doherty gets double underhooks and turns Thrax into the cage.
Doherty shoots in for a double leg but Thrax sprawls well. That's going to sap some energy.
Thrax stuffs a takedown. It's all about dictating where the fight takes place and Thrax wants it to stay on the feet.
Doherty shoots in with a takedown attempt and he has Thrax pinned against the cage. Thrax gets the underhooks and manages to circle away.
Thrax shoots in for a takedown. "I don't think so" says Doherty as he avoids it easily.
Thrax shoots in for a takedown. "I don't think so" says Doherty as he avoids it easily.
Thrax looks frustrated there after his takedown attempt is stuffed easily.#T5#
Doherty shoots in looking for a takedown. Thrax tries to sprawl out of it but Doherty keeps driving through. The fighters are pinned against the cage. Thrax manages to get underhooks and after a bit of a struggle, circles away and we're back to standing.
Doherty shoots in with a takedown attempt and he has Thrax pinned against the cage. Thrax gets the underhooks and manages to circle away.
Doherty shoots in but no luck this time.
Thrax dives in and grabs Doherty's left leg, looking for a takedown. Doherty pushes down on Thrax's head and hops out.
Doherty defends well against a solid takedown attempt from Thrax.
A really sloppy takedown attempt there from Doherty.
Thrax shoots in for a takedown. "I don't think so" says Doherty as he avoids it easily.
No luck with that takedown attempt from Thrax. #T6#
Doherty shoots in for a takedown. "Ole!" shouts Thrax as he jumps to the side.
Thrax with the counter takedown but Doherty avoids it easily.
Doherty fails to land the takedown.
Doherty fails with a takedown attempt from distance.
Thrax shoots in looking for a takedown. Doherty tries to sprawl out of it but Thrax keeps driving through. The fighters are pinned against the cage. Doherty manages to get underhooks and after a bit of a struggle, circles away and we're back to standing.
Thrax fails with a takedown attempt from distance.
Doherty shoots for a takedown but Thrax saw that one coming a mile off and avoided it easily.
Thrax shoots in with a takedown attempt and he has Doherty pinned against the cage. Doherty gets the underhooks and manages to circle away.
Doherty fakes high and shoots in for a takedown but Thrax avoids it really well and circles away.#T7#
A telegraphed takedown attempt from Doherty is defended easily by Thrax.
Thrax stuffs the takedown.
Thrax misses with a takedown attempt. He shot from a bit too far out.
Doherty tries for a takedown but Thrax sees it coming a mile off and avoids it easily.
Thrax is trying hard to land a takedown here. Doherty sprawls well and keeps this one on the feet.
Thrax throws a looping left and ducks down for a takedown. He's got his arms around Doherty's waist but Doherty gets an underhook and avoids the takedown by throwing Thrax off to one side.
Doherty shoots in for a takedown. "Ole!" shouts Thrax as he jumps to the side.
Nice sprawl there from Thrax as Doherty shoots in.#T8#
Doherty has a takedown stuffed.
Thrax shoots in for a takedown but Doherty shows good takedown defense there and keeps this one on the feet.
Doherty shoots in for a takedown. He's persisting with it as Thrax sprawls well. Thrax wins this battle and keeps the fight standing. Doherty gets slowly back to his feet.
Thrax leaves Doherty with his face pressed against the mat as he sprawls beautifully, defending against a solid takedown attempt.
Thrax shoots in looking for a takedown but Doherty manages to keep the fight standing, pushing Thrax's face into the canvas for good measure before circling away.
Thrax shoots for a double leg takedown but Doherty sprawls well. He's pushed Thrax's face into the mat and manages to get back to his feet relatively easily.
Thrax shoots in for a takedown. He's persisting with it as Doherty sprawls well. Doherty wins this battle and keeps the fight standing. Thrax gets slowly back to his feet.#T9#
Thrax fails with a rather predictable takedown attempt.
Thrax goes for a double leg but Doherty avoids the attempt and the two fighters end up clinched against the cage as Doherty continues to drive forward.
Doherty shoots for a double leg takedown but Thrax sprawls well. He's pushed Doherty's face into the mat and manages to get back to his feet relatively easily.
Doherty shoots in with a takedown attempt and he has Thrax pinned against the cage. Thrax gets the underhooks and manages to circle away.
And Thrax tries to counter it with a takedown but Doherty pushes his down on his head and steps out.
Thrax fails with a takedown attempt.
Doherty slaps away a takedown attempt from Thrax, before circling back to the center of the mat.
Thrax shoots for a takedown but Doherty saw that one coming a mile off and avoided it easily.
Doherty misses with a takedown attempt - Thrax sprawls well and throws a nice strike on the way out which just misses.#T10#
Thrax shoots in for a takedown. "I don't think so" says Doherty as he avoids it easily.
Thrax leaves Doherty with his face pressed against the mat as he sprawls beautifully, defending against a solid takedown attempt.
A really sloppy takedown attempt there from Thrax.
Doherty attempts a counter takedown but Thrax avoids it well and moves away.
Nice sprawl there from Thrax as Doherty shoots in.
Doherty fails miserably with a takedown attempt.
Thrax dives in for a single leg takedown but Doherty sprawls and the fighters end up clinched against the cage.
No luck for Doherty with that takedown attempt.
Doherty leaves Thrax with his face pressed against the mat as he sprawls beautifully, defending against a solid takedown attempt.#T11#
Doherty shoots in but Thrax avoids the takedown attempt easily.
Thrax has a takedown stuffed.
Thrax dives in and grabs Doherty's left leg, looking for a takedown. Doherty pushes down on Thrax's head and hops out.
Thrax defends well against a solid takedown attempt from Doherty.
Thrax tries to drive through with a takedown attempt but Doherty defends well and Thrax ends up having to push Doherty into the cage where they will battle it out in the clinch.
Doherty shoots for a double leg takedown but Thrax sprawls well. He's pushed Doherty's face into the mat and manages to get back to his feet relatively easily.
Thrax looks frustrated there after his takedown attempt is stuffed easily.
Doherty fails with the takedown.
Thrax shoots in for a takedown but Doherty shows good takedown defense. #T12#
Doherty shoots in looking for a double leg takedown. Thrax defends it nicely.
A really sloppy takedown attempt there from Doherty.
Thrax shoots in but no luck this time.
Doherty shoots in for a takedown. "I don't think so" says Thrax as he avoids it easily.
Doherty stuffs the takedown attempt from Thrax. Thrax gets slowly back to his feet.
Thrax displays good takedown defense there as he swats away a double leg from Doherty.
No luck with that takedown attempt from Doherty.
Doherty looks frustrated there after his takedown attempt is stuffed easily.#T13#
Thrax fails with a rather predictable takedown attempt.
Doherty stuffs a takedown. It's all about dictating where the fight takes place and Doherty wants it to stay on the feet.
No luck for Doherty with that takedown attempt.
Thrax shoots in for a takedown. "Ole!" shouts Doherty as he jumps to the side.
Doherty fails with a takedown attempt from distance.
Thrax shoots in for a takedown but doesn't get it.
Doherty shoots in for a takedown but doesn't get it.
Thrax slaps away a takedown attempt from Doherty, before circling back to the center of the mat.#T14#
Thrax shoots in for a takedown. He's persisting with it as Doherty sprawls well. Doherty wins this battle and keeps the fight standing. Thrax gets slowly back to his feet.
Doherty stuffs a takedown. It's all about dictating where the fight takes place and Doherty wants it to stay on the feet.
Thrax darts in looking for a takedown but Doherty gets double underhooks and turns Thrax into the cage.
Doherty has a takedown stuffed.
Thrax looks frustrated there after his takedown attempt is stuffed easily.
Thrax is trying hard to land a takedown here. Doherty sprawls well and keeps this one on the feet.
The crowd thankful this round is nearly over.
Doherty shoots for a double leg takedown but Thrax sprawls well. He's pushed Doherty's face into the mat and manages to get back to his feet relatively easily.
Horrible takedown attempt by Thrax or perhaps it was just good defense by Doherty, which made it look bad.
Doherty is trying hard to land a takedown here. Thrax sprawls well and keeps this one on the feet.
And that's the end of the fight!
As we have tied on points and both fighters attempted the same number of subs, we will decide the bout based on the toss of a coin! Doherty is heads and Thrax is tails.
The coin is in the air and it lands... tails!
Thrax wins on points by 1 to 0.
During a confident post fight interview, Ant Thrax thanked all his fans. He seemed very genuine when describing how motivated his fans keep him. |
|
|
|
|
|
|