 |
The Island Season 12, 135 lbs, Round 2 PBP Commentary |
Undercard bout
|
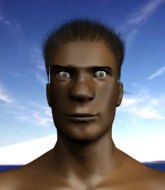
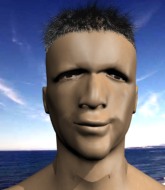
Coming up we have a bantamweight MMA rules bout between Millard Masters (ranked 1532 p4p, 226 weight class) and Squeaky Sneakers (ranked 91 p4p, 13 weight class). Masters comes to the cage accompanied by Enter the Sandman. Millard Masters could well score a knockout today. He has the power to get to Squeaky Sneakers's chin.
 |
|
 |
| 160 cm
27
140
8 - 3 - 0 |
|
163 cm
26
132
11 - 4 - 0 |
Good wrestling
Counter fighter
KO power |
|
Good wrestler
Decent boxing
Knockout power |
|
| |
|
Ladies and gentlemen. This fight is 3 rounds, in the bantamweight division.
Introducing the fighter to my left, fighting out of the red corner.
With a record of 8 - 3 - 0, fighting out of The Island, Millard Masters!
And introducing the fighter to my right, fighting out of the blue corner.
With a record of 11 - 4 - 0, fighting out of The Island, Squeaky Sneakers!
The judges for this bout are Winston Alpacca, Michael Johnstone and Daniel Franklin.

The bell rings for round one and we are underway!
Sneakers tries to land with a swinging hook to the body but Masters was well out of range. Poor timing from Sneakers.
Sneakers throws a hook to the body but it doesn't connect.
A looping hook to the body misses from Sneakers. Masters does a little dance to reset his feet.
Masters closes this distance looking for a takedown but Sneakers circles away.
Masters has been working on his boxing with his coaches at Walter J Abramowitz Center for Bigness in the buildup to the fight.
A jab from Sneakers does it's job there.
Sneakers takes a swing at Masters's ribcage but misses.
Sneakers throws a body punch but Masters moves out of range.
Sneakers throws a nice looking combination but Masters bobs and weaves to avoid any damage.
Sneakers looks to land a combination but Masters avoids it well.
Masters looks to score with a combo but nothing lands.
Sneakers looked like he wanted to counter with a punch but didn't throw it.
Masters takes a shot to the nose. Hopefully that hasn't broken it.
We've had a slow start to the round here - hopefully the action picks up.
Sneakers with a body punch. A glancing blow.
Sneakers looks to land a right hand but Masters moved out of range.
Masters wants to clinch
and Sneakers counters with a right hand to the body.
Masters keeping a good distance there, avoiding the body shot.

That's one minute gone in the round.
A looping hook to the body misses from Sneakers. Masters does a little dance to reset his feet.
Sneakers throws a hard body shot but it just misses.
Masters appears to be looking for a big counter.
Masters is looking to clinch but Sneakers is avoiding it.
Sneakers looks to throw the jab but Masters is out of range.
Masters steps to the side to avoid the strikes from Sneakers.
Masters fails to land with the punch combination there - jab, cross, hook, miss, miss, miss.

Masters drops down and drives through with a powerful takedown into guard.
The ref warns both fighters not to hold the cage as they work up against the meshing.
Sneakers wants to improve his position but instead Masters has moved into half guard.
Sneakers makes his way to full guard. A much better position for Sneakers.
Masters looking to pass the guard.

That's two minutes gone in the round.
Sneakers is working an open guard here, looking to improve his position. No doubt that will leave him open to counters but at least he's being more offensive.
Masters stands and throws Sneakers's legs to the side, diving into side control.
Masters in the domination position with Sneakers hanging on.
You can see the frustration on Sneakers's face as Masters controls the position.
Sneakers regains half guard there - taking advantage of Masters's attempt to lay and pray for a moment.
Masters misses with a head shot. Sneakers uses the momentum to regain guard.

That's three minutes gone in the round.
Masters slows down the pace of the fight, as he sits in guard.
Sneakers is trying to control the position but Masters postures up.
Sneakers pulls Masters in close to prevent any damage.
Masters trying to control but Sneakers is working from the bottom.
Masters throwing elbows and punches but not connecting, as Sneakers works some decent striking defense from the bottom.

Masters drops back looking for a heel hook - he quickly realises he's not going to get it but Sneakers manages to dive on top of him before he can escape and now Masters has Sneakers in his guard.


That's four minutes gone in the round.
My god... these two guys really need to pick up the pace or everyone will leave to go get a beer.
Sneakers throws a big right hand that misses.
Masters is looking for a guillotine. You can't force these things though and Sneakers defends well.
Masters preventing the ground and pound from doing any damage.
Sneakers postures up in Masters's guard and throws a big left but Masters blocks it.
The fighters are pressed up against the cage, both looking to find a bit of space to work.
The crowd thankful this round is nearly over.
Sneakers landing with the ground and pound.
Sneakers landing some decent shots from guard.
Sneakers avoids a guillotine attempt easily.
And that is the end of the round. The fighters go back to their corners.
Squeaky Sneakers dominated that round.
OK. That's time! The bell goes and we're back to the action.

Masters takes a shot right to the bread basket.
Sneakers pushes forward with a 1-2 combination that forces Masters back to the cage. Sneakers follows up with a solid lead hook to the liver.
Sneakers throws a hook but Masters blocks it.
Squeaky Sneakers seems to be getting the better of the standup.
Masters misses with a jab and misses with a cross straight after too.
Masters shoots in looking for a single leg takedown. Sneakers is trying to defend but Masters finishes it well and ends up in half guard. Let's see if he can advance position further.
Sneakers tries to get to full guard but Masters has control of the leg.
Masters wants to lay and pray for a moment but Sneakers keeps working.
Masters missing with the ground and pound from half guard.
That's one minute gone in the round.
Sneakers wants to improve his position but Masters is controlling well.
Masters not throwing his punches with enough precision this time.
Sneakers is refusing to be controlled, as Masters sits in half guard.
Masters is going to have to think about doing something other than just controlling because Sneakers is managing to avoid having the position dictated to him.
Masters seems to be working for a kimura but Sneakers defends the submission attempt.
Masters is trying for a guillotine from the top but the pressure isn't in the right place so Sneakers is just riding it out for now. Masters eventually gives up the hold.
Masters is working hard to pass the guard. He's done it - he's now in full mount! Trouble for Sneakers!
That's two minutes gone in the round.
Masters wants to control the pace but Sneakers is squirming around nicely.
Sneakers slips a leg in and gets back to half guard.
Masters is looking for a kimura but Sneakers is holding onto that half guard position, so it's hard for Masters to get the leverage.
Sneakers wants to get back to full guard.
Masters works his way into side control.
You can see the frustration on Sneakers's face, being in this tough position on the bottom.
Sneakers stops Masters from passing to mount.
That's three minutes gone in the round.
Masters tries for a kimura but Sneakers is defending well.
Sneakers wants to control but Masters postures up.
Masters tries for an arm triangle. That looks pretty tight to me. Is this one over!?! Possibly, maybe, no Masters has let go of the choke. Obviously it wasn't as tight as we thought!
Masters wants to take a breather but Sneakers manages to regain guard - a lesson learnt for Masters.
Sneakers keeping moving, preventing Masters from controlling successfully.
That's four minutes gone in the round.
The crowd are starting to boo a lack of action.
Masters passes Sneakers's right leg, so he's now in half guard.
Masters is pressing down on Sneakers's thigh, looking to free his foot. Sneakers is holding on for now.
Masters is looking for a kimura. It's going to be difficult to finish that from half guard though and Sneakers defends it well.
Sneakers makes his way to full guard, as Masters worked for a kimura.
Boooooooooooooooooooo!!! God, this has been a terrible round. Come on you two, sort yourselves out!
Masters trying to pass the guard but can't manage it just yet.
And that is the end of the round. The fighters go back to their corners.
Millard Masters dominated that second round.
That's the end of the interval. I'm sure that seemed a lot quicker than a minute for our two fighters! Back to the action. This is the final round!

Sneakers jabbing away but nothing is landing.
Sneakers's corner calls for a 1-2. Sneakers obliges with the 1 part as he scores the single shot and moves back out of range.
Masters fails in his attempt to clinch.
Masters keeping a good distance there, avoiding the body shot.
Masters gets a double leg takedown into Sneakers's guard.
Masters tries to free his leg and advance position but Sneakers is retaining full guard.
Sneakers controlling the position.
Masters tries to free his leg and advance position but Sneakers is retaining full guard.
Sneakers bucks up whilst keeping hold of a body lock, managing to reverse the position. Now he's in top in Masters's guard.
We've had a slow start to the round here - hopefully the action picks up.
Masters wants to hit a sweep here but Sneakers passes into full mount! Oh no, disaster for Masters there!
Sneakers cracks Masters with a nasty head shot there - the crowd let out an audible gasp there, as the noise reverberated around the arena.
That's one minute gone in the round.
Masters regains half guard.
Masters works his way to full guard. Good work.
Sneakers trying to control the position from guard on top but Masters is wriggling around, looking for whatever he can.
Sneakers works over Masters with some ground and pound from guard.
Sneakers throws a big elbow that misses.
Masters has a loose triangle. He'll be looking to tighten that up but Sneakers can see exactly what he's planning and manages to posture up and free himself.
Sneakers scoring with some ground and pound.
Sneakers stands up over Masters, holding his feet. He dives back in and lands a decent shot to the head.
That's two minutes gone in the round.
Sneakers trying to control the position from guard on top but Masters is wriggling around, looking for whatever he can.
Sneakers scoring with some ground and pound.
Masters on his back here. We all know that wrestlers don't like being on their back so let's see if Masters tries to get out of the position.
Sneakers postures up and scores with a shot to the body and a follow up elbow to the head.
Masters utilising some decent striking defenses from the guard, preventing the ground and pound.
Masters looks to be working for a triangle here. Oh, it looks like he might have it! Sneakers has picked Masters up and slammed him! Masters can't keep hold of the triangle and Sneakers manages to pass to side control!
Sneakers creates a bit of distance and throws down some hard shots.
Sneakers in side control lands a decent elbow.
Sneakers wants to lay and pray for a moment but Masters keeps working.
That's three minutes gone in the round.
Masters takes an elbow right on the bridge of the nose and winces in pain.
Sneakers lands a knee to the body and a forearm to the face.
Sneakers working the ground and pound but Masters is defending the strikes.
Masters is not in a great position here, taking some shots.
Sneakers lands a few punches from side control.
Sneakers has the superior BJJ but he's also working some ground strikes into his gameplan.
Masters is moving his hips around well on the bottom and has managed to get back to half guard.
Sneakers working the head and body with strikes.
Sneakers throwing punches and elbows but they're not doing any damage.
That's four minutes gone in the round.
Sneakers wants to lay and pray for a moment but Masters keeps working.
Masters actively working from the bottom here.
Sneakers is stalling here. Masters is in no mood to hang around though. He's locked up a kimura from the bottom! Sneakers seems to be keeping calm but he's forced to roll out of the hold and Masters has ended up in side control on the top. Nice work.
Sneakers trying to control but Masters flips him over like a cheap hooker and has his back!
Masters is remaining active here, looking for the choke. The more discerning members of the crowd will appreciate his efforts.
The crowd thankful this round is nearly over.
Masters looking for the rear naked choke. And he's got it! Sneakers taps!
Ladies and gentlemen, after 4:56 of round 3, we have a winner by way of Submission (RNC). Millard Masters!
Millard Masters took to the mic after the fight and begged the organizational hierarchy for a shot at the title.
|
|
|
|
|
|
|
|
|
|
|
|
|
|
|
|
|
|
|
|
|
|
|
| S |
C
A |
G |
S |
C
B |
G |
|
S |
C |
G |
|
energy
A | B |
|
hype
A | B |
|
pop
A | B |
|
mgr
A | B |
|
FIGHT
RATING
45% |
|
|
|
|
|
|
|
Undercard bout
|
Coming up we have a bantamweight MMA rules bout between Takeshi Yuudai (ranked 408 p4p, 1784 weight class) and Valerio Falto (ranked 22 p4p, 108 weight class). Over to our ring announcer for the fighter introductions!
 |
|
 |
| 150 cm
27
136
13 - 4 - 0 |
|
169 cm
27
144
6 - 3 - 1 |
Powerful takedowns
Basic striking
Cardio machine |
|
Powerful takedowns
Counter fighter
Good gas tank |
|
| |
|
Ladies and gentlemen. This fight is 3 rounds, in the bantamweight division.
Introducing the fighter to my left, fighting out of the red corner.
With a record of 13 - 4 - 0, fighting out of The Island, Takeshi Yuudai!
And introducing the fighter to my right, fighting out of the blue corner.
With a record of 6 - 3 - 1, fighting out of The Island, Valerio Falto!
The judges for this bout are Michael Johnstone, Daniel Franklin and Peter Branson.
The bell rings for round one and we are underway!
Yuudai tries to clinch but is not successful on this occasion.
Yuudai shoots and misses
and Falto counters with a crisp hook to the side of the head.
Falto defends well against a solid takedown attempt from Yuudai.
Falto misses with a series of wild punches.
Yuudai tries to counter with a takedown but Falto is quick to defend against it.
Yuudai shoots and misses
and Falto counters with a right hand to the body.
That's three failed takedown attempts in the round for Takeshi Yuudai. That's going to take a lot out of him.
Yuudai looking to shoot here. He's gone for it and he's landed a takedown into side control! Oh, that's bad for Falto!
Falto can't do much from the bottom here.
Falto manages to get back to half guard.
Yuudai is trying to work for a kimura. This could be trouble! No, Falto has managed to free his arm - good work.
Falto is looking to regain full guard. Not this time though.
Yuudai wants to pass to mount but Falto is defending the position.
That's one minute gone in the round.
Yuudai prevents Falto from improving his position.
Falto is trying to control but Yuudai passes into side control!
Yuudai working away.
Falto is looking for a sweep.
Falto is persisting with the attempt to improve his position.
Yuudai trying to control the action but Falto is working from the bottom.
Yuudai tries to advance to mount but Falto denies him.
Yuudai is looking for a kimura. He might have it! No, Falto has escaped the position, nice work there.
That's two minutes gone in the round.
Falto is looking for a sweep.
Falto wants to control but Yuudai postures up.
Yuudai is trying to get an arm triangle but Falto is defending well.
Falto regains half guard.
Yuudai is trying to work for a kimura. This could be trouble! No, Falto has managed to free his arm - good work.
Yuudai is keen to just control but Falto is a slippery customer.
The ref warns both fighters not to hold the cage as they work up against the meshing.
That's three minutes gone in the round.
Falto makes his way to full guard. A much better position for Falto.
Falto keeping moving, preventing Yuudai from controlling successfully.
Yuudai controlling from the top position.
Falto lands a beautiful sweep and he's now moved into his opponent's guard.
Yuudai is working from a closed guard but he's struggling to control his opponent.
Yuudai looks to be in better condition than last time we saw him fight. Obviously he's been working hard on his cardio.
Yuudai is working an open guard here, looking to improve his position. No doubt that will leave him open to counters but at least he's being more offensive.
Falto is just sitting in guard, looking to avoid any submissions.
Yuudai is looking for a guillotine. You can't force these things though and Falto defends well.
That's four minutes gone in the round.
Falto pushes down on Yuudai's leg and manages to get into half guard.
The fighters are pressed up against the cage, both looking to find a bit of space to work.

Falto is looking for a kimura but he's never going to get it from there.
Falto missing with the ground and pound from half guard.
Falto wants to work for an arm triangle but Yuudai is really keeping half guard well and defending the submission attempt.
Yuudai blocking the ground and pound attempt from Falto.
The crowd thankful this round is nearly over.
Yuudai is defending against the submission attempts here by Falto.
Yuudai regains full guard. Nicely done.
And that is the end of the round. The fighters go back to their corners.
A close round but Valerio Falto will probably get the nod.
That's the end of the interval. I'm sure that seemed a lot quicker than a minute for our two fighters! Back to the action.
Falto keeps the fight on the outside.
A nice side step and Falto releases a counter shot to the body, but it doesn't find it's home.
Yuudai is trying hard to land a takedown here. Falto sprawls well and keeps this one on the feet.
Yuudai tries to drive through with a takedown attempt but Falto defends well and Yuudai ends up having to push Falto into the cage where they will battle it out in the clinch.
Falto swings wildly with an uppercut but Yuudai uses good head movement to avoid it.
Falto can't find room to land a body shot as Yuudai controls the action.
Yuudai controlling the action here for a moment.
Yuudai is trying to pull guard but being pressed up against the cage enables Falto to keep the fight standing.
That's three failed takedown attempts in the round for Takeshi Yuudai. That's going to take a lot out of him.
Falto can't find room to land a body shot as Yuudai controls the action.
Yuudai prevents a body shot from Falto.
Yuudai misses with a punch to the body.
Stalling in the clinch from Yuudai.
We've had a slow start to the round here - hopefully the action picks up.
Yuudai trying to stall but Falto improves his position.
Falto gets underhooks to prevent Yuudai's takedown attempt.
Yuudai tries to score a body lock takedown but Falto shows good agility there to stay on his feet.
Yuudai is trying to pull guard but Falto has him pressed against the cage.
Yuudai goes for a takedown attempt but Falto pushes him away and we're back to fighting at a distance.
Yuudai misses with a takedown attempt
and Falto counters with a left to the body.
Yuudai takes an uppercut right on the jaw but it doesn't phase him.
That's one minute gone in the round.
Yuudai gets cracked with a nice right hand there by Falto.

Yuudai moves into the clinch.
Falto tries a shoulder strike but it doesn't do any damage.

Falto escapes the clinch and we're back to striking.
Falto lands a really nice looking cross but Yuudai seems unphased.
Yuudai shoots in but Falto avoids the takedown attempt easily.
Falto has been the more effective fighter overall so far.
Yuudai shoots in for a takedown from distance. He catches Falto napping and manages to drive through into side control!
Falto tries to buck Yuudai off but Yuudai is having none of it.
Falto keeps trying to improve his position.
Falto manages to get one leg in to regain half guard.
Falto slips a foot under and gets full guard. Nice work.
Fantastic stuff here - a very entertaining period of action, which has drawn cheers from the crowd.
Falto is working an open guard here, looking to improve his position. No doubt that will leave him open to counters but at least he's being more offensive.
That's two minutes gone in the round.
Falto wants to control but instead he gets his guard passed and Yuudai is now in half guard.
Yuudai prevents Falto from improving his position.
Falto trying to keep hold of his opponent's head but Yuudai manages to pass to mount!
Falto tries to get back to half guard but can't.
Yuudai tucks in and makes sure he doesn't lose the dominant position.
Yuudai is thinking about an arm triangle here, looking to tighten it up before moving to side control. Falto can see it coming though and defends well with a couple of strikes to the head and some good arm positioning.
Yuudai trying to control but he's not successful this time.
Falto is desperately trying to improve his position but Yuudai has a good base and remains in mount.
That's three minutes gone in the round.
Yuudai with some aggressive grappling here, looking for the finish.
Falto is trying desperately to improve position.
Falto tries to lock up and control but Yuudai gives him a forearm to the face and pushes him away.
Takeshi Yuudai overall seems to be getting the better of the ground position in the fight so far.
Yuudai can't quite control the action as he would like just now, as Falto is looking to escape.
Falto tries to reverse the position but Yuudai maintains control.
Yuudai has control of Falto's right arm, working for a kimura. It's a bit of a token attempt though and Falto regains control of the situation pretty easily.
That's four minutes gone in the round.
Falto is in all sorts of trouble here.
Yuudai thowing strikes but they're hitting the gloves, not doing any damage.
Yuudai looking to control but Falto is working nicely, looking to advance position himself.
Falto is desperately trying to get back to half guard.
Yuudai trying to control but Falto is having none of it.
Falto keeping his composure momentarily, calmly looking to get back to half guard.
Yuudai trying to control but Falto is having none of it.
And that is the end of the round. The fighters go back to their corners.
That was a close second round but I would say that Takeshi Yuudai will probably get the nod.
The corners get their ten second warning. Both fighters stand from their stools and stare each other down, ready to get back to the action. This is the final round!
Yuudai dives in for a single leg takedown but Falto sprawls and the fighters end up clinched against the cage.
Yuudai struggles to land a body shot inside as Falto controls his hands.
Falto throws a head punch that misses.
Falto tries a body shot but Yuudai blocks it.
Falto tried to land a shot to the body but connects with Yuudai's elbow.
Yuudai blocks a couple of punches on the inside.
Falto tried to land a shot to the body but connects with Yuudai's elbow.
Yuudai is trying to pull guard but Falto has him pressed against the cage.
Yuudai lands a takedown into guard.
Yuudai tries to free his leg and advance position but Falto is retaining full guard.
Yuudai preventing the sweep.
Yuudai tries to free his leg and advance position but Falto is retaining full guard.
Yuudai got a little sloppy there for a moment and Falto has worked his way into a loose triangle - can he finish it?! No, Yuudai has managed to get both his arms back between Falto's legs - danger averted.
We've had a slow start to the round here - hopefully the action picks up.
Falto is working from a closed guard but he's struggling to control his opponent.
Falto manages to sweep nicely, so he's now on top. Yuudai manages to get himself to full guard.
Falto pushes down on Yuudai's leg and manages to get into half guard.
That's one minute gone in the round.
Yuudai looking for submissions from an awkward position here.
Yuudai might be looking to lock onto one of his opponent's long limbs for a submission, whilst we're on the ground.
Falto seems to be working for a kimura but Yuudai defends the submission attempt.
Falto is trying for a guillotine from the top but the pressure isn't in the right place so Yuudai is just riding it out for now. Falto eventually gives up the hold.
Falto is looking for an arm triangle, whilst trying to pass to side control. Yuudai doesn't seem that keen to cooperate though. No luck this time Falto.
That's two minutes gone in the round.
A lull in the action here being met with boos from the crowd.
Yuudai tries to roll over but Falto keeps him under control.
Falto is looking for an arm triangle, whilst trying to pass to side control. Yuudai doesn't seem that keen to cooperate though. No luck this time Falto.
Falto is looking for the mount but instead finds himself back in full guard.
Falto slips effortlessly into side control - very nice.
That's three minutes gone in the round.
Falto misses with a strike but at least he's keeping busy, looking to cause some damage - that will still help him when it comes to the judges scorecards.
Falto wants to lay and pray for a moment but Yuudai keeps working.
Falto tries for a kimura but Yuudai is defending well.
Falto tries to land with some ground and pound but misses.
Falto wants to work for a kimura but he's foiled early by Yuudai, who protects the arm well.
Yuudai takes a nasty elbow to the side of the head.
Falto tries for a kimura. Not really close to a finish though.
Yuudai is trying to control Falto's posture but Falto avoids it.
That's four minutes gone in the round.
Yuudai tries to control but end up mounted... ooooh, that's bad.
Takeshi Yuudai has stepped it up - he knows he needs a finish here!
Falto is in full mount, looking to secure a guillotine but Yuudai is surviving well by controlling Falto's body position as best he can.
Falto wants to take his opponent's back but he's not managed it.
Falto with some aggressive grappling here. He's looking for submissions here, rather than waiting for the opportunity to counter.
Boooooooooooooooooooo!!! God, this has been a terrible round. Come on you two, sort yourselves out!
Falto looking to ground and pound but Yuudai is blocking nicely.
Yuudai throwing hammer fists to the chest of Falto. What's that going to do exactly?
And that's the end of the fight!
Valerio Falto comfortably won the final round on my scorecard.
I think Falto has won this one but let's see whether the judges agree with me. Over to the ring announcer for the scorecards.
Ladies and gentlemen, after 3 rounds of action, we go to the scorecards for a decision.
Judge Michael Johnstone scores the fight for Valerio Falto!
Judge Daniel Franklin scores the fight for Valerio Falto!
Judge Peter Branson scores the fight for Valerio Falto!
Valerio Falto wins by unanimous decision!
Valerio Falto seemed lost for words in his post fight interview but he remembered to thank his fans and directed everyone to his website.
|
|
|
|
|
|
|
|
|
|
|
|
|
|
|
|
|
|
|
|
|
|
|
| S |
C
A |
G |
S |
C
B |
G |
|
S |
C |
G |
|
energy
A | B |
|
hype
A | B |
|
pop
A | B |
|
mgr
A | B |
|
FIGHT
RATING
35% |
|
|
|
|
|
|
|
Co-main event
|
Coming up we have a bantamweight MMA rules bout between Dax Crumper (ranked 990 p4p, 727 weight class) and Genji Kamogawa (ranked 58 p4p, 42 weight class). Kamogawa has chosen The Veer Union - Bitter End as his entrance music. Well, the cameraman is lingering on a pretty young lady for a bit too long there. Keep your eyes on the prize buddy or you'll miss the fighter intros!
 |
|
 |
| 165 cm
27
140
7 - 3 - 1 |
|
170 cm
27
135
10 - 4 - 0 |
Good wrestling
Brawler
Very quick |
|
Good wrestler
Decent boxing
Good gas tank |
|
| |
|
Ladies and gentlemen. This fight is 3 rounds, in the bantamweight division.
Introducing the fighter to my left, fighting out of the red corner.
With a record of 7 - 3 - 1, fighting out of The Island, Dax Crumper!
And introducing the fighter to my right, fighting out of the blue corner.
With a record of 10 - 4 - 0, fighting out of The Island, Genji Kamogawa!
The judges for this bout are Michael Johnstone, Daniel Franklin and Peter Branson.
The bell rings for round one and we are underway!
Kamogawa defends well against a solid takedown attempt from Crumper.
Wow, both these guys are really going for it!
Kamogawa scores with a nice strike.
Crumper throws a looping left and ducks down for a takedown. He's got his arms around Kamogawa's waist but Kamogawa gets an underhook and avoids the takedown by throwing Crumper off to one side.
Kamogawa lands an overhand left. A wild punch that just about connected.
Kamogawa fakes a right and follows up with a big left that drops Crumper to one knee - oooooh, he's wobbly! Crumper looks to clinch but Kamogawa throws him off and pummels him into the canvas! Crumper taps out under the strikes! The fight is over!
Ladies and gentlemen, after 0:15 of round 1, we have a winner by way of Submission (Strikes). Genji Kamogawa!
After winning the bout, Genji Kamogawa thanked all his fans and promised he'd do even better in his next fight. The crowd seemed to love his humility.
|
|
|
|
|
|
|
|
|
|
|
|
|
|
|
|
|
|
|
|
|
|
|
| S |
C
A |
G |
S |
C
B |
G |
|
S |
C |
G |
|
energy
A | B |
|
hype
A | B |
|
pop
A | B |
|
mgr
A | B |
|
FIGHT
RATING
100% |
|
|
|
|
|
|
|
Main event
|
Coming up we have a bantamweight MMA rules bout between Kazuo Takashi (ranked 53 p4p, 1557 weight class) and Viserys Targaryen (ranked 5 p4p, 93 weight class). Takashi comes to the cage accompanied by åç°å
å¼ Rising. Both fighters look pumped up here. Let's hope this is a good fight!
 |
|
 |
| 170 cm
27
135
15 - 0 - 0 |
|
170 cm
27
145
8 - 5 - 0 |
BJJ Brown Belt
Counter fighter
Cardio machine |
|
Powerful takedowns
Brawler
Powerful |
|
| |
|
Ladies and gentlemen. This fight is 3 rounds, in the bantamweight division.
Introducing the fighter to my left, fighting out of the red corner.
With a record of 15 - 0 - 0, fighting out of The Island, Kazuo Takashi!
And introducing the fighter to my right, fighting out of the blue corner.
With a record of 8 - 5 - 0, fighting out of The Island, Viserys Targaryen!
The judges for this bout are Sandra Marshall, Dirk Anderson and Winston Alpacca.
The bell rings for round one and we are underway!

Targaryen clinches up against the cage.
Takashi will no doubt start fighting again in a minute but for now he's just having a little rest, leaning Targaryen up against the cage.
Takashi leaning his opponent against the cage.
Takashi stalling in the clinch.
Targaryen gets double underhooks to prevent a takedown attempt from Takashi.
Takashi is clearly stalling here... Pick up the pace son.
Takashi leaning against his opponent.
We've had a slow start to the round here - hopefully the action picks up.
The ref breaks the fighters up, due to lack of action by Kazuo Takashi.
Targaryen looks frustrated there after his takedown attempt is stuffed easily.
Takashi drops down looking for a counter takedown but Targaryen sprawls and moves away.
Targaryen has done a lot of speed work in the buildup to this fight.
Targaryen tries to shoot in for a takedown. He's got hold of a leg but Takashi swivels and escapes.
Takashi changes levels looking for a counter takedown but doesn't commit.
Targaryen fails to land the takedown.
Kazuo Takashi has stuffed three takedown attempts in the round now. That's going to take a lot out of Viserys Targaryen.
That's one minute gone in the round.
Targaryen throws a head kick but Takashi moves out of range.
Takashi appears to be looking for a counter takedown.
Takashi fakes with an overhand right and moves in to clinch with Targaryen, pushing him back against the cage.
Takashi pushes Targaryen back against the cage and lands a hook to the side of the head.

Targaryen is working on a single leg takedown against the cage. Takashi can't fight it off and eventually Targaryen manages to take the fight to the floor. Takashi looks annoyed but at least he's managed to land in guard.
Targaryen tries to free his leg and advance position but Takashi is retaining full guard.
Takashi managing to control the position.
The fighters are pressed up against the cage, both looking to find a bit of space to work.
That's two minutes gone in the round.
Takashi's ground tactics aren't going to win him many fans. Let's hope he's got fireworks for us if he gets back to his feet because he's not doing much on the ground.
Targaryen trying to control but Takashi is working from the bottom.
Targaryen is intent on slowing down the pace of the fight, simply looking to control.
Targaryen wants to control from the top but Takashi keeps moving.

The referee has stepped in and called for a break in the action. We'll restart on the feet.
That's three minutes gone in the round.
Takashi closes the distance, clinches up and gets a nice trip takedown into side control. Very smooth.
Takashi is maintaining the dominant position - no doubt Targaryen will start to get frustrated soon if he's not already.
Takashi is trying to land an Americana. He has the arm isolated but Targaryen is keeping cool and he's avoided the danger for now.
Takashi controlling the position from side mount.
That's four minutes gone in the round.
Takashi has controlled the position for a good 20 seconds, which will no doubt be starting to frustrate his opponent.
Targaryen trying to control but Takashi flips him over like a cheap hooker and has his back!
Targaryen tries to escape the position - he's now mounted. Is that better or worse? Hard to tell!
Takashi wants to take his opponent's back but Targaryen doesn't allow it.
Boooooooooooooooooooo!!! God, this has been a terrible round. Come on you two, sort yourselves out!
Takashi controlling the pace for now.
Targaryen is looking to get to half guard.
And that is the end of the round. The fighters go back to their corners.
Kazuo Takashi dominated that round.
That's time! Back to the action!
Targaryen tries to clinch up.
Takashi clinches with his opponent.
Takashi is really dominating this fight. Is there anything that Targaryen can do to turn this around?
Takashi tries to land a shot to the body but it's blocked.
Takashi is pushing Targaryen up against the cage, for a bit of lean and pray action. Action being used the in the loosest possible sense of the word.
The fighters are pressed against the cage, as the pace of the fight slows.
Takashi prevents a body shot from Targaryen.
Takashi stalling against the cage.
Targaryen wants a takedown.
We've had a slow start to the round here - hopefully the action picks up.
Takashi is working for a takedown up against the cage. He can't get it on this occasion though.
Targaryen wants to get back to striking at distance but Takashi won't allow it.
Takashi avoiding damage.
Takashi misses with an elbow strike.
That's one minute gone in the round.
Targaryen blocks a punch to the side of the head.
Takashi turns his back and goes for a hip toss. It's a bit messy but it gets the job done and Takashi manages to end up in side control.
Targaryen tries to get back to half guard but can't.
Takashi trying to control the position but Targaryen is working away.
Takashi has knee on belly and now moves to full mount! Trouble for Targaryen!
Targaryen is in all sorts of trouble here.
Takashi has improved his flexibility recently so we will have to see if he can use that to his advantage.
Takashi controlling his opponent.
Targaryen is wriggling around here but as he tries to escape, Takashi has taken his back.
That's two minutes gone in the round.
Targaryen wants to escape the position.
Targaryen keeps trying to improve his position.
Takashi just keeping the dominant position. He can't wait too long though, otherwise the referee will stand them back up.
The ref warns both fighters not to hold the cage as they work up against the meshing.
That's three minutes gone in the round.
Targaryen can't escape the position.
A lull in the action here.
Takashi slows the pace down here. Having a little breather whilst he's in a dominant position, looking to rest and regain some energy, ready to go for the finish.
That's four minutes gone in the round.
The crowd are hurling abuse towards the fighters... You can hardly blame them though because there isn't a lot going on in the fight.
Targaryen tries to escape the position - he's now mounted. Is that better or worse? Hard to tell!
Targaryen is trying to escape the mount.
Targaryen wants to hold on but Takashi pushes him away.
Targaryen is squirming around, avoiding Takashi's attempts to control the action.
Takashi controlling the pace for now.
Takashi is trying to take his opponent's back.
Boooooooooooooooooooo!!! God, this has been a terrible round. Come on you two, sort yourselves out!
Takashi avoids the attempt from Targaryen to control.
And that is the end of the round. The fighters go back to their corners.
Kazuo Takashi dominated that second round.
The corners get their ten second warning. Both fighters stand from their stools and stare each other down, ready to get back to the action. So, we enter the final round. Let's see if either fighter can bring us a finish, or whether we're going to the judges scorecards.
Targaryen fails with the takedown
and Takashi decides to take the opportunity to score a takedown. He's landed in Targaryen's guard.
Targaryen controls Takashi momentarily but Takashi frees himself.
Targaryen can't do much from the bottom at the moment, as Takashi controls the pace.
Targaryen is trying to control the position but Takashi postures up.
We've had a slow start to the round here - hopefully the action picks up.
Targaryen throwing some rather feeble looking strikes off his back.
Targaryen trying to control the position.
That's one minute gone in the round.
Takashi pressing down on his opponent's thigh, looking to pass guard. Targaryen is keeping the position for now.
Targaryen wants to sweep here but Takashi controlling him for the moment.
The referee has decided to stand the fighters back up, so we'll restart on the feet.
Targaryen rushes forward with a series of wild hooks but Takashi moves out of range and avoids them all easily.
Targaryen on the wrong end of a nice hook.
Targaryen shoots in but doesn't get the takedown
and Takashi counters with a nice double leg into half guard.
Takashi looks over to his corner - he wants some instructions but his corner are not responding.
Takashi is trying a forearm choke
I don't think that's going to do much at this level of the game.
That's two minutes gone in the round.
Takashi perhaps working for something from half guard, or maybe not. It looks like he's just sitting there.
Takashi seems to have a rather negative gameplan on the ground. He seems keen to just score the takedown and hold down Targaryen for as long as he can get away with.
This is a sustained period of stalling by Takashi.
Kazuo Takashi overall seems to be getting the better of the ground position in the fight so far.
That's three minutes gone in the round.
Targaryen wants to control but Takashi is keeping busy.
The ref stands the fighters back up due to a lack of activity.
Targaryen tries to clinch up against the cage, rushing in to close the distance. Takashi manages to break the clinch and circles back to the middle of the mat.
Targaryen throws a combination that misses
and Takashi counters with a nice shoot takedown that brings the fighters to the ground.
Targaryen wants to get back to his feet but Takashi passes into half guard.
Takashi keeping composed on the top, looking to control the action.
That's four minutes gone in the round.
Takashi is trying for a guillotine from the top but the pressure isn't in the right place so Targaryen is just riding it out for now. Takashi eventually gives up the hold.
Takashi trying to control the pace.
Viserys Targaryen has stepped it up - he knows he needs a finish here!
Boooooooooooooooooooo!!! God, this has been a terrible round. Come on you two, sort yourselves out!
Targaryen looking to force a kimura from the bottom here. He's concentrating on that move too much though and Takashi pushes past his half guard into mount!
And that's the end of the fight!
Kazuo Takashi showed his dominance in that final round.
Well Takashi has outscored his opponent in every aspect of the fight today. Only a scarily incompetent judge or two will keep him from a well deserved win... Over to the ring announcer for the scorecards.
Ladies and gentlemen, after 3 rounds of action, we go to the scorecards for a decision.
Judge Sandra Marshall scores the fight for Kazuo Takashi!
Judge Dirk Anderson scores the fight for Kazuo Takashi!
Judge Winston Alpacca scores the fight for Kazuo Takashi!
Kazuo Takashi wins by unanimous decision!
During a confident post fight interview, Kazuo Takashi thanked all his fans. He seemed very genuine when describing how motivated his fans keep him.
|
|
|
|
|
|
|
|
|
|
|
|
|
|
|
|
|
|
|
|
|
|
|
| S |
C
A |
G |
S |
C
B |
G |
|
S |
C |
G |
|
energy
A | B |
|
hype
A | B |
|
pop
A | B |
|
mgr
A | B |
|
FIGHT
RATING
28% |
|
|
|
|
|
|
|
|
|
|
