|
|
PBP Commentary |
Coming up we have a lightweight MMA rules bout between Noryuki Takahashi (ranked 0 p4p, 0 weight class) and Jack Briggers (ranked 0 p4p, 0 weight class). Noryuki Takahashi looks tired to me. Hopefully he has got enough gas left in the tank to put in a good performance.
 |
|
 |
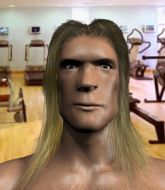
| 177 cm
21
155 lbs
0 - 1 - 0 |
|
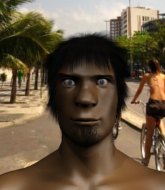
200 cm
18
165 lbs
0 - 0 - 0 |
BJJ Blue Belt
Solid Muay Thai
Big heart |
|
BJJ Blue Belt
Decent boxing
Determined |
|
| |
|
Ladies and gentlemen. This fight is 3 rounds, in the lightweight division.
Introducing the fighter to my left, fighting out of the red corner.
With a record of
0 - 1 - 0, fighting out of Las Vegas, Noryuki Takahashi!
And introducing the fighter to my right, fighting out of the blue corner.
With a record of
0 - 0 - 0, fighting out of Las Vegas, Jack Briggers!
The judges for this bout are George Francis, Daniel Franklin and Chris Downing.

The bell rings for round one and we are underway!
Briggers closes the distance and clinches up with Takahashi, looking for a takedown. Briggers pushes Takahashi against the cage but Takahashi circles to the side and manages to break the clinch.
Briggers shoots for a double leg takedown but Takahashi sprawls well. He's pushed Briggers's face into the mat and manages to get back to his feet relatively easily.

Takahashi scores with a nice takedown into half guard. Let's see what he's got on the ground.
The ref warns both fighters not to hold the cage as they work up against the meshing.
Briggers wants to get back to full guard.
Takahashi trying to control the action but Briggers is working from the bottom.
Briggers slips a foot under and gets full guard. Nice work.

Briggers looking for submissions off his back, moving his hips, looking for an opening.
Briggers working a defensive guard here.
Takahashi in full guard, throwing the ground and pound. No damage this time.

That's one minute gone in the round.
Briggers escapes his hips to the side and looks to be working for an armbar. Takahashi gives him a little smile and shakes his head. No chance.
Takahashi might be looking to lock onto one of his opponent's long limbs for a submission, whilst we're on the ground.
Briggers thows some rabbit punches from the bottom but they don't do any damage.

It looks like we're going to have a standup here. Neither fighter is doing enough on the ground.
Briggers fails with the takedown

and Takahashi holds on and brings the fighters into a clinch.
Noryuki Takahashi has stuffed three takedown attempts in the round now. That's going to take a lot out of Jack Briggers.
Takahashi has hold of a leg and is looking for a trip takedown. Briggers avoids it nicely though and we remain in the clinch.
Takahashi looking for a takedown.
Takahashi has clasped his hands together around Briggers's back... aaand, he's got a takedown into side control. Nicely done.
Takahashi is breathing heavily.
Briggers is trying to get back to half guard.
Briggers trying to control but Takahashi flips him over like a cheap hooker and has his back!
Briggers tries to break free.

That's two minutes gone in the round.
Takahashi throwing sloppy strikes.
Takahashi trying to control.
The fighters are pressed up against the cage, both looking to find a bit of space to work.
Briggers turns into Takahashi and is now in his guard.
Takahashi trying to control the position.
Briggers passes Takahashi's right leg, so he's now in half guard.
Briggers seems content to maintain position for now, rather than mounting any offense.

That's three minutes gone in the round.
Briggers is looking to take a break and control but Takahashi is keeping him honest, looking to work from the bottom.
Takahashi gets back to full guard.
Briggers is a painfully thin specimen of a man. You do wonder whether a good body kick would snap him clean in two.

Briggers stands and steps away. Takahashi gets to his feet too and we're back to the striking game.
A head kick misses from Takahashi.

That's four minutes gone in the round.
There's not a lot going on here and the crowd are letting the fighters know they're not willing to tolerate a lack of action.
Briggers shoots in for a takedown but Takahashi shows good takedown defense.
Briggers pivots as if he's going to throw a leg kick but stops half way.
Nice sprawl there from Briggers as Takahashi shoots in.
Takahashi throws a head kick but Briggers moves out of range.
Good work by Takahashi as he checks the leg kick.
Briggers tries to clinch up but Takahashi circles away and keeps his distance.
Briggers fails with a rather predictable takedown attempt.
Takahashi shoots in for a takedown! He's got it and he's managed to land in full mount! That's better than Takahashi was expecting from the takedown attempt, I'm sure!
Briggers squirming around on the bottom, looking to escape.
Briggers is wriggling around trying to escape.
And thats the end of the round the fighters go back to their corners.
Noryuki Takahashi dominated that round.
The fighters' corners scream their final instructions, as the referee calls time. Here we go, back to the action!

Takahashi moves into the clinch.
Briggers is trying to break the clinch but Takahashi has him pressed against the cage.

Takahashi's corner calls for him to break the clinch, which he does.
Briggers fails with an attempt to clinch.
Briggers tries to clinch up.
Briggers scores with a jab to the body.
Briggers shoots in but Takahashi avoids the takedown attempt easily.
Takahashi fails in his attempt to clinch.
Takahashi shoots in looking for a takedown. Briggers tries to sprawl out of it but Takahashi keeps driving through. The fighters are pinned against the cage. Briggers manages to get underhooks and after a bit of a struggle, circles away and we're back to standing.
Briggers scores with a nice one two combo and darts back out of range to avoid anything coming in the opposite direction.
Both fighters are absolutely exhausted here.
Nice takedown defense from Takahashi. No joy for Briggers on that attempt.
Takahashi tries to clinch there but Briggers circles away.
That's one minute gone in the round.
Takahashi tries to clinch but Briggers is having none of it.
Briggers looks frustrated there after his takedown attempt is stuffed easily.
Noryuki Takahashi has stuffed three takedown attempts in the round now. That's going to take a lot out of Jack Briggers.
Briggers slips a jab and a cross from Takahashi.
Takahashi throws a head kick that misses.
Briggers throws a decent looking leg kick but it doesn't land clean.
Takahashi misses with a body kick.
Briggers changes levels and looks for a double leg takedown. Takahashi tries to avoid it but Briggers manages to keep hold of a leg and drag Takahashi to the ground. Takahashi escapes though and pops straight back up to his feet.
Takahashi gets to the clinch - let's see what his plan is here.
Takahashi gets double underhooks and manages to take the fight to the ground.
Takahashi trying to land body shots but he keeps hitting the mat.
Briggers has a closed guard, preventing Takahashi from standing up.
Takahashi wants to control from the top but Briggers keeps moving.
That's two minutes gone in the round.
Briggers working from the bottom, still in full guard. He's managed to get a loose triangle. Takahashi doesn't seem to be doing much to defend here, obviously he feels comfortable in the position. Takahashi manages to throw the legs off his shoulder and he's back into guard - no problem.
There's a bit of a scramble here and now Briggers is on top in guard.
Briggers stands up and looks to throw the legs aside to pass to side control. Takahashi swivels though and keeps the full guard.
Takahashi looking for a sweep. Not yet Takahashi, not yet.
That's three minutes gone in the round.
Briggers sneaks a leg through and gets to half guard. That was like a knife through butter how easily he passed Takahashi's guard.
Briggers seems very keen to just sit and control from half guard but Takahashi does not like that idea so much and is remaining active off his back.
Briggers passes the half guard and he's now in mount! Big trouble for Takahashi!
Briggers putting on the heat here with some good ground and pound!
Briggers prevents Takahashi from getting the reversal.
That's four minutes gone in the round.
A few boos can be heard. I'm sure they will multiply if the fighters don't pick up the pace.
Briggers looking to control and managing it successfully.
Takahashi tries to buck Briggers off but he can't manage it.
Takahashi can't escape the position.
The crowd thankful this round is nearly over.
Takahashi is working hard here to advance position.
Briggers controlling the position easily from mount.
And thats the end of the round the fighters go back to their corners.
A close second round but Jack Briggers will probably get the nod - 10:9.
The minute break is over - no more time for sponges and pep talks - back to the action! This is the final round!

Briggers misses with a double jab.
Takahashi lands with a kick to the ribs.
Briggers tries to clinch but is not successful on this occasion.
Takahashi closes the distance, clinches up and gets a nice trip takedown into side control. Very smooth.
Briggers manages to get one leg in to regain half guard.
Briggers is looking to control Takahashi's leg but it's slowly edging free. Can Briggers avoid being mounted?
Briggers moves his hips nicely and gets into full guard.
Briggers pushes Takahashi off and scrambles back to his feet.
That's one minute gone in the round.
Briggers has a takedown stuffed.
Noryuki Takahashi is looking to throw some combinations by the looks of things.
Both fighters are breathing heavily.
Briggers avoids the head kick by Takahashi.
Briggers shoots in and drives through. Takahashi sprawls well.
Briggers throws a body kick but he wasn't in range.
Excellent takedown into side control there by Briggers.
Takahashi tries to escape but Briggers is in control.
Briggers is looking to take a break and control but Takahashi is keeping him honest, looking to work from the bottom.
That's two minutes gone in the round.
Takahashi is sneaking out the side here. He's bucked Briggers off and has taken his back!
Takahashi wants to control the position but Briggers frees himself and scrambles - Takahashi manages to regain control in side control.
Takahashi tries to stand but Briggers is controlling his head.
Briggers is trying to improve his position.
Takahashi trying to control the action but Briggers is working from the bottom.
That's three minutes gone in the round.
The referee has ruled that neither fighter is active enough on the ground and has stood them back up.
Takahashi moves out of range of the body kick.
Takahashi avoids a punch combination nicely.
Takahashi drives through with a takedown into guard.
Briggers has his foot on Takahashi's thigh. He's trying to push off and get in position for a triangle, I think. Takahashi works his way back into a safe position though.
Briggers pulls Takahashi in to control the position.
Takahashi throws a big right hand that misses.
Briggers is looking for a triangle here but Takahashi uses the submission attempt to pass into side control.
That's four minutes gone in the round.
Briggers struggling a bit here.
Briggers might have to switch it up a bit here because his efforts to control Takahashi kaven't been going to plan, at least at the current moment in time.
Briggers is letting Takahashi control him for a moment.
Briggers is moving his hips around well on the bottom and has managed to get back to half guard.
And that's the end of the fight!
That was a close round. You could make an argument for either fighter but I would give it to Noryuki Takahashi.
Well Takahashi has outscored his opponent in every aspect of the fight today. Only a scarily incompetent judge or two will keep him from a well deserved win... Over to the ring announcer for the scorecards.
Ladies and gentlemen, after 3 rounds of action, we go to the scorecards for a decision.
Judge George Francis scores the fight 29:28
Judge Daniel Franklin scores the fight 30:28
Judge Chris Downing scores the fight 30:28
In favor of your winner, by unanimous decision... Noryuki Takahashi!
|
|
|
|
|
|
|
|
|
|
|
|
|
|
|
|
|
|
|
|
|
|
|
| S |
C
A |
G |
S |
C
B |
G |
|
S |
C |
G |
|
energy
A | B |
|
hype
A | B |
|
pop
A | B |
|
mgr
A | B |
|
FIGHT
RATING
35% |
|
|
|
|
|
|
