|
|
PBP Commentary |
Coming up we have a featherweight MMA rules bout between Jonathan Maia (ranked 7126 p4p, 0 weight class) and Carlos Mendez (ranked 3978 p4p, 0 weight class). Over to our ring announcer for the fighter introductions!
 |
|
 |
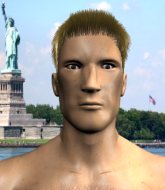
| 173 cm
18
155 lbs
6 - 7 - 0 |
|
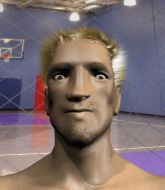
175 cm
25
155 lbs
1 - 2 - 0 |
Good takedowns
Basic striking
Granite chin |
|
BJJ White Belt
Excellent MT
Determined |
|
| |
|
Ladies and gentlemen. This fight is 3 rounds, in the featherweight division.
Introducing the fighter to my left, fighting out of the red corner.
With a record of
6 - 7 - 0, fighting out of The Island, Jonathan Maia!
And introducing the fighter to my right, fighting out of the blue corner.
With a record of
1 - 2 - 0, fighting out of The Island, Carlos Mendez!
The judges for this bout are Bart Greer, David Hoff and Winston Alpacca.

The bell rings for round one and we are underway!
Mendez feints a jab promting Maia to slip. Mendez then demonstrates his capabilities by jabbing again. Maia slips again and ducks right into an uppercut.
Maia with a poor takedown
and Mendez counters with a shot to the ribs. That looked like it hurt.
A shot to the body from Maia misses
and Mendez counters with a nice uppercut.
Maia will have to do better than that with his takedown attempts.
Maia misses with a takedown attempt
and Mendez connects with a straight left hand counter down the middle.
That's three failed takedown attempts in the round for Jonathan Maia. That's going to take a lot out of him.
Maia shoots and misses
and Mendez connects with a straight left hand counter down the middle.
Mendez moves into range and throws a lovely three punch combination.
Mendez lands a jab to Maia's midsection.
The fans in attendance giving it up for the two fighters, who have really let it all hang out in the last minute or so!
Maia gets his takedown attempt stuffed easily
and Mendez counters with a left to the body.
Maia fails with the takedown
and Mendez counters with a nice uppercut.
A jab lands there for Mendez.
Mendez looks more muscular than last time we saw him. He must have been on the weights.
Maia has his takedown stuffed
and Mendez counters with a three punch combination, finished off with a leg kick. Nice work.
Maia gets his takedown attempt stuffed easily
and Mendez counters with a straight right hand.

That's one minute gone in the round.
Maia throws a body punch but Mendez moves out of range.
Maia shoots in but doesn't get the takedown
and Mendez counters with a straight right hand.
Mendez displaying good standup as he scores with a three punch combination.
Maia misses with a takedown
and Mendez counters with a good right hand that lands right on the jaw.
Mendez stalks Maia and leaps in with a furious combination of punches. Uppercuts and crosses smash into Maia's face. Maia staggers backwards, shaken.
Maia gets his takedown attempt stuffed easily
and Mendez counters with a left and a right that stings Maia.
Mendez is landing a lot of head punches in this opening round! Maia had better start moving his head a bit unless he wants his face to turn into pâté.
Maia fails miserably with a takedown attempt.
Maia looks for a takedown here. Will he get it? Mendez is fending him off so far but Maia persists. Nope, Mendez circles away and we're back to standing.
Mendez is working the combinations to good effect here.
Mendez scores with a decent looking hook.
The crowd are loving this. Great action here.
Maia gets his takedown attempt stuffed easily
and Mendez counters with a nice body shot.

That's two minutes gone in the round.
Maia with a lazy takedown attempt
and Mendez counters with a shot to the ribs. That looked like it hurt.
Maia misses with a takedown
and Mendez makes him pay by landing a nice hook to the body before moving out of range.
Maia with a lazy takedown attempt
and Mendez counters with a left to the body.
Mendez listening to his corner there, landing a nice uppercut.
Maia with a poor takedown
letting Mendez counter with a right hand.
Maia with a lazy takedown attempt
and Mendez counters with a nice uppercut.
Mendez lands a jab.
Mendez lands with a nice body punch.
Maia gets his takedown attempt stuffed easily
and Mendez counters with a crisp hook to the side of the head.
Mendez throws out a powerful jab.
Maia shoots in looking for a takedown. Mendez tries to sprawl out of it but Maia keeps driving through. The fighters are pinned against the cage. Mendez manages to get underhooks and after a bit of a struggle, circles away and we're back to standing.

That's three minutes gone in the round.
Mendez thuds his right hand into Maia's forehead from close range. That could be painful for both fighters.
Maia fails with the takedown
and Mendez counters with a three punch combo that has Maia backing up. Maia nods at Mendez to acknowledge the strikes.
Mendez darts in and out, connecting with a jab.
Mendez takes a step towards his opponent and connects with a left hand, before circling away.
Maia gets his takedown attempt stuffed easily
and Mendez counters with a stiff right hand.
Maia gets his takedown attempt stuffed easily
and Mendez counters nicely by changing levels and landing a hook to the body.
Maia gets cracked with a nice right hand there by Mendez.
Maia looks like he's developed a pretty tasty lump over his left eye. He'll need to avoid taking much more damage to that.
Maia with a poor takedown
and Mendez counters with a crisp hook to the side of the head.
A decent looking cross lands there for Mendez.
The crowd are loving this. Great action here.
Maia takes an uppercut right on the button but keeps his composure.

That's four minutes gone in the round.
Maia misses with a takedown attempt
and Mendez counters with a crisp hook to the side of the head.
Maia moves forwards but Mendez connects with a nice, crisp jab.
Maia drops his hands momentarily and Mendez takes advantage with a crisp shot to the head.
Mendez lands a nice shot that snaps Maia's head back.
A right-left combo lands from Mendez.
Maia has his takedown stuffed
letting Mendez counter with a right hand.
Maia tries for a takedown but Mendez circles away easily
and Mendez counters with a lovely shot to the body.
Carlos Mendez is looking to keep the fight on the feet at all costs.
Mendez stuffs the takedown.
Maia with a lazy takedown attempt
and Mendez counters with a lovely shot to the body.
The crowd applaud the fighters' efforts here as the round comes to an end.
Maia tries for a takedown but Mendez circles away easily
and Mendez counters with a crisp hook to the side of the head.

Excellent takedown into side control there by Maia.
The ref warns both fighters not to hold the cage as they work up against the meshing.
Mendez is trying to improve his position.
And thats the end of the round the fighters go back to their corners.
Carlos Mendez dominated that round.
That's the end of the interval. I'm sure that seemed a lot quicker than a minute for our two fighters! Back to the action.

Mendez works his jab well there, keeping his opponent at a distance.
Jab from Mendez.
Horrible takedown attempt by Maia or perhaps it was just good defense by Mendez, which made it look bad.
Maia misses with an uppercut.
Mendez cracks Maia with an open hand slap.
Maia tries to clinch up
and Mendez counters with a crisp hook to the side of the head.
A right-left combo lands from Mendez.
We've had a slow start to the round here - hopefully the action picks up.
Maia shoots in with a takedown attempt and he has Mendez pinned against the cage. Mendez gets the underhooks and manages to circle away.
Maia throws a body kick that misses
and Mendez counters with a stiff right hand.
Mendez scores with the left hand. Maia knows he should have avoided that one.
That's one minute gone in the round.
Maia doesn't succeed with the takedown
and Mendez counters nicely by changing levels and landing a hook to the body.
That's three failed takedown attempts in the round for Jonathan Maia. That's going to take a lot out of him.
Maia throws an ugly left hook that misses
and Mendez counters nicely by changing levels and landing a hook to the body.
Maia throws an off balance right hand
and Mendez counters with a three punch combination, finished off with a leg kick. Nice work.
Maia throws a lazy uppercut
and Mendez counters with a one-two to the body.
Maia fails with the takedown
and Mendez counters with a stiff right hand.
Jonathan Maia seems to be the more aggressive standup fighter in this bout.
Mendez jabs Maia to the body, keeping him at a distance.
Mendez cracks Maia with a nice right hand that draws applause from the crowd.
Mendez wings a very wild body shot but it does the job and lands to the midsection.
We've seen a great period of action over the last minute or so - credit to both fighters for going all out!
Mendez dips down and scores with a jab to the body.
Maia shoots in but doesn't get the takedown
and Mendez counters with a crisp hook to the side of the head.
Maia misses with a left hand
and Mendez counters with a left and a right that stings Maia.
Maia misses with a left hand
and Maia takes a counter punch right on the button for his troubles.
That's two minutes gone in the round.
Maia tries for a takedown but Mendez circles away easily
and Mendez counters nicely by changing levels and landing a hook to the body.
Maia has his takedown stuffed
and Mendez cracks him with a counter punch right on the button.
Maia misses with a body shot
and Mendez counters with a left and a right that stings Maia.
Carlos Mendez seems to be getting the better of the standup.
Maia with a lazy takedown attempt
and Mendez counters with a straight punch to the midsection.
Mendez scores with a three punch combo!
Maia misses with a takedown
and Mendez counters with a nice body shot.
Mendez scores to the head and body with a nice combination!
Mendez cracks a nice hook into Maia's ribs.
Maia fakes high and shoots in for a takedown but Mendez avoids it really well and circles away.
That's three minutes gone in the round.
Mendez lands a jab.
Mendez goes to the watering hole and comes back with a big thumbs up from the judges as he scores a three punch combo.
Maia misses with a hook
and Mendez counters with a quick right hand to the jaw.
Maia needs to keep his hands up - Mendez had a free shot at his head there.
Maia tries to grapple but his opponent circles
and Maia takes a counter punch right on the button for his troubles.
Maia has his takedown stuffed
and Mendez counters with a crisp hook to the side of the head.
Maia with a lazy takedown attempt
enabling Mendez to counter with a crisp jab.
Maia misses with a takedown
and Mendez counters with a good right hand that lands right on the jaw.
That's four minutes gone in the round.
Mendez lands a right hook to the body.
This has been an exciting period of action!
A shot to the body from Maia misses
and Mendez counters with a nice body shot.
Maia thows a leg kick but Mendez checks it
and Mendez counters with a nice body shot.
Maia misses with a takedown attempt
and Mendez counters with a crisp hook to the side of the head.
Maia with a poor takedown
and Mendez counters with a nice body shot.
Both fighters are absolutely exhausted here.
Mendez moves into range and throws a combination. A nice jab followed by a hook to the body.
Maia doesn't succeed with the takedown
and Mendez counters with a nice uppercut.
Maia shoots and misses
and Mendez counters with a quick right hand to the jaw.
Mendez lands a nice looking body shot.
Mendez scores with a nice strike.
The crowd applaud the fighters' efforts here as the round comes to an end.
Mendez lands a nice looking body shot.
Maia throws an off balance right hand
and Mendez counters with a lovely straight right hand!
Mendez lands three nice shots there - that looked like it hurt!
Jab, cross, leg kick. Nice combination by Mendez!
And thats the end of the round the fighters go back to their corners.
Carlos Mendez showed his class in that round. I'd imagine he'll take it on all the scorecards.
The fighters' corners scream their final instructions, as the referee calls time. Here we go, back to the action! And we move into the final round!

Maia takes a punch to the jaw and another one to the bread basket.
Maia takes one to the side of the head.
Maia with a lazy takedown attempt
and Mendez counters nicely by changing levels and landing a hook to the body.
Mendez gets taken down but at least he's managed to land in guard.
Mendez wants to get back to his feet but Maia is in a dominant position and won't allow it.
Mendez looking for a sweep. Not yet Mendez, not yet.
Mendez is pulling down on Maia's head. It's preventing any offense from Maia, at least for the moment.
Mendez utilising some decent striking defenses from the guard, preventing the ground and pound.
The fighters are pressed up against the cage, both looking to find a bit of space to work.
We've had a slow start to the round here - hopefully the action picks up.
Maia won't allow Mendez to sweep him here.
Maia pressing down on his opponent's thigh, looking to pass guard. Mendez is keeping the position for now.
A big thud reverberates around the arena there as Maia accidentally thumps the mat. Hopefully he's not broken his hand.
We get told so often about how wrestlers don't like to be on their backs. Let's see if Mendez can do anything to dispel that myth.
Maia stopping the sweep attempt from Mendez.
Maia throwing strikes from guard but Mendez blocks nicely.
Maia won't allow Mendez to sweep him here.
That's one minute gone in the round.
Maia pushing down on Mendez's thigh, trying to pass to half guard. He's managed it... Nice work.
Maia missing with some ground and pound from the half guard.
Mendez has been the more effective fighter overall so far.
Maia wants to free his trapped foot but Mendez is holding on for dear life with his legs.

Maia is working for a kimura but Mendez is defending it quite comfortably.
Both fighters are breathing heavily.
Maia throwing shots but Mendez is blocking nicely.
Maia is thinking about going for an arm triangle but he can't free his leg.
Mendez tries to get to full guard but Maia has control of the leg.
Mendez really doesn't want to stay on the ground with Maia. If he can't get it back to his feet, it's only a matter of time before he'll be tapping out.
Maia is thwarting Mendez's attempts to control the position.
Mendez is looking to improve his position.
Mendez is trying to maintain the position but Maia is very close to passing his half guard.
Carlos Mendez is fighting for a decision - hopefully he's judged it right and he's actually winning the fight.
That's two minutes gone in the round.
Maia is looking for a kimura but he's never going to get it from there.
Mendez is positioning himself well to prevent Maia advancing to mount.
Maia seems to be working for a kimura but Mendez defends the submission attempt.
Maia is looking for a kimura. It's going to be difficult to finish that from half guard though and Mendez defends it well.
Maia missing with some ground and pound from the half guard.
Jonathan Maia overall seems to be getting the better of the ground position in the fight so far.
Mendez is concentrating on defense, preventing Maia from advancing position.
Maia is thinking about going for an arm triangle but he can't free his leg.
Maia is working for a kimura but Mendez is defending it quite comfortably.
Mendez is looking to control Maia's leg but it's slowly edging free. Can Mendez avoid being mounted?
That's three minutes gone in the round.
Mendez tries to roll over but Maia keeps him under control.
Maia is trying to work for a kimura. This could be trouble! No, Mendez has managed to free his arm - good work.
Mendez wants to get back to full guard.
Maia seems to be looking for submissions.
Maia is thinking about going for an arm triangle but he can't free his leg.
Mendez is looking for a sweep. Maia is wise to his cunning plan and keeps the top position.
Mendez is doing well to avoid being mounted. He's controlling the position at the moment.
Mendez wants to improve his position but Maia is controlling well.
Maia throwing shots but Mendez is blocking nicely.
That's four minutes gone in the round.
Maia is trying to work for a kimura but Mendez is defending well.
Maia is looking for a kimura. It's going to be difficult to finish that from half guard though and Mendez defends it well.
Maia not throwing his punches with enough precision this time.
Mendez preventing any damage for now, controlling his opponent's head.
Mendez tries to get to full guard but Maia has control of the leg.
The crowd thankful this round is nearly over.
Mendez wants to control but Maia is keeping busy and won't allow it.
Mendez avoiding damage under a succession of punches from Maia.
Mendez is looking to control Maia's leg but it's slowly edging free. Can Mendez avoid being mounted?
Jonathan Maia has stepped it up - he knows he needs a finish here!
Maia wants to control but Mendez is keeping him busy.
And that's the end of the fight!
Jonathan Maia showed his dominance in that final round.
I think Mendez has won this one but let's see whether the judges agree with me. Over to the ring announcer for the scorecards.
Ladies and gentlemen, after 3 rounds of action, we go to the scorecards for a decision.
Judge Bart Greer scores the fight 26:29
Judge David Hoff scores the fight 26:29
Judge Winston Alpacca scores the fight 26:29
In favor of your winner, by unanimous decision... Carlos Mendez!
|
|
|
|
|
|
|
|
|
|
|
|
|
|
|
|
|
|
|
|
|
|
|
| S |
C
A |
G |
S |
C
B |
G |
|
S |
C |
G |
|
energy
A | B |
|
hype
A | B |
|
pop
A | B |
|
mgr
A | B |
|
FIGHT
RATING
73% |
|
|
|
|
|
|
