|
|
PBP Commentary |
Coming up we have a middleweight MMA rules bout between Mo Riggins (ranked 0 p4p, 0 weight class) and Han Solo (ranked 0 p4p, 0 weight class). Both these guys have really solid chins. Will we see a standup war or will they both decide that a knockout is unlikely and try to win the fight elsewhere?
 |
|
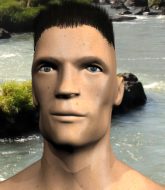 |
| 185 cm
19
194 lbs
2 - 2 - 0 |
|
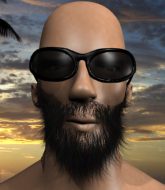
185 cm
21
183 lbs
4 - 7 - 0 |
BJJ Blue Belt
Solid boxing
Good chin |
|
BJJ Blue Belt
Brawler
Granite chin |
|
| |
|
Ladies and gentlemen. This fight is 3 rounds, in the middleweight division.
Introducing the fighter to my left, fighting out of the red corner.
With a record of
2 - 2 - 0, fighting out of Sydney, Mo Riggins!
And introducing the fighter to my right, fighting out of the blue corner.
With a record of
4 - 7 - 0, fighting out of Sydney, Han Solo!
The judges for this bout are Damien Edna, Hugh Johnson and Skip Squint.

The bell rings for round one and we are underway!
Riggins lunges in with swinging rights and lefts but Solo circles away quickly and effectively.
Riggins fails to land with a series of punches.
Oooh a lovely combination from Riggins sends Solo down but not out. Riggins dives into side control looking to finish.

It looks like Han Solo has been cut.
We've seen a great period of action over the last minute or so - credit to both fighters for going all out!
Riggins wants to lay and pray for a moment but Solo keeps working.
Solo is trying to control Riggins's posture but Riggins avoids it.
Solo is trying to get back to half guard.
Riggins trying to control the position but Solo is working away.
Riggins staying calm.

Riggins has had enough of the ground for now and decides to stand.

That's one minute gone in the round.
Riggins misses with a jab and misses with a cross straight after too.
Riggins looks to score with a combo but nothing lands.
Riggins tries to bum rush Solo with a series of wild strikes but Solo uses good footwork to avoid the assault.
Solo showing good head movement there, avoiding the strikes from Riggins.
Riggins swinging wilding here.
Solo drops his hands and takes a jab to the jaw for his troubles.
Riggins throws a jab when Solo was well out of range.
Riggins throws a low kick, looking for Solo's leg but Solo calmly moves out of range.
Solo slips a jab and a cross from Riggins.
Mo Riggins is looking to keep the fight on the feet at all costs.
Solo showing good head movement there, avoiding the strikes from Riggins.
Riggins throws a nice looking combination but Solo bobs and weaves to avoid any damage.
Solo misses with a half-hearted attempt at a head kick.

That's two minutes gone in the round.
Solo misses with a jab and misses with a cross straight after too.
Solo checks the leg kick.
Riggins throws a series of punches but Solo avoids them all with ease.
Mo Riggins seems to be the more aggressive standup fighter in this bout.
Riggins throws a right hand that Solo ducks under and follows up with a left that Solo also avoids with ease.
Riggins is breathing heavily.
Riggins lands a nice hook to Solo's body. Solo takes it in his stride and looks to land his own strikes.
Riggins throws a right hand that Solo ducks under and follows up with a left that Solo also avoids with ease.
Solo swings away but doesn't land with a series of punches.
Solo showing good head movement there, avoiding the strikes from Riggins.
Solo misses with a two punch combination.
A big left from Riggins misses.
Riggins throws a combination but comes up with nothing but fresh air.
Solo throws a wild combination but nothing lands.
Solo scores with a nice one two combo and darts back out of range to avoid anything coming in the opposite direction.
Riggins moving in and out of range nicely, whilst landing the scoring shot.
Riggins dips down and scores with a jab to the body.
Riggins swings away but doesn't land with a series of punches.
Solo tries to close the distance and clinch up but Riggins swats him away and circles back towards the center.

That's three minutes gone in the round.
Riggins will need to tighten up his combinations if he doesn't want to gas himself out, swinging at thin air.
Riggins throws out a powerful jab.
Riggins lands a jab, followed by a cross and another cross, as Solo backs up against the cage.
No joy there for Riggins, who threw a few shots but didn't land.
Riggins fails to land with the punch combination there - jab, cross, hook, miss, miss, miss.
Riggins avoids a lazy jab quite easily.
Riggins fails to land with the punch combination there - jab, cross, hook, miss, miss, miss.
Solo shoots in for a takedown. "I don't think so" says Riggins as he avoids it easily.
Riggins throws a combination that misses

and Solo decides to take the opportunity to score a takedown. He's landed in Riggins's guard.
Riggins keeping full guard, as Solo tries to pass.
Riggins is doing well to control the posture of his opponent and prevent any damage.
Solo postures up.
The fighters are pressed up against the cage, both looking to find a bit of space to work.

That's four minutes gone in the round.
Riggins pulls Solo in close to his closed guard and prevents Solo from doing any damage or advancing position.
Solo postures up.
Solo throws a strike but Riggins rolls with it and manages to sweep. Now he's in guard on top.
Riggins seems content to control from guard here. He's going to have to remain active though if he doesn't want to get stood back up.
The fans in attendance giving it up for the two fighters, who have really let it all hang out in the last minute or so!
As the round comes to an end the crowd are showing their appreciation for a great round of action.
Riggins's ground tactics aren't going to win him many fans. Let's hope he's got fireworks for us if he gets back to his feet because he's not doing much on the ground.
And thats the end of the round the fighters go back to their corners.
Mo Riggins dominated that round.
The cut man is working on Han Solo's cut.
The fighters' corners scream their final instructions, as the referee calls time. Here we go, back to the action!

Solo dodges the punch combination from Riggins.
Riggins throws a wild combination but nothing lands.
Riggins throws a series of punches but Solo avoids them all with ease.
Solo has his head slapped from side to side by a 3 punch combination. That must have hurt him.
A punch combination from Riggins misses.
Riggins scores with a jab.
Riggins looking to take his opponent's legs away with the low kicks.
Riggins with a body punch. A glancing blow.
Mo Riggins is looking to throw some combinations by the looks of things.
This has been an exciting period of action!
Riggins closes the distance and lands a one-two.
Riggins dips down and scores with a jab to the body.
Solo takes a really solid shot there but just smiles back and shrugs his shoulders.
Riggins throws a right and a left that Solo avoids nicely.
Riggins lands a left and a right that sends Solo crashing to the canvas! Riggins dives into mount looking to finish!

Solo is rocked!
Solo is desperately trying to get back to half guard.
Both fighters are absolutely exhausted here.
Riggins controlling his opponent.
That's one minute gone in the round.
Riggins has controlled the position for a good 20 seconds, which will no doubt be starting to frustrate his opponent.
Solo looking to escape from mount but he's given up his back!
You know, I was talking to some of our celebrities at ringside tonight and they were split right down the middle on who was going to win this fight.
Riggins not allowing Solo to control his hands.
That's two minutes gone in the round.
My god... these two guys really need to pick up the pace or everyone will leave to go get a beer.
Riggins biding his time, looking for the opening.
Solo looking very determined here, making life difficult for Riggins.
You know, I was talking to some of our celebrities at ringside tonight and they were split right down the middle on who was going to win this fight.
The ref warns both fighters not to hold the cage as they work up against the meshing.
Solo prevents Riggins from getting a body triangle.
That's three minutes gone in the round.

The referee stands the fighters back up. Mo Riggins just wasn't active enough from the dominant position.
Riggins scores to the head and body with a nice combination!
Riggins is really dominating this fight. Is there anything that Solo can do to turn this around?
Riggins lands a nice leg kick that just misses Solo's sensitive parts.
Riggins throws a leg kick but Solo sees it coming and moves out of range.
Riggins lands with a big right hook that stumbles Solo - he's out on his feet here! Riggins follows up with another monster hook that separates Solo from consciousness! Solo falls, almost in slow motion to the canvas! Riggins stands and admires his work as the crowd go wild.
Ladies and gentlemen, after 3:27 of round 2, we have a winner by way of KO (Punches). Mo Riggins!
|
|
|
|
|
|
|
|
|
|
|
|
|
|
|
|
|
|
|
|
|
|
|
| S |
C
A |
G |
S |
C
B |
G |
|
S |
C |
G |
|
energy
A | B |
|
hype
A | B |
|
pop
A | B |
|
mgr
A | B |
|
FIGHT
RATING
64% |
|
|
|
|
|
|
