|
|
PBP Commentary |
Coming up we have a featherweight MMA rules bout between Juan Hicks (ranked 0 p4p, 0 weight class) and Kaziro Satomi (ranked 0 p4p, 0 weight class). Over to our ring announcer for the fighter introductions!
 |
|
 |
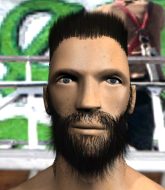
| 183 cm
20
151 lbs
1 - 2 - 0 |
|
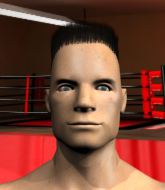
172 cm
25
155 lbs
0 - 0 - 0 |
BJJ Blue Belt
Counter fighter
Cuts easily |
|
BJJ Blue Belt
Brawler
Likes musicals |
|
| |
|
Ladies and gentlemen. This fight is 3 rounds, in the featherweight division.
Introducing the fighter to my left, fighting out of the red corner.
With a record of
1 - 2 - 0, fighting out of Tokyo, Juan Hicks!
And introducing the fighter to my right, fighting out of the blue corner.
With a record of
0 - 0 - 0, fighting out of Tokyo, Kaziro Satomi!
The judges for this bout are Kenichi Hosakawa, Shigeki Fujiwara and Shirou Masuda.

The bell rings for round one and we are underway!

Satomi shoots in for a takedown and gets it.
Hicks punching from the bottom.
Hicks is trying to maintain the position but Satomi is very close to passing his half guard.

Hicks looking to work for a kimura from the bottom.
Hicks wants to get back to his feet.
Hicks looking for submissions off his back.
Hicks is refusing to be controlled, as Satomi sits in half guard.
We've had a slow start to the round here - hopefully the action picks up.

Satomi is sneakily working for an arm triangle but Hicks sees it coming and defends easily.
Satomi wants to lay and pray for a moment but Hicks keeps working.

That's one minute gone in the round.
Hicks misses with some strikes from the bottom.
Hicks is looking to sinch up a guillotine here but Satomi pulls his head out easily.

Satomi gets to his feet - back to striking we go!
Satomi scores with a jab to the jaw.

It looks like Juan Hicks has been cut.
Satomi fails with a takedown attempt.
Satomi buckles his opponent's knee momentarily with a nice leg kick.

Hicks darts in and clinches Satomi up against the cage.

That's two minutes gone in the round.

Satomi pushes off and circles away, back to the middle of the mat.
Satomi fails with a takedown attempt.
Satomi closes the distance and clinches up, looking for a takedown. He shifts his weight and gets a nice trip into half guard.
Neither fighter is being very active at the moment, with Satomi in particular looking to stall.
Hicks looking to work for a kimura from the bottom.
Hicks looking for submissions off his back.

That's three minutes gone in the round.
Hicks is pressing down on Satomi's left leg trying to get back to full guard. He's managed it.
Hicks really does look like a pencil wearing a pair of gloves. Let's hope he has a gameplan to suit that ridiculous body shape.
Hicks has his foot on Satomi's thigh. He's trying to push off and get in position for a triangle, I think. Satomi works his way back into a safe position though.
Hicks working for submissions but it's allowed Satomi to get to half guard.
Satomi is pressing down on Hicks's thigh, looking to free his foot. Hicks is holding on for now.
Satomi trying to control the action but Hicks is working from the bottom.
Satomi is in a good position here but he's just trying to control... And he's not even managing to do that successfully.
Satomi stops Hicks from getting back to his feet.

That's four minutes gone in the round.
A lull in the action here being met with boos from the crowd.
Satomi lands with a punch from half guard.
Satomi is taking a breather. Hicks says something to him but it's hard to make out. Perhaps he's telling him to get on with it and actually do something.
Hicks tries to get to full guard but Satomi has control of the leg.
Hicks has hold of Satomi's hands but Satomi slips his arm to the side and lands an elbow.
Hicks actively working from the bottom here.
Hicks is not content to let Satomi control the position.
Boooooooooooooooooooo!!! God, this has been a terrible round. Come on you two, sort yourselves out!
Hicks looking for subs from the bottom but Satomi mounts him!
And thats the end of the round the fighters go back to their corners.
Kaziro Satomi dominated that round.
The cut man is working on Juan Hicks's cut.
The referee calls time. The cornermen exit stage left and we're back to business.

Satomi throws a right hand that Hicks ducks under and follows up with a left that Hicks also avoids with ease.
Hicks avoids the head kick by Satomi.
Satomi gets a takedown into half guard.
Hicks actively working from the bottom here.

Hicks kicks Satomi off and gets back to his feet.
Satomi pivots as if he's going to throw a leg kick but stops half way.
We've had a slow start to the round here - hopefully the action picks up.
Satomi avoids the clinch attempt nicely.
Satomi fails with a takedown attempt.
Hicks drops down looking for a counter takedown but Satomi sprawls and moves away.
That's one minute gone in the round.
Satomi shoots in for a takedown. "Ole!" shouts Hicks as he jumps to the side.

Satomi gets in close and instigates a clinch.
Satomi tries to pull guard but Hicks won't allow it.
Juan Hicks has stuffed three takedown attempts in the round now. That's going to take a lot out of Kaziro Satomi.
Hicks tries to land a shot to the body but it's blocked.

Hicks manages to pull guard. Let's see whether he can land a sub off his back.
Hicks is looking to stand up but Satomi isn't so interested in that idea.
Hicks keeping moving, preventing Satomi from controlling successfully.
Satomi landing some decent shots from guard.
That's two minutes gone in the round.
Hicks looking to sweep here. No luck so far.
Hicks is working the butterfly guard. He manages to land a nice scissor sweep and is now in half guard on the top. Nice move.

Satomi keeping his head moving to avoid the ground and pound.
Hicks looking for a kimura but he'll have to free his other leg if he wants to finish that. Perhaps he's just using it as a distraction technique.
Hicks looks to score some points with some ground and pound.
That's three minutes gone in the round.
Satomi looking for submissions from an awkward position here.
Hicks thows a huge punch but Satomi dodges it nicely.

Satomi kicks Hicks off and gets back to his feet.
Satomi swings wildly with a couple of big hooks
and Hicks counters with a left to the body.
Hicks wants to clinch.
Satomi shoots and misses
and Hicks holds on and brings the fighters into a clinch.
Hicks lands a short shot on the inside that snaps the head of Satomi backwards.
That's four minutes gone in the round.
Hicks can't find room to land a body shot as Satomi controls the action.
Satomi breaks from the clinch.
A really sloppy takedown attempt there from Satomi.
Hicks throws a big counter combination but Satomi scrambles out of danger and avoids any damage.
Satomi is breathing heavily.
Satomi clinches with his opponent.
Hicks doesn't land with the attempted body shot.
Some stalling of biblical proportions here from Satomi.
The crowd thankful this round is nearly over.
Hicks can't find room to land a body shot as Satomi controls the action.
Hicks misses with a punch to the body.
Hicks has Satomi pressed up against the cage. He's trying to work for a single leg takedown. Hicks pulls back from the cage and twists to the side, sending Satomi tumbling to the mat - Hicks dives into Satomi's guard.
And thats the end of the round the fighters go back to their corners.
Juan Hicks dominated that second round.
The cut man is working on Juan Hicks's cut.
OK. That's time! The bell goes and we're back to the action. This is the final round!

Satomi clinches.
The referee calls for Hicks to work.
Knees to the body from Hicks.
Hicks is trying to pull guard but Satomi has him pressed against the cage.
Satomi gets control of Hicks's arms and successfully pulls guard. Satomi will no doubt be looking for submissions off his back.
The ref warns both fighters not to hold the cage as they work up against the meshing.
We've had a slow start to the round here - hopefully the action picks up.
Satomi wants to sweep but no luck.
Hicks content to strike from guard, landing some decent shots.
Hicks with a flurry of punches that miss.
Hicks won't allow Satomi to sweep him here.
That's one minute gone in the round.
Hicks stands up over Satomi, holding his feet. He dives back in and lands a decent shot to the head.
Hicks won't allow Satomi to sweep him here.
Hammerfist, elbow! yells Hicks's corner. There ya go! There ya go!
Hicks landing with the ground and pound.
Satomi has his foot on Hicks's thigh. He's trying to push off and get in position for a triangle, I think. Hicks works his way back into a safe position though.
Hicks will need to keep those long limbs tucked in whilst he's on the ground, to prevent any submissions.
Hicks stopping the sweep attempt from Satomi.
Hicks postures up and lands a big shot to Satomi's brow.
There's a bit of a scramble here and now Satomi is on top in guard.

Satomi takes a big intake of breath there - he's definitely tired.
Hicks throws a couple of shots from the bottom but they don't land.
Hicks is trying to control the position from the bottom.
That's two minutes gone in the round.
Satomi tries to stand but Hicks is controlling from the bottom.
Hicks has his foot on Satomi's thigh. He's trying to push off and get in position for a triangle, I think. Satomi works his way back into a safe position though.
Satomi slows down the pace of the fight, as he sits in guard.
Hicks has been looking to land a fair amount of strikes on the ground. He might be looking to soften his opponent up in order to work for a submission.
Satomi is looking to work some ground and pound but Hicks has wrist control.
Hicks throwing his legs up looking for a triangle.
Hicks wants to get back to his feet but Satomi is in a dominant position and won't allow it.
Hicks keeping moving, preventing Satomi from controlling successfully.
That's three minutes gone in the round.
Satomi cracks Hicks with a solid left hand.
Hicks looking for submissions from the bottom but instead Satomi passes into side control.
Satomi grinds an elbow into Hicks's temple.
Hicks struggling a bit here.
Hicks is looking to reverse the position.
Hicks tries to wriggle free to get back to his feet but he's given up his back! Oops.
Satomi controls the action.
That's four minutes gone in the round.
Hicks is really stuck here.
Satomi punishes Hicks with strikes from the back mount.
Hicks trying to control the action but Satomi just sinks the hooks in.
I would not like to be Hicks right now.
The crowd hopeful of a finish here - Satomi's supporters are on their feet, screaming for him to go for the rear naked choke.
Boooooooooooooooooooo!!! God, this has been a terrible round. Come on you two, sort yourselves out!
Satomi keeps control of the position as Hicks tries to break free.
Hicks looking very determined here, making life difficult for Satomi.
And that's the end of the fight!
Kaziro Satomi comfortably won the final round on my scorecard.
I think Satomi has won this one but let's see whether the judges agree with me. Over to the ring announcer for the scorecards.
Ladies and gentlemen, after 3 rounds of action, we go to the scorecards for a decision.
Judge Kenichi Hosakawa scores the fight 28:29
Judge Shigeki Fujiwara scores the fight 28:29
Judge Shirou Masuda scores the fight 28:29
In favor of your winner, by unanimous decision... Kaziro Satomi!
|
|
|
|
|
|
|
|
|
|
|
|
|
|
|
|
|
|
|
|
|
|
|
| S |
C
A |
G |
S |
C
B |
G |
|
S |
C |
G |
|
energy
A | B |
|
hype
A | B |
|
pop
A | B |
|
mgr
A | B |
|
FIGHT
RATING
32% |
|
|
|
|
|
|
