|
|
PBP Commentary |
Coming up we have a light heavyweight MMA rules bout between Bryan Mayhem (ranked 0 p4p, 0 weight class) and Daiki Yamaguchi (ranked 0 p4p, 0 weight class). Bryan Mayhem has the edge in experience - let's see if he can make that count tonight.
 |
|
 |
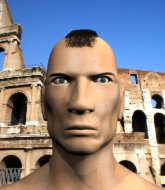
| 180 cm
26
223 lbs
8 - 0 - 0 |
|
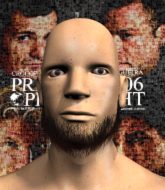
185 cm
27
215 lbs
1 - 2 - 0 |
Good wrestling
Counter fighter
KO power |
|
Good wrestler
Excellent boxer
Granite chin |
|
| |
|
Ladies and gentlemen. This fight is 5 rounds, for the light heavyweight championship of the world!
Introducing the champion to my left, fighting out of the red corner.
With a record of
8 - 0 - 0, fighting out of Helsinki, Bryan Mayhem!
And introducing the challenger to my right, fighting out of the blue corner.
With a record of
1 - 2 - 0, fighting out of Las Vegas, Daiki Yamaguchi!
The judges for this bout are Paul Tew, Steven Brown and James Atkins.

The bell rings for round one and we are underway!
Yamaguchi looks to land a left hand but Mayhem moved out of range nicely.
Mayhem half commits to a counter takedown before pushing away, out of range.
Yamaguchi throws a hook to the side of Mayhem's head but Mayhem sees it coming and ducks under it beautifully.
As Yamaguchi tries to get set, Mayhem tries to push him back and clinch up but Yamaguchi manages to avoid the attempt.
Mayhem moves in looking to clinch but Yamaguchi pushes him off.
Mayhem avoids the body shot from Yamaguchi.
As Yamaguchi tries to get set, Mayhem tries to push him back and clinch up but Yamaguchi manages to avoid the attempt.
Nice sprawl there from Yamaguchi as Mayhem shoots in.
We've had a slow start to the round here - hopefully the action picks up.
Mayhem avoids a lazy jab quite easily.

Mayhem forces Yamaguchi back against the cage and clinches.
Yamaguchi fails to land with a short punch on the inside.

That's one minute gone in the round.
Mayhem has a body lock and is looking for a takedown. Yamaguchi is bouncing around trying to prevent the takedown and somehow he has indeed managed to stay on his feet.
Mayhem misses with a punch to the body.
Yamaguchi fails to land with a short punch on the inside.

Mayhem gets control of Yamaguchi's arms and successfully pulls guard. Mayhem will no doubt be looking for submissions off his back.
Mayhem trying to control the position.
The ref warns both fighters not to hold the cage as they work up against the meshing.
Yamaguchi content to stall in guard here.
Mayhem controls Yamaguchi momentarily but Yamaguchi frees himself.
Mayhem seems keen to control Yamaguchi's posture.

That's two minutes gone in the round.
There's not a lot going on here and the crowd are letting the fighters know they're not willing to tolerate a lack of action.
Mayhem wants to sweep but no luck.
Yamaguchi is fighting to break Mayhem's control of his arms but Mayhem is doing a good job of controlling the position at the moment.
Mayhem is working an open guard here, looking to improve his position. No doubt that will leave him open to counters but at least he's being more offensive.
The referee must be thinking about standing these guys back up.
Mayhem manages to sweep nicely, so he's now on top. Yamaguchi manages to get himself to full guard.

Mayhem working some ground and pound from guard but it's not doing any damage.
Yamaguchi wants to sweep here but Mayhem controlling him for the moment.
Mayhem content to stall in guard here.

That's three minutes gone in the round.
Mayhem wants to control from the top but Yamaguchi keeps moving.
Yamaguchi has Mayhem pulled in close to control his posture.
We get told so often about how wrestlers don't like to be on their backs. Let's see if Yamaguchi can do anything to dispel that myth.
Mayhem trying to control the position from guard on top but Yamaguchi is wriggling around, looking for whatever he can.
Mayhem stands up over Yamaguchi, holding his feet. He dives back in and lands a decent shot to the head.
Mayhem postures up to throw the ground and pound strikes but they don't connect.
Mayhem connects with a couple of short punches.
Mayhem trying to control the position from guard on top but Yamaguchi is wriggling around, looking for whatever he can.

That's four minutes gone in the round.
A few boos can be heard. I'm sure they will multiply if the fighters don't pick up the pace.
Mayhem postures up in Yamaguchi's guard and throws a big left but Yamaguchi blocks it.
Yamaguchi really doesn't want to stay on the ground with Mayhem. If he can't get it back to his feet, it's only a matter of time before he'll be tapping out.
Mayhem preventing the sweep.
Mayhem throwing elbows and punches but not connecting, as Yamaguchi works some decent striking defense from the bottom.
Mayhem has been looking to land a fair amount of strikes on the ground. He might be looking to soften his opponent up in order to work for a submission.
Yamaguchi working the defensive guard well to avoid strikes from Mayhem.
Mayhem landing with the ground and pound.
Yamaguchi preventing the ground and pound from doing any damage.
Mayhem forces his way into half guard.
Boooooooooooooooooooo!!! God, this has been a terrible round. Come on you two, sort yourselves out!
Yamaguchi is in trouble now - Mayhem has advanced to mount!
The fighters are pressed up against the cage, both looking to find a bit of space to work.
Mayhem punishing his opponent with strikes.
And thats the end of the round the fighters go back to their corners.
Bryan Mayhem dominated that round.
The fighters' corners scream their final instructions, as the referee calls time. Here we go, back to the action!

Mayhem will have to do better than that with his takedown attempts.
Yamaguchi throws a nice hook to the body that draws an oooh from the crowd.
Mayhem is looking light on his feet compared to last time was saw him fight.
Mayhem wants to clinch up but Yamaguchi keeps it at a distance.
Despite the aggression on Yamaguchi's face he doesn't fully commit to the counter.
Mayhem ducks under a wild hook from Yamaguchi.
Yamaguchi throws a right and a left that Mayhem avoids nicely.
We've had a slow start to the round here - hopefully the action picks up.
Mayhem swings for the body but Yamaguchi moves out of range.
Yamaguchi ducks down and throws a hook to the body but Mayhem moves away.
That's one minute gone in the round.
Yamaguchi throws a series of punches but Mayhem avoids them all with ease.
Yamaguchi misses with a few strikes there.
Yamaguchi scores with a nice head shot.
Yamaguchi swats away the attempt to clinch by Mayhem.
Mayhem moves out of range as Yamaguchi strikes.
Mayhem moves away from the strike by Yamaguchi.
That's two minutes gone in the round.
Mayhem rushes Yamaguchi and pushes him back against the cage in a clinch.
Mayhem is looking for a takedown up against the cage. Yamaguchi gets underhooks though and prevents the takedown attempt.
A short uppercut from Yamaguchi.
Mayhem blocking some punches.
Yamaguchi misses with a hook to the ribs.
Mayhem pulls guard.
Yamaguchi throwing strikes but missing.
Bryan Mayhem overall seems to be getting the better of the ground position in the fight so far.
Mayhem is doing well to control the posture of his opponent and prevent any damage.
Yamaguchi stopping the sweep attempt from Mayhem.
That's three minutes gone in the round.
Mayhem is working the butterfly guard. He manages to land a nice scissor sweep and is now in half guard on the top. Nice move.
Mayhem looks to score some points with some ground and pound.
Mayhem not landing any meaningful shots this time.
Nice strikes from Mayhem there.
Yamaguchi on the receiving end of some nice ground and pound.
Mayhem thumps the canvas. Not on purpose obviously - he just missed Yamaguchi's head.
Mayhem works his foot free and advances to mount.
Mayhem is really dominating this fight. Is there anything that Yamaguchi can do to turn this around?
Mayhem lands a nice shot to the head.
That's four minutes gone in the round.
Yamaguchi tries to lock up and control but Mayhem gives him a forearm to the face and pushes him away.
Mayhem trying to control but he's not successful this time.
Mayhem breaks from Yamaguchi's wrist control and lands an elbow.
Mayhem fakes a shot to the body and cracks his opponent in the head. Nice ground and pound there!
We've seen a great period of action over the last minute or so - credit to both fighters for going all out!
Mayhem breaks from Yamaguchi's wrist control and lands an elbow.
Mayhem softens up his opponent with a couple of shots there and then CRACK! One massive shot lands there and Yamaguchi is out cold! Mayhem jumps to his feet and celebrates on the cage with the fans, who are, quite frankly, going absolutely mental!
Ladies and gentlemen, after 4:52 of round 2, we have a winner by way of TKO (Strikes). Bryan Mayhem!
Bryan Mayhem retains his light heavyweight title!
Bryan Mayhem took to the microphone after his victory and thanked his sponsors, Irish Collar & Elbow Nutrition and Laundry for their support in the buildup to the fight.
The defeated Daiki Yamaguchi had this to say: 'Sepukku!!!'.
|
|
|
|
|
|
|
|
|
|
|
|
|
|
|
|
|
|
|
|
|
|
|
| S |
C
A |
G |
S |
C
B |
G |
|
S |
C |
G |
|
energy
A | B |
|
hype
A | B |
|
pop
A | B |
|
mgr
A | B |
|
FIGHT
RATING
29% |
|
|
|
|
|
|
