|
|
PBP Commentary |
Coming up we have a welterweight MMA rules bout between Carl Moon (ranked 0 p4p, 0 weight class) and Dre Day (ranked 0 p4p, 0 weight class). Dre Day will no doubt be trying to keep this one on the feet, where he has a distinct advantage.
 |
|
 |
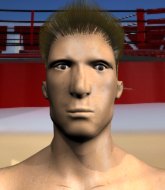
| 168 cm
22
177 lbs
1 - 0 - 0 |
|
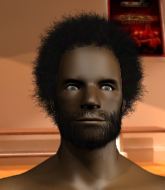
190 cm
25
170 lbs
0 - 0 - 0 |
BJJ Blue Belt
Counter fighter
Likes comics |
|
BJJ Blue Belt
Brawler
Solid chin |
|
| |
|
Ladies and gentlemen. This fight is 3 rounds, in the welterweight division.
Introducing the fighter to my left, fighting out of the red corner.
With a record of
1 - 0 - 0, fighting out of Los Angeles, Carl Moon!
And introducing the fighter to my right, fighting out of the blue corner.
With a record of
0 - 0 - 0, fighting out of Los Angeles, Dre Day!
The judges for this bout are Jack Bonds, Frank Antenori and Don Winkell.

The bell rings for round one and we are underway!

Day moves into range and clinches up with Moon.
Day is looking to take this one to the mat.
Moon working hard to break the clinch.
Moon wants to break the clinch but can't.
Day is working for a takedown up against the cage. He can't get it on this occasion though.
Day has hold of a leg and is looking for a trip takedown. Moon avoids it nicely though and we remain in the clinch.
Carl Moon has stuffed three takedown attempts in the round now. That's going to take a lot out of Dre Day.

Moon manages to break the clinch.
Day thuds his right hand into Moon's forehead from close range. That could be painful for both fighters.
Day fails with a takedown attempt.
A quick step to the side and Moon tries to counter with a shot to the body but it doesn't connect.
We've had a slow start to the round here - hopefully the action picks up.
Day shoots in but no luck this time.
Day fails with a takedown attempt.
Moon appears to be looking for a counter punch to the body.

That's one minute gone in the round.
Day fails with a rather predictable takedown attempt.
A quick step to the side and Moon tries to counter with a shot to the body but it doesn't connect.
Moon defends well against a solid takedown attempt from Day.
Day gets in close and instigates a clinch.
Moon could do with losing a few pounds - he looks very soft around the mid section, to put it politely.

Moon drags the fight down to the ground.

Moon looking for submissions from the bottom here. Moving his hips around, possibly looking for an armbar.
Moon has control of Day's left arm, preventing Day from doing any damage.

Moon pushes Day off and gets back to his feet.
Day shoots in looking for a double leg takedown. Moon defends it nicely.

That's two minutes gone in the round.
Day looks frustrated there after his takedown attempt is stuffed easily.
Day misses with a takedown attempt
and Moon counters with a nice jab to the body that keeps Day thinking.
Day looks winded!
Day throws a one two combo.
This has been an exciting period of action!
Day tries to clinch there but Moon circles away.
Day tries to clinch up against the cage, rushing in to close the distance. Moon manages to break the clinch and circles back to the middle of the mat.
Moon throws a loose over hand right and dives in with a double leg takedown. Day tries to sprawl but it's too late and the fighters hit the mat. Moon is in Day's guard.
Moon is working the ground and pound from guard. He might want to try advancing position though to get more of an impact.
The ref warns both fighters not to hold the cage as they work up against the meshing.
Day has a closed guard, preventing Moon from standing up.
Moon has been looking to land a fair amount of strikes on the ground. He might be looking to soften his opponent up in order to work for a submission.

Moon stands up and waves to Day to follow him.

That's three minutes gone in the round.
Day tries to grapple but his opponent circles
and Moon connects with a straight left hand counter down the middle.
Moon looking to score a takedown here. Day is defending well but Moon drives through and ends up in Day's guard.

Day manages to wriggle out and sneak his way back up to his feet, so the fighters are now clinched up against the cage.
Moon with the Thai clinch. He's looking to land a big knee but he's not managed it this time.
Moon has had enough of the clinch but Day keeps him there for the moment.
Moon manages to pull guard. Let's see whether he can land a sub off his back.
Day throwing strikes but missing.
Moon is trying to stand up but he's not managed so far.

That's four minutes gone in the round.
Moon wants to control here, rather than go for any submissions from the bottom. At least for now.
Day trying to control the position from guard on top but Moon is wriggling around, looking for whatever he can.
Moon wants to stand and escape but Day is having none of it.
Day trying to control the position from guard on top but Moon is wriggling around, looking for whatever he can.
Moon pulls Day in close to prevent any damage.
The referee is pacing around the two fighters - he looks like he's thinking about a standup.
Moon is trying to stand up but he's not managed so far.

The referee has decided to stand the fighters back up, so we'll restart on the feet.
Moon has a takedown stuffed.
And thats the end of the round the fighters go back to their corners.
Carl Moon dominated that round.
That's the end of the interval. I'm sure that seemed a lot quicker than a minute for our two fighters! Back to the action.

Day tries to close the distance and clinch up against the cage but Moon paws at him with a jab and circles away.
Moon darts in and lands a nice takedown into half guard.
Day manages to create a bit of space in order to work his way back to his feet. Moon keeps hold of his opponent and drives him back against the cage.
Moon is trying to force a seperation but Day has the dominant position.
Day tries for a takedown. No joy.
Both fighters working to control the clinch.
Moon is trying to break the clinch but Day is controlling him.
We've had a slow start to the round here - hopefully the action picks up.
Day is looking to control Moon's arms but Moon gets an underhook and turns him. Now Day has his back to the cage.
Moon tries to pull guard but Day forces him back to his feet, against the cage.
Moon goes for a takedown attempt but Day pushes him away and we're back to fighting at a distance.
Day doesn't succeed with the takedown

and Moon holds on and brings the fighters into a clinch.
That's one minute gone in the round.
Day is looking for a takedown.
Carl Moon has stuffed three takedown attempts in the round now. That's going to take a lot out of Dre Day.
Moon jumps guard but Day turns him against the cage and keeps the fight standing.
Day tries to pull guard but Moon forces him back to his feet, against the cage.
Day is trying to pull guard but Moon turns him against the cage and we stay in the clinch.
Day tries for a takedown but Moon manages to get underhooks.
Moon fails to pull guard.

Day breaks from the clinch.

Day feints and then dives in with a takedown. That was a long way out but the feint bought him enough time to close the distance and complete the takedown. Now we'll play guard for a bit and see who can get the better of that position.
Day is breathing heavily.
Day wants to pass the guard but Moon is keeping the position.
Day avoids a guillotine attempt easily.
Day controls from within his opponent's guard.
That's two minutes gone in the round.
Day prevents Moon from getting back to his feet.
Moon controlling the position.
Day trying to control the position from guard on top but Moon is wriggling around, looking for whatever he can.
Moon pulls Day in close to his closed guard and prevents Day from doing any damage or advancing position.
Carl Moon overall seems to be getting the better of the ground position in the fight so far.
Moon wants to stand up but Day is controlling him.
The ref stands the fighters back up due to a lack of activity.
Dre Day is looking to throw some combinations by the looks of things.
That's three minutes gone in the round.
Day throws a solid leg kick but Moon takes the impact on his shin and smiles at Day.
Day tries to clinch up against the cage, rushing in to close the distance. Moon manages to break the clinch and circles back to the middle of the mat.
Day tries to keep at a distance but Moon has taken the fight into the clinch.
Moon has moved round to his opponent's back and is looking for a suplex! Oh snap! He's tossed Day clear over his head and slammed him to the mat!
Moon biding his time, looking for the opening.
Day is a painfully thin specimen of a man. You do wonder whether a good body kick would snap him clean in two.
Day trying to control the action but Moon just sinks the hooks in.
That's four minutes gone in the round.
Moon slows the pace down here. Having a little breather whilst he's in a dominant position, looking to rest and regain some energy, ready to go for the finish.
Moon patiently working for the choke. Which fighter will keep their nerve here?
The fighters are pressed up against the cage, both looking to find a bit of space to work.
Day preventing the rear naked choke attempt from Moon.
Day can't escape the position.
Moon avoiding Day 's attempts to control his hands.
Moon is persistently looking for the submission but Day is defending it well.
Moon controls the position.
The crowd thankful this round is nearly over.
Day tries to escape but Moon has the hooks in and won't let him break free.
And thats the end of the round the fighters go back to their corners.
That was a close second round but I would say that Carl Moon will probably get the nod.
Well, the break between rounds is over. Let's get back to the scrappin! This is the final round!

A head kick misses from Day.
Moon seemed to be looking to counter by closing the distance.
Moon fails to land the takedown.
Day has his takedown stuffed
and Moon counters with a kick to the head that grazes his opponent. Day is lucky that one didn't land flush.
Day looks for a takedown here. Will he get it? Moon is fending him off so far but Day persists. Nope, Moon circles away and we're back to standing.
We've had a slow start to the round here - hopefully the action picks up.
Day throws a lazy head kick
and Moon counters by clinching up.
Moon works on Day's body with a couple of short punches.
Day takes a big intake of breath there - he's definitely tired.
Day trying to stall but Moon improves his position.
Moon manages to break the clinch.
That's one minute gone in the round.
Day misses with a body punch
and Moon counters by moving into the clinch.
Day manages to break the clinch.
Day displays good takedown defense there as he swats away a double leg from Moon.
Moon darts in looking for a takedown but Day gets double underhooks and turns Moon into the cage.
That's three failed takedown attempts in the round for Carl Moon. That's going to take a lot out of him.
Day fails with a takedown attempt.
Moon looked to counter with a high kick but didn't commit.
Day doesn't manage to clinch there - Moon circles away.
Moon wants to take advantage of his opponent's missed offense by moving into the clinch.
Day tries to clinch there but Moon circles away.
Moon is looking to counter punch.
That's two minutes gone in the round.
Moon shoots in with a takedown attempt and he has Day pinned against the cage. Day gets the underhooks and manages to circle away.
Day scores with a nice takedown into half guard. Let's see what he's got on the ground.
Moon trying to control here.
Moon scrambles, trying to get to his feet, but Day manages to mount him!
That's three minutes gone in the round.
Day avoids the attempt from Moon to control.
Moon in a bad spot here, taking shots to the head.
Day can't quite control the action as he would like just now, as Moon is looking to escape.
Moon is trying to escape the mount.
Moon regains half guard.
Moon holds on for dear life, maintaining half guard for now.
Moon wants to stand back up but Day manages to pass into side control.
You can see the frustration on Moon's face, being in this tough position on the bottom.
That's four minutes gone in the round.
Moon is working hard to escape and get back to his feet. After a battle for position, Day asserts his dominance and retains side control.
Day tries to move to mount but Moon blocks the move with his legs.
Moon struggling a bit here.
The referee tells the fighters to keep busy.
Day tries to advance to mount but Moon denies him.
Moon tries to work a leg under to get back to half guard but Day wriggles his own leg back out and remains in side control.
Boooooooooooooooooooo!!! God, this has been a terrible round. Come on you two, sort yourselves out!

Day decides to stand back up.
Dre Day has stepped it up - he knows he needs a finish here!
Carl Moon is fighting for a decision here - he's started to take the cautious approach.
Day shoots for a double leg takedown but Moon sprawls well. He's pushed Day's face into the mat and manages to get back to his feet relatively easily.
And that's the end of the fight!
Dre Day comfortably won the final round on my scorecard.
I think Moon has won this one but let's see what the judges have to say. Over to the ring announcer for the scorecards.
Ladies and gentlemen, after 3 rounds of action, we go to the scorecards for a decision.
Judge Jack Bonds scores the fight 29:28
Judge Frank Antenori scores the fight 29:28
Judge Don Winkell scores the fight 29:28
In favor of your winner, by unanimous decision... Carl Moon!
|
|
|
|
|
|
|
|
|
|
|
|
|
|
|
|
|
|
|
|
|
|
|
| S |
C
A |
G |
S |
C
B |
G |
|
S |
C |
G |
|
energy
A | B |
|
hype
A | B |
|
pop
A | B |
|
mgr
A | B |
|
FIGHT
RATING
37% |
|
|
|
|
|
|
