|
|
PBP Commentary |
Coming up we have a bantamweight MMA rules bout between Chopper Reid (ranked 0 p4p, 0 weight class) and Jamie Greywar (ranked 0 p4p, 0 weight class). Fingers crossed for an exciting fight - I'm sure both fighters are looking for a nice under the table bonus!
 |
|
 |
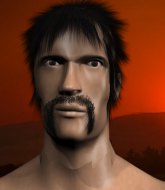
| 225 cm
23
144 lbs
3 - 1 - 0 |
|
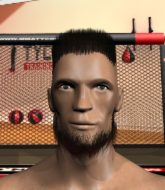
150 cm
19
130 lbs
2 - 0 - 0 |
BJJ Blue Belt
Solid boxing
KO power |
|
Good wrestler
Basic striking
Experienced |
|
| |
|
Ladies and gentlemen. This fight is 3 rounds, in the bantamweight division.
Introducing the fighter to my left, fighting out of the red corner.
With a record of
3 - 1 - 0, fighting out of Sydney, Chopper Reid!
And introducing the fighter to my right, fighting out of the blue corner.
With a record of
2 - 0 - 0, fighting out of Sydney, Jamie Greywar!
The judges for this bout are Winston Howard, Steve Erwin and Eliza Hachem.

The bell rings for round one and we are underway!
Greywar throws a head kick that misses.
No joy there for Reid, who threw a few shots but didn't land.
Jamie Greywar seems to be the more aggressive standup fighter in this bout.
Reid slips a jab and a cross from Greywar.

Greywar shoots in and gets a takedown into half guard. Greywar showed some decent athleticism there.
Greywar perhaps working for something from half guard, or maybe not. It looks like he's just sitting there.
Greywar wants to free his trapped foot but Reid is holding on for dear life with his legs.
Greywar trying to advance position but Reid counters by regaining guard.
Reid wants to stand but Greywar is controlling the position.
Greywar trying to pass the guard but can't manage it just yet.
Reid keeping moving, preventing Greywar from controlling successfully.
Reid is looking to get back to his feet but can't, whilst Greywar is controlling him.

That's one minute gone in the round.
Greywar stands up and looks to throw the legs aside to pass to side control. Reid swivels though and keeps the full guard.

It looks like we're going to have a standup here. Neither fighter is doing enough on the ground.
Reid slips in close and lands a nice hook before moving back out of range.
Greywar shoots in from a long way out. He's driving through with the takedown attempt and he eventually gets it, landing in Reid's guard.
Greywar with a flurry of punches that miss.
Reid wants to stand and escape but Greywar is having none of it.
Greywar throwing elbows and punches but not connecting, as Reid works some decent striking defense from the bottom.
Greywar stops Reid from standing up.
Greywar throwing shots from guard but he's hitting more mat than opponent.
Reid really does look like a pencil wearing a pair of gloves. Let's hope he has a gameplan to suit that ridiculous body shape.
Greywar trying to control the position from guard on top but Reid is wriggling around, looking for whatever he can.
Greywar is looking to work some ground and pound but Reid has wrist control.

That's two minutes gone in the round.
It looks like we're going to have a standup here. Neither fighter is doing enough on the ground.
Greywar shoots in for a takedown. "I don't think so" says Reid as he avoids it easily.
Reid fails with an attempt to clinch.
Reid scores with a hook to the body. Greywar takes a step back and tries to catch his breath.
Greywar shoots in from a long way out. He's driving through with the takedown attempt and he eventually gets it, landing in Reid's guard.

Reid is edging up against the cage. He's using the cage to get back to his feet. Nice work there - the fighters are clinched.
Reid blocks a knee to the body. He'll have a nicely bruised forearm in the morning.
Greywar jumps guard but his hands slip and he falls flat on his back. Well, he's made himself look a right mug there, as Reid walks away with a smile on his face. Greywar gets slowly back to his feet and shakes his head.
Reid misses with a jab and misses with a cross straight after too.
Greywar misses with a wild body shot.
Greywar missing with a left hand there. Reid was out of range so wasted energy throwing that one.
Greywar throws a combination but it was largely blocked by Reid.
Excellent takedown into side control there by Greywar.
Greywar wants to control but Reid is keeping him busy.

That's three minutes gone in the round.
Greywar passes to full mount! That's big trouble for Reid!
Greywar content just to control the position here.
Greywar trying to control but Reid is having none of it.

Greywar goes for an armbar but he's fallen flat on his backside there and now Reid is on top in guard.

That's four minutes gone in the round.
Neither fighter has done anything of merit for a good minute or two here and the crowd are not happy about it.
Reid trying to stand up but can't free himself from Greywar's guard.
Greywar throws his legs up looking to secure a triangle. Oh, that looks pretty tight, I gotta say! Reid escapes and throws Greywar's legs to the side, diving into side control!
Greywar is trying to improve his position.
Greywar struggling a bit here.
Reid stands up and we're back to a striking position.
And thats the end of the round the fighters go back to their corners.
Jamie Greywar dominated that round.
OK. That's time! The bell goes and we're back to the action.

Reid blocks a leg kick.
Chopper Reid is looking to throw some combinations by the looks of things.
Greywar throws a left and a right that both miss
and Greywar takes a counter punch right on the button for his troubles.
Greywar closes this distance looking for a takedown but Reid circles away.
Reid rushes forward with a series of wild hooks but Greywar moves out of range and avoids them all easily.
Reid checks a low kick. Bone on bone - not my idea of a good time.
Reid keeping a good distance there, avoiding the body shot.
Reid misses with a few strikes there.
Greywar tries a switch kick but it misses it's target.

Reid instigates a clinch.

Reid breaks from the clinch.
Greywar shoots in looking for a takedown. Reid tries to sprawl out of it but Greywar keeps driving through. The fighters are pinned against the cage. Reid manages to get underhooks and after a bit of a struggle, circles away and we're back to standing.
A clash of legs there as Reid blocks the low kick.
Greywar throws a head kick that misses and slips in the process. He scrambles back to his feet and the fighters circle.
We've had a slow start to the round here - hopefully the action picks up.
Greywar tries a low kick but Reid avoids it.
Reid showing good head movement there, avoiding the strikes from Greywar.
Reid scores to the head and body with a nice combination!
Greywar looks to land a left hand but Reid moved out of range nicely.
Reid's corner calls for a 1,2 combination and Reid duly obliges.
Reid throws a series of strikes that have Greywar backpedaling.
Reid's corner calls for a 1-2. Reid obliges with the 1 part as he scores the single shot and moves back out of range.
That's one minute gone in the round.
Greywar has a takedown stuffed.
Chopper Reid has stuffed three takedown attempts in the round now. That's going to take a lot out of Jamie Greywar.
Reid catches Greywar with a nice straight right. He seems pissed - ooooh, it's on now! On like donkey kong!
Greywar throws a sloppy head kick and Reid moves out of range easily.
Reid lands a nice hook to Greywar's body. Greywar takes it in his stride and looks to land his own strikes.
Reid avoids a punch combination nicely.
Greywar looking to shoot here. He's gone for it and he's landed a takedown into mount! Oh, that's bad for Reid!
Greywar goes for an armbar but Reid turns quickly into his guard - lovely anticipation from Reid.
Greywar is breathing heavily.
Greywar is looking for a triangle but Reid pushes his legs off easily.
There's a bit of a scramble here and now Greywar is on top in guard.
Reid wants to stand but Greywar is controlling the position.
The fighters are pressed up against the cage, both looking to find a bit of space to work.
That's two minutes gone in the round.
Greywar wants to control from the top but Reid keeps moving.
Greywar controlling from the guard. I say controlling but really, he's stalling.
Reid wants to stand but Greywar is controlling the position.
Greywar stays in close to Reid's body and controls the position.
That's three minutes gone in the round.
Greywar throwing elbows and punches but not connecting, as Reid works some decent striking defense from the bottom.
Greywar wants to pass the guard but Reid is keeping the position.
The ref warns both fighters not to hold the cage as they work up against the meshing.
Neither fighter is doing enough for the referee's liking and he's decided to stand them back up.
Greywar shoots for a double leg takedown but Reid sprawls well. He's pushed Greywar's face into the mat and manages to get back to his feet relatively easily.
Greywar swings wildly with a right hand that was never going to find it's target.
Jab, cross, leg kick. Nice combination by Reid!
Greywar looks to score with a combo but nothing lands.
Reid throws a right and a left that both miss.
Greywar looks frustrated there after his takedown attempt is stuffed easily.
Greywar tries for a takedown but Reid sees it coming a mile off and avoids it easily.
Greywar closes the distance and takes a jab right on the nose as he does so.
Reid tests Greywar's chin there with a solid looking shot.
Greywar drives through with a really nice takedown into side control.
Greywar laying and praying for a moment but Reid takes advantage and regains half guard.
That's four minutes gone in the round.
Greywar trying to control the action but Reid is working from the bottom.
Reid pushes Greywar off looking to stand but Greywar dives back in and keeps control.
Greywar missing with the ground and pound from half guard.
Greywar is trying to advance to mount but he's lost his balance and Reid reverses the position - he's now on top in Greywar's guard.
Greywar looking for a sweep. Not yet Greywar, not yet.
Greywar is looking for a triangle but Reid pushes his legs off easily.
And thats the end of the round the fighters go back to their corners.
Chopper Reid dominated that second round.
Well, the break between rounds is over. Let's get back to the scrappin! This is the final round!

Greywar misses with a takedown attempt - Reid sprawls well and throws a nice strike on the way out which just misses.
Greywar shoots in for a takedown and gets it. Oh and he's advanced to full mount straight away.
Greywar controlling his opponent.
Greywar punching from mount but Reid doing a good job of avoiding damage.
Reid is trying to stand.
Greywar looking for a guillotine from mount but Reid is having none of it.
Greywar wants to control the action but instead Reid gets a body lock and reverses into Greywar's guard! Nice work!
Both fighters are breathing heavily.
That's one minute gone in the round.
Reid wants to stand but Greywar is controlling his posture from full guard.
Greywar will have to put a bit more behind his punches if he's going to do any damage from this position.
Greywar trying to control the position.
The referee decides to stand the fighters back up.
Greywar closes the distance, clinches up and gets a nice trip takedown into side control. Very smooth.
Greywar tries for a kimura. Not really close to a finish though.
Greywar in side control, throwing shots but Reid defends.
That's two minutes gone in the round.
Reid tries to escape but Greywar is in control.
Greywar trying to control the action but Reid is working from the bottom.
Reid is pushing Greywar's head away, looking to escape. Greywar manages to hold on to the position though.
Greywar looking for an arm triangle but it's way too loose to do anything.
Reid tries to escape but Greywar is in control.
Greywar tries to advance to mount but Reid denies him.
That's three minutes gone in the round.
Well, the referee has seen enough. Neither fighter is active enough on the ground so he's stood them back up.
Greywar throws a lazy head kick
and Reid counters with a body kick.
Reid throws a combination but comes up with nothing but fresh air.
Greywar closes the distance, clinches up and gets a nice trip takedown into side control. Very smooth.
Reid is not content to let Greywar control the position.
Greywar tries to move into full mount but can't pass Reid's legs.
Greywar trying to control the position but Reid is working away.
Reid is trying to buck Greywar off.
Greywar is looking to take a break and control but Reid is keeping him honest, looking to work from the bottom.
That's four minutes gone in the round.
Greywar is looking for a kimura. He might have it! No, Reid has escaped the position, nice work there.
Reid is not content to let Greywar control the position.
Greywar tries to cartwheel into mount but he doesn't manage it.
The crowd thankful this round is nearly over.
It looks like we're going to have a standup here. Neither fighter is doing enough on the ground.
Nice takedown defense from Reid. No joy for Greywar on that attempt.
And that's the end of the fight!
Jamie Greywar comfortably won the final round on my scorecard.
I think Greywar has won this one but let's see whether the judges agree with me. Over to the ring announcer for the scorecards.
Ladies and gentlemen, after 3 rounds of action, we go to the scorecards for a decision.
Judge Winston Howard scores the fight 28:29
Judge Steve Erwin scores the fight 28:29
Judge Eliza Hachem scores the fight 28:29
In favor of your winner, by unanimous decision... Jamie Greywar!
|
|
|
|
|
|
|
|
|
|
|
|
|
|
|
|
|
|
|
|
|
|
|
| S |
C
A |
G |
S |
C
B |
G |
|
S |
C |
G |
|
energy
A | B |
|
hype
A | B |
|
pop
A | B |
|
mgr
A | B |
|
FIGHT
RATING
38% |
|
|
|
|
|
|

