|
|
PBP Commentary |
Coming up we have a welterweight MMA rules bout between Laurence Mcfadden (ranked 0 p4p, 0 weight class) and Dijoban Totohami (ranked 0 p4p, 0 weight class). Over to our ring announcer for the fighter introductions!
 |
|
 |
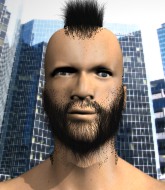
| 184 cm
18
177 lbs
3 - 0 - 0 |
|
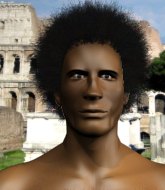
160 cm
25
168 lbs
0 - 0 - 0 |
BJJ Blue Belt
Counter fighter
Cuts easily |
|
BJJ Blue Belt
Good kicks
Granite chin |
|
| |
|
Ladies and gentlemen. This fight is 3 rounds, in the welterweight division.
Introducing the fighter to my left, fighting out of the red corner.
With a record of
3 - 0 - 0, fighting out of Tokyo, Laurence Mcfadden!
And introducing the fighter to my right, fighting out of the blue corner.
With a record of
0 - 0 - 0, fighting out of Tokyo, Dijoban Totohami!
The judges for this bout are Sosuke Kotani, Hirohito Nitta and Tatsuya Matsuyama.

The bell rings for round one and we are underway!
Totohami throws a head kick that misses and slips in the process. He scrambles back to his feet and the fighters circle.
Mcfadden takes a thudding leg kick, right into the meat of the thigh.

Totohami gets in close and instigates a clinch.
Mcfadden has had enough of the clinch and is looking to separate.
Totohami taking a break, stalling in the clinch.
Mcfadden tries to pull guard but Totohami holds him up against the cage and eventually Mcfadden drops back down to his feet.
Totohami stalling against the cage.
Mcfadden jumps guard but his hands slip and he falls flat on his back. Well, he's made himself look a right mug there, as Totohami walks away with a smile on his face. Mcfadden gets slowly back to his feet and shakes his head.
We've had a slow start to the round here - hopefully the action picks up.
Decent striking displayed by Totohami there.

It looks like Laurence Mcfadden has been cut.
Totohami misses with a head kick.
Totohami forces Mcfadden back against the cage and clinches.
Totohami keeps control of Mcfadden as he tries to wriggle out of the double underhooks.

That's one minute gone in the round.
Mcfadden wants to get back to striking at distance but Totohami won't allow it.
Mcfadden is trying to break free.

Mcfadden manages to break the clinch.
Totohami connects with a leg kick. Mcfadden looked like he was expecting something else and didn't defend it.
Mcfadden gets tackled into the cage by Totohami. Totohami maintains the clinch.
Mcfadden wants to break free but Totohami has control.
A bit of stalling here from Totohami.
Mcfadden tries to break the clinch but Totohami is controlling the position.
Mcfadden has had enough of the clinch and is looking to separate.
Mcfadden wants to push off and get back to the center of the mat but Totohami has him pressed against the cage.
Mcfadden working hard to break the clinch.
Mcfadden jumps guard but Totohami turns him against the cage and keeps the fight standing.
That's three failed takedown attempts in the round for Laurence Mcfadden. That's going to take a lot out of him.
Totohami has Mcfadden pressed against the cage, preventing Mcfadden from circling away and getting back to striking at range.

That's two minutes gone in the round.
Totohami lands a body shot in the clinch.
Totohami digs a right hand into Mcfadden's ribs. Those have got to be taking their toll on Mcfadden's gas tank.
Mcfadden tries to land a knee to the head but Totohami blocks with his arms.

Totohami pushes off and circles away, back to the middle of the mat.
Totohami forces Mcfadden back against the cage and clinches.
Totohami taking a break, stalling in the clinch.
Mcfadden escapes the clinch and we're back to striking.
Totohami moves into range and clinches up with Mcfadden.
Mcfadden jumps guard but Totohami stands there with Mcfadden around his waist. Mcfadden gives up and drops back to his feet. We remain in the clinch.
Mcfadden being controlled against the cage.
Mcfadden manages to break the clinch.

That's three minutes gone in the round.
Mcfadden avoids the head kick by Totohami.
Totohami misses with a few strikes there.
Mcfadden blocks a head kick by Totohami.
Totohami fakes a jab and scores with a low kick.
Totohami wings a very wild body shot but it does the job and lands to the midsection.
Mcfadden stumbles momentarily as he takes a strong leg kick from Totohami.
Dijoban Totohami is looking to keep the fight on the feet at all costs.
Mcfadden moves out of range as Totohami strikes.
Totohami stuffs the takedown attempt from Mcfadden. Mcfadden gets slowly back to his feet.
Mcfadden tries to clinch up but Totohami circles away and keeps his distance.
Totohami moves into the clinch successfully.

That's four minutes gone in the round.
Totohami is leaning against Mcfadden and scores with a nice uppercut to the body.
Mcfadden tries to break free but Totohami pushes him back against the cage.
Mcfadden wants to push off and get back to the center of the mat but Totohami has him pressed against the cage.
Mcfadden gets underhooks to prevent Totohami's takedown attempt.
Mcfadden breaks the clinch and we're back to striking at distance.
Mcfadden looks for a takedown here. Will he get it? Totohami is fending him off so far but Mcfadden persists. Nope, Totohami circles away and we're back to standing.
Totohami displays good takedown defense there as he swats away a double leg from Mcfadden.
Totohami appeared to try and counter that last move with a leg kick.
Totohami scores with a head kick.
Fantastic stuff here - a very entertaining period of action, which has drawn cheers from the crowd.
Totohami has closed the distance and engaged Mcfadden in a clinch.
Mcfadden is trying to pull guard but Totohami turns him against the cage and we stay in the clinch.
And thats the end of the round the fighters go back to their corners.
Dijoban Totohami dominated that round.
The cut man is working on Laurence Mcfadden's cut.
The corners get their ten second warning. Both fighters stand from their stools and stare eachother down, ready to get back to the action.

Mcfadden throws a quick head kick that skims the top of Totohami's head.
Mcfadden tries to clinch up against the cage, rushing in to close the distance. Totohami manages to break the clinch and circles back to the middle of the mat.
Totohami takes the fight into the clinch.
Mcfadden is trying to pull guard but Totohami has him pressed against the cage.
Totohami has been the more effective fighter overall so far.
Totohami stalling the fight.
Mcfadden tries to break free but Totohami pushes him back against the cage.
Totohami stays in close to his opponent and throws a right hand to the body.
Mcfadden tries to pull guard but Totohami forces him back to his feet, against the cage.
We've had a slow start to the round here - hopefully the action picks up.
Mcfadden gets double underhooks to prevent a takedown attempt from Totohami.
Mcfadden escapes the clinch and we're back to striking.
That's one minute gone in the round.
Mcfadden tries to drive through with a takedown attempt but Totohami defends well and Mcfadden ends up having to push Totohami into the cage where they will battle it out in the clinch.
That's three failed takedown attempts in the round for Laurence Mcfadden. That's going to take a lot out of him.
Totohami misses with a half-hearted attempt at a head kick.
Mcfadden shoots in for a takedown. "Ole!" shouts Totohami as he jumps to the side.
Totohami shapes to counter with a head kick.
Totohami clinches up with Mcfadden and pushes him back against the cage.
Mcfadden tries to take the fight to the ground by pulling guard but can't manage it.
A head punch blocked on the inside by Totohami.

Totohami is trying to trip Mcfadden. He has hold of a leg but Mcfadden is hopping around, keeping his balance for the moment. Totohami persists though and gets the takedown into guard.
Mcfadden will need to keep those long limbs tucked in whilst he's on the ground, to prevent any submissions.
Totohami is taking a break and basically stalling. The referee will not allow him to do that for long.
That's two minutes gone in the round.
Totohami's corner are shouting for him to control the position and he seems happy to oblige.
Totohami is continuing to stall.
Mcfadden not looking particularly offensive just at the moment.
Totohami showing good wrestling skills to control the position.

Totohami avoids a guillotine attempt easily.
Both fighters are absolutely exhausted here.
Totohami is just sitting in guard, looking to avoid any submissions.

The ref stands the fighters back up due to a lack of activity.
That's three minutes gone in the round.
Totohami lands a head kick. Mcfadden smiles back at him and beckons him forward.
Mcfadden takes a nice looking leg kick right on the meat of his thigh there.
Totohami lands a leg kick and bounces back out of range.
Totohami clinches up against the cage.
Totohami manages to break the clinch.
The fight stays on the outside here - Mcfadden looks like he's thinking about clinching though.
Totohami tries to clinch but Mcfadden moves out of range.
Mcfadden avoids the head kick by Totohami.
Totohami lands with a nice low kick. That'll leave a bruise.
Totohami throws a head kick that misses.

Mcfadden forces Totohami back against the cage and clinches.
That's four minutes gone in the round.
Mcfadden jumps guard but Totohami stands there with Mcfadden around his waist. Mcfadden gives up and drops back to his feet. We remain in the clinch.
Mcfadden tries to break free but Totohami pushes him back against the cage.
Totohami tries to circle away but Mcfadden has him pinned against the cage.
A frustrated look appears on Mcfadden's face as he tries to break the clinch.
Mcfadden is trying to work out of this bad position, with his back against the cage.
Mcfadden is looking to break free of the clinch but Totohami has double underhooks.
Mcfadden tries to pull guard but Totohami won't allow it.
The crowd thankful this round is nearly over.
Totohami slows down the pace here.
The fighters are pressed against the cage, as the pace of the fight slows.
And thats the end of the round the fighters go back to their corners.
Dijoban Totohami showed his class in that round. I'd imagine he'll take it on all the scorecards.
The cut man is working on Laurence Mcfadden's cut.
That's the end of the interval. I'm sure that seemed a lot quicker than a minute for our two fighters! Back to the action. Ladies and gentlemen, this is the final round!

Mcfadden has taken the fight to the clinch.
Totohami keeps control of Mcfadden as he tries to wriggle out of the double underhooks.
Mcfadden's corner calls for him to break the clinch, which he does.
Totohami misses with a half-hearted attempt at a head kick.
Totohami tries to clinch up against the cage, rushing in to close the distance. Mcfadden manages to break the clinch and circles back to the middle of the mat.
Mcfadden lands with a kick to the temple. Totohami shrugs as if to say "is that all you've got?"
Mcfadden tries to close the distance and clinch up against the cage but Totohami paws at him with a jab and circles away.
We've had a slow start to the round here - hopefully the action picks up.
Totohami pulls out of a head kick attempt.
Totohami scores with a jab.
Totohami closes the distance and pushes Mcfadden back into the cage.
Mcfadden jumps guard but Totohami stands there with Mcfadden around his waist. Mcfadden gives up and drops back to his feet. We remain in the clinch.
That's one minute gone in the round.
Totohami breaks the clinch and we're back to striking at distance.
Mcfadden looks shocked there as he takes a right hand to the temple.
Totohami moves into the clinch successfully.
Totohami has dropped down and is looking to force the takedown but it's defended by Mcfadden after a bit of a struggle.
Totohami takes a big intake of breath there - he's definitely tired.
Totohami keeps control of Mcfadden as he tries to wriggle out of the double underhooks.
Mcfadden working hard to break the clinch.
Totohami lands a nice elbow.
Mcfadden is trying to break free.
Mcfadden takes an elbow to the temple.

Mcfadden is rocked!
Totohami has dropped down and is working for a takedown. Mcfadden is trying to keep an underhook but Totohami manages to get the takedown into half guard.
Mcfadden is trying to stand.
The ref warns both fighters not to hold the cage as they work up against the meshing.
Totohami is just sitting in half guard, waiting for something to happen.
That's two minutes gone in the round.
Totohami stops Mcfadden from getting back to his feet.
Mcfadden trying to control from the bottom.
Totohami wants to pass the guard but Mcfadden is defending well.
Mcfadden flails away from the bottom but he's not doing any damage.
Mcfadden keeping hold of Totohami's head, controlling as best he can.
The referee claps his hands together and tells the fighters to work.
Mcfadden is trying to get back to full guard.
Mcfadden looking to work for a kimura from the bottom.
Mcfadden taking some punishment here, with Totohami in his half guard.
That's three minutes gone in the round.
Mcfadden wants to get back to full guard.
Mcfadden is working hard here to advance position.
Mcfadden flails away from the bottom but he's not doing any damage.
Dijoban Totohami has got the better of the ground game so far.
Mcfadden trying to control but Totohami postures up.
The referee decides to stand the fighters back up.
Mcfadden on the receiving end of a decent leg kick there by Totohami. Totohami obviously looking to wear him down.
Mcfadden fails in his attempt to clinch.
Totohami tries a head kick but it misses.
Totohami lands with a cross to side of his opponent's head.
Totohami tries to clinch up against the cage, rushing in to close the distance. Mcfadden manages to break the clinch and circles back to the middle of the mat.
That's four minutes gone in the round.
A nice inside leg kick there by Totohami. That's going to slow Mcfadden down.
Mcfadden shoots in with a takedown attempt and he has Totohami pinned against the cage. Totohami gets the underhooks and manages to circle away.
Totohami throws out a counter right but Mcfadden avoids it with no problem.
Totohami throws a sloppy head kick and Mcfadden moves out of range easily.
Mcfadden tries to counter with a takedown but Totohami is quick to defend against it.
Mcfadden lands a leg kick. The shin dug right into the meat of the thigh.
A head kick by Totohami misses

and Mcfadden counters with a nice shoot takedown that brings the fighters to the ground.
Hammerfist, elbow! yells Mcfadden's corner. There ya go! There ya go!
Mcfadden not doing a lot at the moment. He'll have to show some more aggression or the fight will get stood up.
And that's the end of the fight!
Dijoban Totohami comfortably won the final round on my scorecard.
Well Totohami has outworked and out performed his opponent in all aspects of the game today. He was simply too good and the decision should be no more than a formality. Over to the ring announcer for the scorecards.
Ladies and gentlemen, after 3 rounds of action, we go to the scorecards for a decision.
Judge Sosuke Kotani scores the fight 27:30
Judge Hirohito Nitta scores the fight 27:30
Judge Tatsuya Matsuyama scores the fight 27:30
In favor of your winner, by unanimous decision... Dijoban Totohami!
|
|
|
|
|
|
|
|
|
|
|
|
|
|
|
|
|
|
|
|
|
|
|
| S |
C
A |
G |
S |
C
B |
G |
|
S |
C |
G |
|
energy
A | B |
|
hype
A | B |
|
pop
A | B |
|
mgr
A | B |
|
FIGHT
RATING
36% |
|
|
|
|
|
|

