|
|
PBP Commentary |
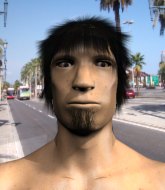
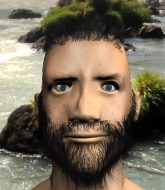
Coming up we have a light heavyweight MMA rules bout between Maynard Maddox (ranked 0 p4p, 0 weight class) and Ragnar Rage (ranked 0 p4p, 0 weight class). Maynard Maddox has a significant reach advantage - let's see if he can make it count.
 |
|
 |
| 220 cm
26
215 lbs
0 - 0 - 1 |
|
182 cm
22
215 lbs
0 - 4 - 0 |
BJJ Blue Belt
Counter fighter
Cuts easily |
|
Good wrestler
Brawler
Determined |
|
| |
|
Ladies and gentlemen. This fight is 3 rounds, in the light heavyweight division.
Introducing the fighter to my left, fighting out of the red corner.
With a record of
0 - 0 - 1, fighting out of New York, Maynard Maddox!
And introducing the fighter to my right, fighting out of the blue corner.
With a record of
0 - 4 - 0, fighting out of New York, Ragnar Rage!
The judges for this bout are Reed Andrews, Jonathan Paton and Russell Pearce.

The bell rings for round one and we are underway!
Rage shoots in for a takedown but Maddox shows good takedown defense there and keeps this one on the feet.

Maddox gets tackled into the cage by Rage. Rage maintains the clinch.
We've been informed that Rage has been sparring a lot of Muay Thai in the buildup to this fight so let's see if that has an impact on the result.
Maddox lands a shot to the body.
Maddox is looking to break free of the clinch but Rage has double underhooks.

Maddox tightens his grip and picks Rage up, before dumping him to the ground. Rage manages to land in guard.
A big thud reverberates around the arena there as Maddox accidentally thumps the mat. Hopefully he's not broken his hand.
The ref warns both fighters not to hold the cage as they work up against the meshing.
Maddox landing some decent shots from guard.
Rage wants to sweep but no luck.
We've had a slow start to the round here - hopefully the action picks up.
Rage utilising some decent striking defenses from the guard, preventing the ground and pound.
Maddox slows down the pace of the fight for a moment. He'll need to remain active if he doesn't want to see the fight stood back up.

That's one minute gone in the round.
Maddox throwing strikes but missing.
Maddox trying to land body shots but he keeps hitting the mat.
Rage keeping moving, preventing Maddox from controlling successfully.

The referee decides to stand the fighters back up.
Rage shoots in for a takedown. He's persisting with it as Maddox sprawls well. Maddox wins this battle and keeps the fight standing. Rage gets slowly back to his feet.
Horrible takedown attempt by Rage or perhaps it was just good defense by Maddox, which made it look bad.
Maynard Maddox has stuffed three takedown attempts in the round now. That's going to take a lot out of Ragnar Rage.
Rage fails with a takedown attempt from distance.

Maddox has Rage up against the cage in a clinch.

That's two minutes gone in the round.
Rage is trying to work for a single leg takedown but Maddox pulls him back up using the underhooks.
Maddox wants to push off and get back to the center of the mat but Rage has him pressed against the cage.
Rage tries for a takedown but Maddox manages to get underhooks.
Maddox is looking to break free of the clinch but Rage has double underhooks.
A short uppercut from Maddox.

Maddox breaks the clinch and we return to the middle of the mat.
Maddox changes levels and looks for a double leg takedown. Rage tries to avoid it but Maddox manages to keep hold of a leg and drag Rage to the ground. Rage escapes though and pops straight back up to his feet.
Rage shoots in for a takedown. "I don't think so" says Maddox as he avoids it easily.
Rage shoots in looking for a takedown but Maddox manages to keep the fight standing, pushing Rage's face into the canvas for good measure before circling away.
Rage looks winded!
Rage misses with a takedown attempt - Maddox sprawls well and throws a nice strike on the way out which just misses.

That's three minutes gone in the round.
Rage closes this distance looking for a takedown but Maddox circles away.
Maddox closes the distance and pushes Rage back into the cage.
Maddox wants to get back to striking at distance but Rage won't allow it.
Maddox wants a takedown.
Rage gets double underhooks to prevent a takedown attempt from Maddox.
Maddox wants to push off and get back to the center of the mat but Rage has him pressed against the cage.
Maddox gets double underhooks and manages to take the fight to the ground.

That's four minutes gone in the round.
Maddox lands a nice shot whilst sitting in his opponent's guard.
Maddox working some ground and pound from guard but it's not doing any damage.
Maddox wanted to stand there but Rage had control of the position.
Maddox has been looking to land a fair amount of strikes on the ground. He might be looking to soften his opponent up in order to work for a submission.
Maddox trying to control but Rage is working from the bottom.
Rage really doesn't want to stay on the ground with Maddox. If he can't get it back to his feet, it's only a matter of time before he'll be tapping out.
Rage utilising some decent striking defenses from the guard, preventing the ground and pound.
Boooooooooooooooooooo!!! God, this has been a terrible round. Come on you two, sort yourselves out!
Maddox in full guard, throwing the ground and pound. No damage this time.
If this pace continues, the referee will definitely step in and force a standup.
Maddox wants to get up but he can't break Rage's closed guard. He needs to be careful trying to break the legs open, as he's open to submissions here.
The ref stands the fighters back up due to a lack of activity.
And thats the end of the round the fighters go back to their corners.
Maynard Maddox dominated that round.
That's the end of the round. The referee orders the cornermen out of the cage so we can get back down to business.


Rage dives in and scores a takedown into Maddox's guard.
Rage stopping the sweep attempt from Maddox.
Rage throws a big elbow that misses.
Maddox looking to control.
Maddox wants to stand but Rage is controlling the position.
Maddox trying to control the position here.
Rage prevents Maddox from getting back to his feet.
We've had a slow start to the round here - hopefully the action picks up.
Rage lands a couple of decent looking shots.
Rage postures up in Maddox's guard and throws a big left but Maddox blocks it.
Maddox pulls Rage in close to prevent any damage.
The referee has stepped in and called for a break in the action. We'll restart on the feet.
Rage scores with a takedown into Maddox's guard.
That's one minute gone in the round.
Rage throwing strikes but missing.
Maddox tries to land a sweep but no joy.
Rage is sitting in guard, working some ground and pound.
Maddox bucks up whilst keeping hold of a body lock, managing to reverse the position. Now he's in top in Rage's guard.

Maddox wants to stand but Rage is controlling his posture from full guard.
Rage is doing well to control the posture of his opponent and prevent any damage.
Maddox missing there with some ground and pound from the guard.
Maddox will need to keep those long limbs tucked in whilst he's on the ground, to prevent any submissions.
That's two minutes gone in the round.
Maddox wants to get up but he can't break Rage's closed guard. He needs to be careful trying to break the legs open, as he's open to submissions here.
Maddox lands a couple of digs.
Maddox trying to control but Rage is working from the bottom.

Maddox postures up as if he's going to throw some strikes but drops back for an ankle! Rage is in big trouble! He looks ready to tap! But no, he's escaped and dives on top of Maddox, into his guard.

Maddox is looking to stand up but Rage isn't so interested in that idea.
That's three minutes gone in the round.
Rage landing with the ground and pound.
Rage throwing strikes from guard but Maddox blocks nicely.
Maynard Maddox overall seems to be getting the better of the ground position in the fight so far.
Rage seems content to control from guard here. He's going to have to remain active though if he doesn't want to get stood back up.
Rage prevents Maddox from getting back to his feet.
Maddox is really dominating this fight. Is there anything that Rage can do to turn this around?
Maddox wants to sweep here but Rage controlling him for the moment.
The referee decides to stand the fighters back up.
Excellent takedown into side control there by Rage.
That's four minutes gone in the round.
Rage lands a knee to the body and a forearm to the face.
Maddox stops Rage from passing to mount.
You can see the frustration on Maddox's face, being in this tough position on the bottom.
Maddox wants to escape from the position here - easier said than done!
Maddox manages to get one leg in to regain half guard.
Maddox blocking the ground and pound attempt from Rage.
Maddox pushes Rage off but Rage dives into side control.
Boooooooooooooooooooo!!! God, this has been a terrible round. Come on you two, sort yourselves out!
Maddox tries to escape but Rage is in control.
Both fighters are absolutely exhausted here.
Maddox wants to control but Rage postures up.
And thats the end of the round the fighters go back to their corners.
Ragnar Rage showed his class in that round. I'd imagine he'll take it on all the scorecards.
Well, the break between rounds is over. Let's get back to the scrappin! So, we enter the final round. Let's see if either fighter can bring us a finish, or whether we're going to the judges scorecards.

Maddox stuffs the takedown attempt from Rage. Rage gets slowly back to his feet.
Ragnar Rage seems to be the more aggressive standup fighter in this bout.
Maddox tries to sprawl but Rage drives through with a takedown into half guard.
Maddox wants to get back to his feet.
Maddox is working for an escape here. He's hooked one of Rage's legs and he's managed to sneak out and take Rage's back!
Rage staying busy and making it hard for Maddox to control.
We've had a slow start to the round here - hopefully the action picks up.
Maddox is staying calm and holding on to the back position, whilst working on a rear naked choke. Rage is defending well though. Maddox let's go of the attempt for now.
Maddox is punishing Rage with strikes - can he finish him?!
That's one minute gone in the round.
Maddox has the hooks in. Rage is trying to push off one leg but he has to do so cautiously to avoid being submitted.
Rage is still trying to improve position.
Maddox looking for the choke but no joy.
Rage trying to control the hands but Maddox won't let him.
Rage takes a big intake of breath there - he's definitely tired.
That's two minutes gone in the round.
Neither fighter has done anything of merit for a good minute or two here and the crowd are not happy about it.
Maddox controlling from the back.
Maddox is persistently looking for the submission but Rage is defending it well.
Maddox working for a choke but Rage is defending well.
The fighters are pressed up against the cage, both looking to find a bit of space to work.
That's three minutes gone in the round.
Rage tries to roll but Maddox sticks to his back.
Maddox is working the back position looking for the choke. Oh, he's slid into an armbar! Beautiful transition and Rage taps out! Fantastic Jiu Jitsu from Maddox.
Ladies and gentlemen, after 3:51 of round 3, we have a winner by way of Submission (Armbar). Maynard Maddox!
|
|
|
|
|
|
|
|
|
|
|
|
|
|
|
|
|
|
|
|
|
|
|
| S |
C
A |
G |
S |
C
B |
G |
|
S |
C |
G |
|
energy
A | B |
|
hype
A | B |
|
pop
A | B |
|
mgr
A | B |
|
FIGHT
RATING
35% |
|
|
|
|
|
|
