|
|
PBP Commentary |
Coming up we have a featherweight MMA rules bout between Stacey Briggs (ranked 0 p4p, 0 weight class) and Brad Bull (ranked 0 p4p, 0 weight class). Both fighters look fresh as a daisy as they make their way towards the cage.
 |
|
 |
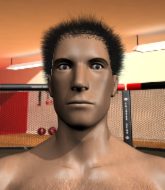
| 159 cm
24
151 lbs
0 - 3 - 0 |
|
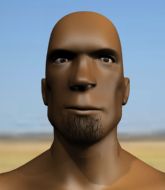
200 cm
24
148 lbs
0 - 0 - 0 |
BJJ Blue Belt
Solid Muay Thai
Cuts easily |
|
BJJ Blue Belt
Brawler
Granite chin |
|
| |
|
Ladies and gentlemen. This fight is 3 rounds, in the featherweight division.
Introducing the fighter to my left, fighting out of the red corner.
With a record of
0 - 3 - 0, fighting out of Hilo, Stacey Briggs!
And introducing the fighter to my right, fighting out of the blue corner.
With a record of
0 - 0 - 0, fighting out of Hilo, Brad Bull!
The judges for this bout are Micheangelo Fripello, Roger Salmon and Colin Fray.

The bell rings for round one and we are underway!
Bull misses with a takedown attempt - Briggs sprawls well and throws a nice strike on the way out which just misses.
Briggs tries to land with a swinging hook to the body but Bull was well out of range. Poor timing from Briggs.
Bull slaps away a takedown attempt from Briggs, before circling back to the center of the mat.
Briggs blocks a head kick by Bull.
Briggs thows a body kick. Bull tries to catch it but that hurt him.

Briggs closes the distance and presses his opponent up against the cage.
Bull stalling in the clinch but Briggs improves position.
Bull fails to pull guard.
Bull wants a takedown.
Stacey Briggs has stuffed three takedown attempts in the round now. That's going to take a lot out of Brad Bull.
Bull jumps guard but Briggs turns him against the cage and keeps the fight standing.
Bull jumps guard but his hands slip and he falls flat on his back. Well, he's made himself look a right mug there, as Briggs walks away with a smile on his face. Bull gets slowly back to his feet and shakes his head.
Bull closes this distance looking for a takedown but Briggs circles away.
Briggs fails with a takedown attempt.
Briggs fails with a takedown attempt from distance.

That's one minute gone in the round.
Briggs fails to land with a series of punches.
Bull throws a series of punches but Briggs moves out of range.
Briggs fails with the takedown.

Bull scores a trip takedown into side control. Nice.
We must be close to a standup if these guys don't pick up the pace.
Bull scores with a couple of short elbows.

Bull tries for a kimura but Briggs is defending well.
Briggs is looking to reverse the position.

That's two minutes gone in the round.

Bull decides to stand back up.
Briggs goes for a high kick. It partially lands.

Bull moves into the clinch successfully.
Bull is a painfully thin specimen of a man. You do wonder whether a good body kick would snap him clean in two.
We've seen a great period of action over the last minute or so - credit to both fighters for going all out!
Briggs stalling in the clinch.
A battle for position here, against the cage.
Briggs tries to jump guard but he falls flat on his backside. Bull smiles and moves away.
Bull scores a trip takedown into side control. Nice.

That's three minutes gone in the round.
Briggs is trying to work for a sweep but Bull has mounted him!
Bull looking to control but Briggs is working nicely, looking to advance position himself.
Bull lands a couple of nice shots there from mount.
Bull looking to control but Briggs is working nicely, looking to advance position himself.
Briggs tries to lock up and control but Bull gives him a forearm to the face and pushes him away.
Bull can't quite control the action as he would like just now, as Briggs is looking to escape.
Briggs manages to regain half guard. Good work.

That's four minutes gone in the round.
Bull has decided to stand back up but his arm is trapped. Whilst he's worrying about his arm, Briggs works to full guard.
Bull drops back for a leg but he's not going to get it - he lets go and Briggs dives on top into guard.
Briggs would like to get this fight back to the feet but can't get free from the closed guard.
The fighters are pressed up against the cage, both looking to find a bit of space to work.
As the round comes to an end the crowd are showing their appreciation for a great round of action.
Briggs trying desperately to get back to his feet here but he's not having any joy at all. He's going to tire himself out if he's not careful.
Bull wants to stand and escape but Briggs is having none of it.
And thats the end of the round the fighters go back to their corners.
Brad Bull dominated that round.
OK. That's time! The bell goes and we're back to the action.

Bull leaves Briggs with his face pressed against the mat as he sprawls beautifully, defending against a solid takedown attempt.
Briggs fails with an attempt to clinch.
Briggs takes a head kick and keeps coming.
Briggs doesn't succeed with the takedown
and Briggs takes a counter punch right on the button for his troubles.
Bull tries to clinch up against the cage, rushing in to close the distance. Briggs manages to break the clinch and circles back to the middle of the mat.
Horrible takedown by Bull or perhaps it was just good defense by Briggs which made him look bad.
A head kick misses from Briggs.
Stacey Briggs is looking to throw some combinations by the looks of things.
Bull shoots in for a takedown but doesn't get it.
Bull tries to close the distance and clinch up but Briggs swats him away and circles back towards the center.
Briggs connects with a leg kick. Bull looked like he was expecting something else and didn't defend it.
That's one minute gone in the round.
Nice sprawl there from Briggs as Bull shoots in.
Stacey Briggs has stuffed three takedown attempts in the round now. That's going to take a lot out of Brad Bull.
Bull throws a body kick that misses.
Bull tries a head kick but it misses.
Bull has managed to clinch.

Briggs breaks the clinch and we return to the middle of the mat.
Briggs fails with a rather predictable takedown attempt.
Bull circles away from the clinch attempt.
Briggs shoots in for a takedown but Bull shows good takedown defense there and keeps this one on the feet.
Bull darts in looking for a takedown but Briggs gets double underhooks and turns Bull into the cage.
Bull is defending well against a takedown attempt.
Both fighters are absolutely exhausted here.
Briggs breaks the clinch.
That's two minutes gone in the round.
Excellent takedown into side control there by Bull.
Sloppy strikes there by Bull.
Bull stands up.
The fans in attendance giving it up for the two fighters, who have really let it all hang out in the last minute or so!
Briggs feints with a shoulder and throws a nice leg kick to Bull's calf.
Briggs fails with a takedown attempt.
Briggs throws a head kick that misses.
Briggs throws a head kick that misses and slips in the process. He scrambles back to his feet and the fighters circle.
That's three minutes gone in the round.
Briggs dives in and grabs Bull's left leg, looking for a takedown. Bull pushes down on Briggs's head and hops out.
Bull darts in looking for a takedown but Briggs gets double underhooks and turns Bull into the cage.
Bull is trying to break the clinch but Briggs is controlling him.
Knees in the clinch landing for Briggs.
Bull is working for takedown but Briggs is calmly controlling the position for now.
Briggs tries for a takedown. No joy.
Bull is trying to force a seperation but Briggs has the dominant position.
Bull looks like he'd prefer to be striking at range right now.
Briggs is pressed up against the cage. Bull has hold of a leg and is looking to drag Briggs down to the mat. Briggs avoids the attempt though and has circled away. We're back to striking at a distance.
Briggs doesn't manage to clinch there - Bull circles away.
Briggs fakes a couple of low kicks, before throwing one on the third attempt. It connects and Bull has to reset his feet before getting ready to engage.
That's four minutes gone in the round.
Briggs with a poor takedown
and Bull moves into the clinch.
Bull is trying to break the clinch but Briggs is controlling him.
Briggs lands a hook to the side of the head.
Bull misses with an elbow over the top.
Bull working hard to break the clinch.
Bull is looking to break free of the clinch but Briggs has double underhooks.
Bull wants to break free but Briggs has control.
Bull drops down for a takedown but doesn't get it.
Briggs changes levels and goes for a takedown here. Bull fights it off and pushes away nicely.
As the round comes to an end the crowd are showing their appreciation for a great round of action.
A telegraphed takedown attempt from Bull is defended easily by Briggs.
And thats the end of the round the fighters go back to their corners.
Brad Bull showed his class in that round. I'd imagine he'll take it on all the scorecards.
That's the end of the interval. I'm sure that seemed a lot quicker than a minute for our two fighters! Back to the action. Ladies and gentlemen, this is the final round!

Bull fails in his attempt to clinch.
Bull is looking to land body kicks.
Briggs shoots in and drives through. Bull sprawls well.
No luck with that takedown attempt from Bull.
Briggs tries a head kick but it misses.
Bull shoots in for a takedown - he's clinched up with Briggs but Briggs pushes him off and we're back to square one.
Bull on the wrong end of a nice low kick. He's acting like it's no big deal but he doesn't want to take many more of those.
Briggs shoots in looking for a takedown but Bull manages to keep the fight standing, pushing Briggs's face into the canvas for good measure before circling away.
That's one minute gone in the round.
Bull shoots for a takedown but Briggs saw that one coming a mile off and avoided it easily.
Stacey Briggs has stuffed three takedown attempts in the round now. That's going to take a lot out of Brad Bull.
Bull swings widly with a right hand
and Briggs counters with a nice leg kick.
Bull takes a big intake of breath there - he's definitely tired.
Briggs has managed to clinch.
Briggs looks to throw an elbow but misses.
Briggs breaks from the clinch.
Stacey Briggs is winning the standup battle so far.
Bull shoots in for a takedown but Briggs shows good takedown defense there and keeps this one on the feet.
Bull has managed to clinch.
Bull is working for takedown but Briggs is calmly controlling the position for now.
Bull tries to break the clinch but Briggs is controlling the position.
Briggs pushes off and circles away, back to the middle of the mat.
Bull shoots for a double leg takedown but Briggs sprawls well. He's pushed Bull's face into the mat and manages to get back to his feet relatively easily.
Briggs shoots in but no luck this time.
That's two minutes gone in the round.
Briggs throws a head kick but Bull moves out of range.
Briggs throws a head kick that misses and slips in the process. He scrambles back to his feet and the fighters circle.
Bull misses with a head kick.
Briggs tries to clinch there but Bull circles away.
Briggs could do with losing a few pounds - he looks very soft around the mid section, to put it politely.
Bull stuffs a takedown. It's all about dictating where the fight takes place and Bull wants it to stay on the feet.
No luck for Bull with that takedown attempt.
A telegraphed takedown attempt from Briggs is defended easily by Bull.
The crowd cheering loudly, showing their appreciation for the quality fight we're seeing here.
Bull misses with a body shot. Nice footwork from Briggs.
That's three minutes gone in the round.
Bull throws a lazy head kick
and Briggs counters with a left and a right that stings Bull.
Briggs throws a looping left and ducks down for a takedown. He's got his arms around Bull's waist but Bull gets an underhook and avoids the takedown by throwing Briggs off to one side.
Bull tries to clinch but Briggs is having none of it.
A big left from Bull misses.
Bull fails with the takedown.
Briggs catches Bull with a nice straight right. He seems pissed - ooooh, it's on now! On like donkey kong!
Briggs closes the distance and clinches.
Briggs scores with a nice hook to the head.
Bull looking to slow down the pace here.
That's four minutes gone in the round.
Briggs breaks the clinch.
Briggs will have to do better than that with his takedown attempts.
Briggs darts in looking for a takedown but Bull gets double underhooks and turns Briggs into the cage.
Bull manages to pull guard.
There's a bit of a scramble here and now Bull is on top in guard.
Bull pushing down on Briggs's thigh, trying to pass to half guard. He's managed it... Nice work.
The crowd applaud the fighters efforts here as the round comes to an end.
Bull looks to score some points with some ground and pound.
We've seen a great period of action over the last minute or so - credit to both fighters for going all out!
Bull stands up from half guard.
Stacey Briggs has stepped it up - he knows he needs a finish here!
Brad Bull is fighting for a decision - hopefully he's judged it right and he's actually winning the fight.
Bull tries to shoot in for a takedown. He's got hold of a leg but Briggs swivels and escapes.
And that's the end of the fight!
I would just about give that final round to Brad Bull.
I've got Bull winning every round here. Surely the decision will go his way and he'll pick up a well deserved decision victory. Over to the ring announcer for the scorecards.
Ladies and gentlemen, after 3 rounds of action, we go to the scorecards for a decision.
Judge Micheangelo Fripello scores the fight 27:30
Judge Roger Salmon scores the fight 27:30
Judge Colin Fray scores the fight 27:30
In favor of your winner, by unanimous decision... Brad Bull!
|
|
|
|
|
|
|
|
|
|
|
|
|
|
|
|
|
|
|
|
|
|
|
| S |
C
A |
G |
S |
C
B |
G |
|
S |
C |
G |
|
energy
A | B |
|
hype
A | B |
|
pop
A | B |
|
mgr
A | B |
|
FIGHT
RATING
57% |
|
|
|
|
|
|
