|
|
PBP Commentary |
Coming up we have a welterweight MMA rules bout between Mitsuyo Maeda (ranked 0 p4p, 0 weight class) and Simeon Malaya (ranked 0 p4p, 0 weight class). Mitsuyo Maeda had a look across the cage there at his opponent. He definitely means business
 |
|
 |
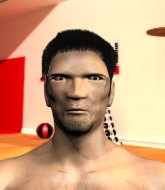
| 177 cm
32
178 lbs
14 - 8 - 1 |
|
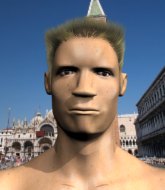
190 cm
30
180 lbs
24 - 8 - 0 |
Great wrestler
World class boxer
Insanely flexible |
|
Good wrestler
World class MT
Granite chin |
|
| |
|
Ladies and gentlemen. This fight is 3 rounds, in the welterweight division.
Introducing the fighter to my left, fighting out of the red corner.
With a record of
14 - 8 - 1, fighting out of Rio de Janeiro, Mitsuyo Maeda!
And introducing the fighter to my right, fighting out of the blue corner.
With a record of
24 - 8 - 0, fighting out of London, Simeon Malaya!
The judges for this bout are Timothy Bukovac, Jack Bonds and Don Winkell.

The bell rings for round one and we are underway!
Maeda scores with a nice body kick.
Maeda ducks under a wild hook from Malaya.
Maeda shakes his hands off, looking to compose himself, but takes a jab to the jaw whilst he does it.
Maeda connects with a lovely right hand, straight down the pipe.
Malaya misses with a looping right.
Malaya moves out of range as Maeda strikes.
That kick from Maeda tenderised Malaya's leg. Malaya is trying to keep his angry face on.
Malaya tried to score with a low kick but Maeda checks it.
Malaya moves out of range as Maeda strikes.
Malaya thuds his shin into the meat of Maeda's side.
An inside leg kick lands from Malaya.
Malaya sizes up Maeda with a pawing jab and scores with a straight right down the middle.
This is a great period of action - very entertaining stuff!
Maeda looks to land a right hand but Malaya moved out of range.
Maeda digs a good body shot into Malaya's ribs.
Left hook, right uppercut from Maeda.
Malaya throws a low kick but Maeda moves out of range easily.
Maeda is pinned up against the cage taking some big shots here. The referee is looking closely deciding whether he should stop the fight.

That's one minute gone in the round.
Malaya pushes Maeda away with a front kick.
Maeda keeping a good distance there, avoiding the body shot.
Malaya blocks a jab.
Maeda tries a head kick but it misses.
Maeda moves out of range of the body kick from Malaya.
Maeda throws out a powerful jab.
Maeda tried to score with a low kick but Malaya checks it.
We've been hearing reports that Maeda has been drilling takedowns in recent sessions so let's see if that has an impact on the result of this fight.
Maeda is looking to slow Malaya down with leg kicks.
Malaya ducks down and throws a hook to the body but Maeda moves away.
Maeda fails with a rather predictable takedown attempt.
Simeon Malaya is looking to keep the fight on the feet at all costs.
A big left from Malaya misses.
Maeda lands a nice shot that snaps Malaya's head back.
Maeda fakes with a right hand and throws a good leg kick, right into the thigh. That had to hurt Malaya.

That's two minutes gone in the round.
Maeda uses decent footwork to sidestep a right hand from Malaya.
Maeda's corner calls for a 1, 2 combination and Maeda duly obliges.
Malaya misses with a body shot.
Maeda avoids a lazy jab quite easily.
Fantastic stuff here - a very entertaining period of action, which has drawn cheers from the crowd.
A low kick from Malaya misses

so Maeda counters with a double leg into guard. Good agility.
Maeda trying to pass the guard but can't manage it just yet.
Maeda trying to land body shots but he keeps hitting the mat.
Maeda pressing down on his opponent's thigh, looking to pass guard. Malaya is keeping the position for now.
Maeda is working hard here to advance position.

That's three minutes gone in the round.
Maeda postures up.
Maeda trying to pass the guard but can't manage it just yet.
Maeda trying to control the position from guard on top but Malaya is wriggling around, looking for whatever he can.

The referee decides to stand the fighters back up.
Malaya tries to score with a leg kick but it misses it's target.
Malaya uses good footwork to get in and out and land a nice right hand before Maeda has time to react.
Malaya pivots, looking for a leg kick but Maeda is out of range and Malaya settles back down.
Maeda throws an uppercut from half a mile away. Malaya sees it coming and avoids it easily.
Malaya lands a head shot.
Well, he's not going to score with shots like that. A lazy body kick attempt from Malaya.

That's four minutes gone in the round.
Malaya thows a left - swing and a miss!
Maeda rushes forward with a series of wild hooks but Malaya moves out of range and avoids them all easily.
Maeda ducks under an overhand right and circles away with a smile on his face.
Maeda fakes a strike and closes the distance, dragging Malaya to the ground. Maeda is now in Malaya's guard.
Maeda might be looking to lock onto one of his opponent's long limbs for a submission, whilst we're on the ground.
Maeda wants to control from the top but Malaya keeps moving.
Maeda tries to free his leg and advance position but Malaya is retaining full guard.
The crowd are loving this. Great action here.
Malaya working a defensive guard here.
The crowd are going absolutely nuts as the round comes to an end - what a fantastic round of action!

Malaya throwing his legs up looking for a triangle.
And thats the end of the round the fighters go back to their corners.
Mitsuyo Maeda dominated that round.
That's the end of the interval. I'm sure that seemed a lot quicker than a minute for our two fighters! Back to the action.

Malaya scores with a sloppy right hand. Maeda should have avoided that one.
Maeda fakes low and throws an overhand right that catches Malaya on the side of the head.
Simeon Malaya seems to be the more aggressive standup fighter in this bout.
Maeda avoids the body shot from Malaya.
Nice shot by Maeda.
Maeda shoots in and gets a takedown into half guard. Maeda showed some decent athleticism there.
The fighters are starting to perspire pretty heavily.
Malaya blocking the ground and pound attempt from Maeda.
Maeda is keen to just control but Malaya is a slippery customer.
The fighters are pressed up against the cage, both looking to find a bit of space to work.
Maeda thumps the canvas. Not on purpose obviously - he just missed Malaya's head.
That's one minute gone in the round.
Maeda working over Malaya with some ground and pound. Malaya looks like he wants out of this position, which is understandable.
Malaya is refusing to be controlled, as Maeda sits in half guard.
Malaya gets full guard.
Maeda scores with a decent looking elbow strike.
Mitsuyo Maeda overall seems to be getting the better of the ground position in the fight so far.
Malaya seems keen to control Maeda's posture.
Maeda is taking a break and basically stalling. The referee will not allow him to do that for long.
Maeda throws a big right hand that misses.
That's two minutes gone in the round.
Maeda passes into half guard.
Maeda wants to free his trapped foot but Malaya is holding on for dear life with his legs.
Malaya keeping hold of Maeda's head, controlling as best he can.
Maeda wants to pass the guard but Malaya is defending well.
That's three minutes gone in the round.
Maeda works his way into side control.
The ground and pound from Maeda seems to be hitting the mat more than his opponent.
Maeda advances nicely into full mount.
Maeda with a couple of short strikes.
Maeda misses with a series of strikes from mount. He'll no doubt be working on his ground and pound when he gets back to the gym.
Maeda misses with a head shot.
Maeda misses with a series of strikes from mount. He'll no doubt be working on his ground and pound when he gets back to the gym.
That's four minutes gone in the round.
Malaya tries to hold on but Maeda pushes him away.
Malaya suckers Maeda into throwing a sloppy strike and uses the momentum to reverse the position beautifully! Malaya is now in Maeda's guard!
Malaya tries to stand but Maeda is controlling from the bottom.
Wooooo! Give it up for these two warriors! They are putting on a show!
Maeda trying to control the position here.
As the round comes to an end the crowd are showing their appreciation for a great round of action.
Maeda is working an open guard here, looking to improve his position. No doubt that will leave him open to counters but at least he's being more offensive.
And thats the end of the round the fighters go back to their corners.
Mitsuyo Maeda dominated that second round.
That's time! Maeda's corner gives him a slap on the ass as he gets ready to fight. This is the final round!

Maeda moves out of range of the strikes.
Simeon Malaya seems to be getting the better of the standup.
Maeda goes for a spinning back kick but it misses.
Malaya moves out of range of the body kick from Maeda.
Maeda has his hands up protecting his head but a hook from Malaya finds it's way round the side to connect with Maeda's head.
Maeda gets a double leg takedown into Malaya's guard.
Malaya is pulling down on Maeda's head. It's preventing any offense from Maeda, at least for the moment.
Maeda tries to free his leg and advance position but Malaya is retaining full guard.
Maeda throwing shots from guard but he's hitting more mat than opponent.
That's one minute gone in the round.
Maeda works a leg free and moves into half guard.
Malaya controlling the position for now.

Maeda is trying a forearm choke
I don't think that's going to do much at this level of the game.
Maeda thows a wild elbow that connects with the canvas.
That's two minutes gone in the round.
Maeda is trying to control the action in half guard but Malaya is working away on the bottom, looking perhaps to get back to full guard.
Maeda is stalling here. Malaya is in no mood to hang around though. He's locked up a kimura from the bottom! Maeda seems to be keeping calm but he's forced to roll out of the hold and Malaya has ended up in side control on the top. Nice work.

Malaya stands up and beckons Maeda to his feet.
Malaya throws a half hearted mid kick.
Malaya misses with a low kick.
Maeda pushing out the jab but it's not landing.
Maeda takes an uppercut right on the jaw but it doesn't phase him.
Malaya cracks Maeda with a nice right hand that draws applause from the crowd.
Malaya fakes a head shot and lands one to the body.
We've seen a great period of action over the last minute or so - credit to both fighters for going all out!
Maeda throws a nice looking combination but Malaya bobs and weaves to avoid any damage.
That's three minutes gone in the round.
Malaya feints a straight left to the body, then turns around with a flashy move and hits Maedas jaw with a dramatic spinning back fist!
Maeda uses good footwork to avoid the strikes from Malaya.
Malaya lands a high kick!
Maeda shoots in for a double leg but Malaya sprawls well. That's going to sap some energy.
Jab, jab by Malaya - just one landing.
Malaya lands with a hook. Maeda tried to avoid it but it clipped the top of his head.
Maeda blocks a jab.
Maeda shoots in but no luck this time.
Malaya lands with a straight right. Maeda didn't see that one coming.
Like a baseball bat into the meat of his leg there - nice leg kick by Malaya.
The crowd are loving this. Great action here.
Maeda throws a body kick, spinning off balance
and Malaya counters with a crisp hook to the side of the head.
Maeda takes a nice looking leg kick right on the meat of his thigh there.
Maeda thows a left - swing and a miss!
Malaya throws out a token jab with nothing on it.
That's four minutes gone in the round.
Malaya scores with a nice strike.
Malaya waving his hands out in front of him, looking to distract Maeda.
Malaya looks to land a left hand but Maeda moved out of range nicely.
Malaya throws an uppercut from half a mile away. Maeda sees it coming and avoids it easily.
Horrible takedown by Maeda or perhaps it was just good defense by Malaya which made him look bad.
That's three failed takedown attempts in the round for Mitsuyo Maeda. That's going to take a lot out of him.
Malaya lands with a kick to the ribs.
Malaya has used his reach advantage pretty well so far tonight.
Malaya throws a body kick that misses.
Malaya pivots, looking for a leg kick but Maeda is out of range and Malaya settles back down.
Malaya scores with a punch to the head.
As the round comes to an end the crowd are showing their appreciation for a great round of action.
Maeda misses with a body shot. Nice footwork from Malaya.
Maeda scores to the head and body with a nice combination!
Simeon Malaya has stepped it up - he knows he needs a finish here!
Malaya throws a body kick despite being completely out of range
and Maeda counters with a takedown into side control! That could mean trouble for Malaya!
And that's the end of the fight!
Simeon Malaya comfortably won the final round on my scorecard.
I think Maeda has won this one but let's see what the judges have to say. Over to the ring announcer for the scorecards.
Ladies and gentlemen, after 3 rounds of action, we go to the scorecards for a decision.
Judge Timothy Bukovac scores the fight 29:28
Judge Jack Bonds scores the fight 29:28
Judge Don Winkell scores the fight 29:28
In favor of your winner, by unanimous decision... Mitsuyo Maeda!
A relieved looking Mitsuyo Maeda thanked the fans for their support and gave the usual line about them being amazing. They seemed to believe that he actually meant it.
|
|
|
|
|
|
|
|
|
|
|
|
|
|
|
|
|
|
|
|
|
|
|
| S |
C
A |
G |
S |
C
B |
G |
|
S |
C |
G |
|
energy
A | B |
|
hype
A | B |
|
pop
A | B |
|
mgr
A | B |
|
FIGHT
RATING
72% |
|
|
|
|
|
|
