|
|
PBP Commentary |
Coming up we have a lightweight MMA rules bout between Brad Black (ranked 0 p4p, 0 weight class) and Mike Bansa (ranked 0 p4p, 0 weight class). This should be fireworks!
 |
|
 |
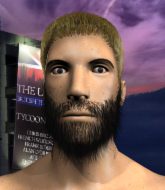
| 180 cm
20
162 lbs
5 - 7 - 0 |
|
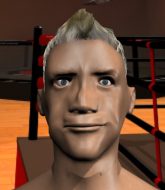
167 cm
26
155 lbs
2 - 2 - 0 |
BJJ Blue Belt
Brawler
Granite chin |
|
BJJ Blue Belt
Good kicks
Very confident |
|
| |
|
Ladies and gentlemen. This fight is 3 rounds, in the lightweight division.
Introducing the fighter to my left, fighting out of the red corner.
With a record of
5 - 7 - 0, fighting out of Los Angeles, Brad Black!
And introducing the fighter to my right, fighting out of the blue corner.
With a record of
2 - 2 - 0, fighting out of Los Angeles, Mike Bansa!
The judges for this bout are Don Winkell, Frank Antenori and Timothy Bukovac.

The bell rings for round one and we are underway!
Bansa fakes and then throws a beautiful body shot. Black looks a bit winded and takes a step backwards to take a breath.
Bansa scores with a jab to the body.
Brad Black seems to be the more aggressive standup fighter in this bout.

Bansa forces Black back against the cage and clinches.

Bansa breaks the clinch and we're back to striking at distance.
Bansa lands with a good body shot.
Black shoots in with a takedown attempt and he has Bansa pinned against the cage. Bansa gets the underhooks and manages to circle away.
Black connects with a crisp jab.
Black looks for a takedown but Bansa sprawls well.
Bansa darts in and clinches Black up against the cage.
Bansa breaks the clinch.
Black shoots in for a takedown but Bansa shows good takedown defense there and keeps this one on the feet.
That's three failed takedown attempts in the round for Brad Black. That's going to take a lot out of him.
Bansa displays good takedown defense there as he swats away a double leg from Black.
This has been an exciting period of action!
Black fails with a takedown attempt.

Black shoots in and scores a nice double leg takedown into half guard.

That's one minute gone in the round.
The referee is asking the fighters to pick up the pace.
Neither fighter is being very active at the moment, with Black in particular looking to stall.
Black throwing shots but Bansa is blocking nicely.
Bansa is not content to let Black control the position.
Black will need to keep those long limbs tucked in whilst he's on the ground, to prevent any submissions.
Black throwing shots but Bansa is blocking nicely.
Black is trying to get back to his feet now but his leg is trapped.
Black controlling the action here.

That's two minutes gone in the round.

The referee decides to stand the fighters back up, due to lack of activity on the part of Brad Black.
A telegraphed takedown attempt from Black is defended easily by Bansa.
Bansa has closed the distance and engaged Black in a clinch.
Bansa lands a knee to the body.
Black tries for a takedown. No joy.
Bansa tries a knee to the head but Black blocks it.
Bansa lands a nice knee to the body.
Bansa has had enough of the clinch and is looking to separate.
Bansa is defending well against a takedown attempt.
Black is breathing heavily.
We've seen a great period of action over the last minute or so - credit to both fighters for going all out!
Bansa breaks the clinch and we're back to striking at distance.
Black shoots for a takedown but Bansa saw that one coming a mile off and avoided it easily.
Bansa gets to the clinch - let's see what his plan is here.

That's three minutes gone in the round.
Bansa is pressed up against the cage. Black has hold of a leg and is looking to drag Bansa down to the mat. Bansa avoids the attempt though and has circled away. We're back to striking at a distance.
Mike Bansa is looking to keep the fight on the feet at all costs.
Bansa closes the distance and lands a one-two.
Bansa rushes Black and pushes him back against the cage in a clinch.
Bansa scores with a knee to the head.
Black is trying to trip Bansa. He has hold of a leg but Bansa is hopping around, keeping his balance for the moment. Black persists though and gets the takedown into guard.

Black postures up as if he's going to throw some strikes but drops back for an ankle! Bansa is in big trouble! He looks ready to tap! But no, he's escaped and dives on top of Black, into his guard.
We've seen a great period of action over the last minute or so - credit to both fighters for going all out!
Black working the defensive guard well to avoid strikes from Bansa.
Black wants to sweep but no luck.
Hammerfist, elbow! yells Bansa's corner. There ya go! There ya go!
Bansa passes Black's right leg, so he's now in half guard.
Bansa wants to advance to full mount but Black doesn't think that's going to happen and regains full guard instead.
Bansa stands up and looks to throw the legs aside to pass to side control. Black swivels though and keeps the full guard.

That's four minutes gone in the round.
The ref warns both fighters not to hold the cage as they work up against the meshing.
Black can't keep his opponent in guard - Bansa advances to half guard, no doubt looking to mount.
Bansa tries to stand but his arm is trapped.
Bansa throwing shots but Black is blocking nicely.
Bansa passes to side control.

Bansa decides to stand back up. Bansa steps back and let's Black get back to his feet.
Bansa throws a right high kick that is partially blocked by Black.
Bansa pulls out of a head kick attempt.
The crowd are going absolutely nuts as the round comes to an end - what a fantastic round of action!
Black shoots in but Bansa avoids the takedown attempt easily.
The fight moves into the clinch position.
And thats the end of the round the fighters go back to their corners.
Mike Bansa dominated that round.
OK. That's time! The bell goes and we're back to the action.

Bansa moves into range and clinches up with Black.
Black dictating the pace here, as the fighters clinch against the cage.
Bansa tries a knee to the head but Black blocks it.
Black tries to pull guard but Bansa won't allow it.
Black can't get the takedown.
Black wants to break free. God knows he wants to breaaaak freeee.
Black fails to pull guard.
That's three failed takedown attempts in the round for Brad Black. That's going to take a lot out of him.
Black tries for a takedown but Bansa manages to get underhooks.
Bansa pushes off and circles away, back to the middle of the mat.
Bansa has closed the distance and engaged Black in a clinch.
Black changes levels and goes for a takedown here. Bansa fights it off and pushes away nicely.
Black moves out of range of the body kick from Bansa.
That's one minute gone in the round.
Bansa closes the distance and presses his opponent up against the cage.
Black is trying to trip Bansa. He has hold of a leg but Bansa is hopping around, keeping his balance for the moment. Black persists though and gets the takedown into guard.
Black trying to control the position from guard on top but Bansa is wriggling around, looking for whatever he can.
Bansa is trying to stand up but he's not managed so far.
Bansa can't do much from the bottom at the moment, as Black controls the pace.
Black trying to control but Bansa is working from the bottom.
The ref stands the fighters back up because Brad Black just wasn't active enough.
Black shoots in and drives through. Bansa sprawls well.
That's two minutes gone in the round.
Nice sprawl there from Bansa as Black shoots in.
Both fighters are absolutely exhausted here.
Bansa throws a combination but comes up with nothing but fresh air.
Black is looking to clinch but Bansa is avoiding it.
Black dives in and grabs Bansa's left leg, looking for a takedown. Bansa pushes down on Black's head and hops out.
Black will have to do better than that with his takedown attempts.
Bansa fakes with an overhand right and moves in to clinch with Black, pushing him back against the cage.
This has been an exciting period of action!
Bansa tries to break the clinch but Black is controlling the position.
Black on the defensive, avoiding the knees to the body.
Bansa escapes the clinch and we're back to striking.
Bansa scores with a one two! Black had his feet all tangled up there and couldn't avoid the strikes.
Bansa moves into range and clinches up with Black.
Bansa is pressed up against the cage. Black has hold of a leg and is looking to drag Bansa down to the mat. Bansa avoids the attempt though and has circled away. We're back to striking at a distance.
Bansa gets to the clinch - let's see what his plan is here.
Bansa is defending well against a takedown attempt.
Bansa putting his Muay Thai to good use. He has Black in a tight clinch and is doing some damage with knees to the body.
Bansa tries to circle away but Black has him pinned against the cage.
That's three minutes gone in the round.
Black takes a knee to the side of the body.
Bansa looks like he'd prefer to be striking at range right now.
Bansa is trying to wear down his opponent with knees to the body.
Bansa is trying to break the clinch but Black is controlling him.
Knees to the body from Bansa.
Black prevents Bansa from breaking the clinch.
Mike Bansa seems to be working more effectively in the clinch in the fight so far.
Bansa breaks the clinch and we're back to striking at distance.
Mike Bansa seems to be getting the better of the standup.
A head kick misses from Bansa.
Bansa clinches.
Black is working for takedown but Bansa is calmly controlling the position for now.
Black wants to get back to striking at distance but Bansa won't allow it.
We've seen a great period of action over the last minute or so - credit to both fighters for going all out!
Bansa breaks from the clinch.
Bansa connects with a high kick.
Bansa slips in close and lands a nice hook before moving back out of range.
Black looking to shoot here. He's gone for it and he's landed a takedown into side control! Oh, that's bad for Bansa!
That's four minutes gone in the round.
Bansa is putting a lot of effort into getting back to his feet here.
Bansa is not content to let Black control the position.
Black is working Bansa over with some ground and pound from side control.
The crowd are going absolutely nuts as the round comes to an end - what a fantastic round of action!
Bansa is trying to get back to his feet.
And thats the end of the round the fighters go back to their corners.
Mike Bansa showed his class in that round. I'd imagine he'll take it on all the scorecards.
Well, the break between rounds is over. Let's get back to the scrappin! Let's hear some noise people - this is the final round!

Black fakes high and shoots in for a takedown but Bansa avoids it really well and circles away.
Black shoots in for a double leg but Bansa sprawls well. That's going to sap some energy.
Bansa scores with a jab.
Black shoots in for a double leg but Bansa sprawls well. That's going to sap some energy.
That's three failed takedown attempts in the round for Brad Black. That's going to take a lot out of him.
Black gets tackled into the cage by Bansa. Bansa maintains the clinch.
Black goes for a takedown in the clinch but Bansa prevents it.
Bansa's corner calls for him to break the clinch, which he does.
No luck with that takedown attempt from Black.
Bansa connects with a high kick.
Both fighters are breathing heavily.
Bansa misses with a series of wild punches.
Black will have to do better than that with his takedown attempts.
That's one minute gone in the round.
Bansa drives through and clinches with Black against the cage.
Bansa is trying to wear down his opponent with knees to the body.
Knees in the clinch landing for Bansa.
Bansa lands a knee to the body.
Bansa escapes the clinch and we're back to striking.
Bansa sizes up Black with a pawing jab and scores with a straight right down the middle.
Bansa connects with a high kick.
Bansa has Black up against the cage in a clinch.
The crowd cheering loudly, showing their appreciation for the quality fight we're seeing here.
Bansa escapes the clinch and we're back to striking.
Bansa moves into range and clinches up with Black.
Bansa breaks the clinch.
Black shoots in for a takedown. "Ole!" shouts Bansa as he jumps to the side.
Black walks into a left hand.
That's two minutes gone in the round.
Bansa lands a nice looking kick to the body. Black takes a step back to recover.
Bansa scores with a push kick.
Bansa instigates a clinch.
Bansa working hard to break the clinch.
Black is trying to stall.
Bansa escapes the clinch and we're back to striking.
Bansa thows a body kick. Black tries to catch it but that hurt him.
Black blocks a head kick by Bansa.
Bansa closes the distance and clinches.
Black is trying to pull guard but Bansa turns him against the cage and we stay in the clinch.
Bansa breaks the clinch.
Bansa darts in and clinches Black up against the cage.
That's three minutes gone in the round.
Black has hold of a leg and is looking for a trip takedown. Bansa avoids it nicely though and we remain in the clinch.
Bansa has had enough of the clinch and is looking to separate.
Bansa lands a knee to the head.
Bansa is looking to score with knees to the body. Maybe he'll change it up and go body then head. Black is defending well for now.
Bansa lands a knee to the head.
Black is trying to drag Bansa to the mat but Bansa just about manages to keep his footing. He used the cage to his advantage there.
Black wants a takedown.
Bansa escapes the clinch and we're back to striking.
Bansa moves into the clinch.
Knees to the body from Bansa.
Black blocks an elbow strike.
Bansa manages to break the clinch.
Bansa has managed to clinch.
That's four minutes gone in the round.
Black has dropped down and is looking to force the takedown but it's defended by Bansa after a bit of a struggle.
Bansa pushes off and circles away, back to the middle of the mat.
Bansa lands a nice looking kick to the body. Black takes a step back to recover.
Mike Bansa is looking to throw some combinations by the looks of things.
We've seen a great period of action over the last minute or so - credit to both fighters for going all out!
Bansa lands with a kick to the temple. Black shrugs as if to say "is that all you've got?"
Bansa has managed to clinch.
Black has Bansa pressed against the cage, preventing Bansa from circling away and getting back to striking at range.
Bansa breaks the clinch and we're back to striking at distance.
Bansa slaps away a takedown attempt from Black, before circling back to the center of the mat.
Bansa rushes Black and presses him up against the cage.
The crowd are going absolutely nuts as the round comes to an end - what a fantastic round of action!
Black wants a takedown but no success here.
Bansa breaks the clinch and we're back to striking at distance.
Brad Black has stepped it up - he knows he needs a finish here!
Bansa has Black up against the cage in a clinch.
And that's the end of the fight!
Mike Bansa comfortably won the final round on my scorecard.
I've got Bansa winning every round here. Surely the decision will go his way and he'll pick up a well deserved decision victory. Over to the ring announcer for the scorecards.
Ladies and gentlemen, after 3 rounds of action, we go to the scorecards for a decision.
Judge Don Winkell scores the fight 27:30
Judge Frank Antenori scores the fight 27:30
Judge Timothy Bukovac scores the fight 27:30
In favor of your winner, by unanimous decision... Mike Bansa!
|
|
|
|
|
|
|
|
|
|
|
|
|
|
|
|
|
|
|
|
|
|
|
| S |
C
A |
G |
S |
C
B |
G |
|
S |
C |
G |
|
energy
A | B |
|
hype
A | B |
|
pop
A | B |
|
mgr
A | B |
|
FIGHT
RATING
100% |
|
|
|
|
|
|
