|
|
PBP Commentary |
Coming up we have a welterweight MMA rules bout between James Pain (ranked 0 p4p, 0 weight class) and Loser Haha (ranked 0 p4p, 0 weight class). Loser Haha has the better chin. Will he look to stand and bang today?
 |
|
 |
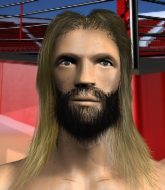
| 176 cm
31
170 lbs
5 - 0 - 0 |
|
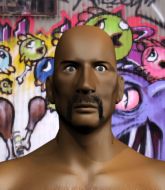
180 cm
25
180 lbs
0 - 0 - 0 |
Good takedowns
Counter fighter
Cuts easily |
|
Good wrestler
Brawler
Tends to cut |
|
| |
|
Ladies and gentlemen. This fight is 3 rounds, in the welterweight division.
Introducing the fighter to my left, fighting out of the red corner.
With a record of
5 - 0 - 0, fighting out of New York, James Pain!
And introducing the fighter to my right, fighting out of the blue corner.
With a record of
0 - 0 - 0, fighting out of New York, Loser Haha!
The judges for this bout are Dean Styles, Anthony Taglia and Bruno Lombardi.

The bell rings for round one and we are underway!
A nice inside leg kick there by Pain. That's going to slow Haha down.
Pain is looking to take this fight into the clinch.

Pain moves into the clinch.
Haha jumps guard but his hands slip and he falls flat on his back. Well, he's made himself look a right mug there, as Pain walks away with a smile on his face. Haha gets slowly back to his feet and shakes his head.
Haha fakes high and shoots in for a takedown but Pain avoids it really well and circles away.
Pain tries to clinch but is not successful on this occasion.

Haha has Pain up against the cage in a clinch.
Haha swings away with an uppercut that misses.
Haha gets underhooks to prevent Pain's takedown attempt.
Haha is working hard here but doesn't seem to be able to control effectively, up against the cage.

That's one minute gone in the round.
Pain prevents the takedown attempt.
James Pain has stuffed three takedown attempts in the round now. That's going to take a lot out of Loser Haha.
Haha tries to pull guard but can't drag his opponent to the mat. Pain just stands there and leans against the cage.
Haha wants a takedown but no success here.
Haha tries to take the fight to the ground by pulling guard but can't manage it.
Pain wants a takedown but no success here.
Haha wants to stall.
Haha is trying to pull guard but Pain turns him against the cage and we stay in the clinch.
Haha tries to pull guard but Pain won't allow it.

That's two minutes gone in the round.

Pain breaks the clinch and we return to the middle of the mat.
Haha rushes Pain and presses him up against the cage.
Haha wants to strike at distance but he can't break free of the clinch.
Haha misses with a punch to the body.
Haha pressing his opponent against the cage.
Haha misses with a knee strike.
Haha is trying to pull guard but Pain has him pressed against the cage.
Pain keeps the fight in the clinch, despite Haha's efforts to push away.

That's three minutes gone in the round.
Haha is trying to work for a single leg takedown but Pain pulls him back up using the underhooks.

Pain has hold of one of Haha's legs. Haha is fighting the takedown attempt but Pain gets the trip and lands the takedown into guard.
Haha is working from a closed guard but he's struggling to control his opponent.
Pain trying to control the position from guard on top but Haha is wriggling around, looking for whatever he can.
Haha is trying to control the position from the bottom.
Haha really doesn't want to stay on the ground with Pain. If he can't get it back to his feet, it's only a matter of time before he'll be tapping out.
Pain postures up and lands a big shot to Haha's brow.
Pain chips away with some ground and pound.
Pain postures up in Haha's guard and throws a big left but Haha blocks it.
Pain has been looking to land a fair amount of strikes on the ground. He might be looking to soften his opponent up in order to work for a submission.

That's four minutes gone in the round.
Pain distracts Haha with his right hand and drops a big elbow with his other arm.
The crowd cheering loudly, showing their appreciation for the quality fight we're seeing here.
Pain missing there with some ground and pound from the guard.
Pain wants to control from the top but Haha keeps moving.

Pain avoids a guillotine attempt easily.
Pain pressing down on his opponent's thigh, looking to pass guard. Haha is keeping the position for now.
Haha has an active guard here but Pain has managed to pass into half guard.
Pain is trying to control. Haha wants to improve his position but can't escape this time.
We get told so often about how wrestlers don't like to be on their backs. Let's see if Haha can do anything to dispel that myth.
As the round comes to an end the crowd are showing their appreciation for a great round of action.
Pain thows a huge punch but Haha dodges it nicely.
And thats the end of the round the fighters go back to their corners.
James Pain dominated that round.
That's the end of the interval. I'm sure that seemed a lot quicker than a minute for our two fighters! Back to the action.

Haha keeps the fight standing with a nice sprawl.
Haha leaves Pain with his face pressed against the mat as he sprawls beautifully, defending against a solid takedown attempt.
Haha shoots in with a takedown attempt and he has Pain pinned against the cage. Pain gets the underhooks and manages to circle away.
Pain leaves Haha with his face pressed against the mat as he sprawls beautifully, defending against a solid takedown attempt.
Pain stuffs a takedown. It's all about dictating where the fight takes place and Pain wants it to stay on the feet.
James Pain has stuffed three takedown attempts in the round now. That's going to take a lot out of Loser Haha.
Haha clinches with his opponent.
Haha is trying to drag Pain to the mat but Pain just about manages to keep his footing. He used the cage to his advantage there.
That's one minute gone in the round.
Pain prevents Haha from breaking the clinch.
Pain has dropped down and is looking to force the takedown but it's defended by Haha after a bit of a struggle.
Pain prevents Haha from breaking the clinch.
Haha looking for a takedown.
Haha tries to pull guard but Pain won't allow it.
Haha stops a takedown attempt from Pain.
Haha is fighting off a takedown attempt but Pain is just too persistent for him and manages to trip Haha to the mat. Haha regains guard as soon as the fighters hit the mat.
A big thud reverberates around the arena there as Pain accidentally thumps the mat. Hopefully he's not broken his hand.
That's two minutes gone in the round.
Pain postures up.
Haha looking for subs off his back but Pain has passed one foot through into half guard.
Haha wants to get back to full guard.
Pain wants to pass the guard but Haha is defending well.
Pain is keen to just control but Haha is a slippery customer.
Pain is going to have to think about doing something other than just controlling because Haha is managing to avoid having the position dictated to him.
Pain scoring with strikes to the body and head.
This has been an exciting period of action!
Haha misses with some strikes from the bottom.
That's three minutes gone in the round.
Pain works his way into side control.
Pain landing strikes.
Pain is looking to take a break and control but Haha is keeping him honest, looking to work from the bottom.
Haha wants to escape from the position here - easier said than done!
The fighters are pressed up against the cage, both looking to find a bit of space to work.
Pain landing strikes.
Pain working the ground and pound from side control.
Haha struggling a bit here.
Haha is trying to get back to his feet.
That's four minutes gone in the round.
Pain in side control, trying to ground and pound but not landing this time.
Pain working away.
Pain wants to lay and pray for a moment but Haha keeps working.
Haha manages to work his way to half guard, despite Pain's best efforts.
The crowd are loving this. Great action here.
Pain seems very keen to just sit and control from half guard but Haha does not like that idea so much and is remaining active off his back.
Pain not landing any meaningful shots this time.
Haha trying to control here.
Pain landing with strikes to the body and head, softening up his opponent.
As the round comes to an end the crowd are showing their appreciation for a great round of action.
Pain is looking to take a break and control but Haha is keeping him honest, looking to work from the bottom.
Pain lands with a punch from half guard.
And thats the end of the round the fighters go back to their corners.
James Pain dominated that second round.
That's the end of the round. The referee orders the cornermen out of the cage so we can get back down to business. This is the final round!

Pain fails miserably with a takedown attempt.
A momentary lapse in concentration from Haha enables Pain to shoot in and score with a neat double leg. Haha manages to secure a closed guard as the fighters hit the mat.
Pain loading up with the ground and pound but he's missing more than he's landing in this flurry.
Haha working a defensive guard here.
Pain slips effortlessly into side control - very nice.
Pain working away.
Pain landing a few strikes.

Haha is rocked!
Pain in side control here. He's dropped a big elbow there and Haha looks hurt! Oh, he is hurt! Pain turns on the heat and pounds him out for a TKO victory! Good killer instinct there!
Ladies and gentlemen, after 1:58 of round 3, we have a winner by way of TKO (Strikes). James Pain!
A loyal slave to those sponsorship dollars, James Pain made sure he mentioned KAISER, along with how happy he was to win his fight.
|
|
|
|
|
|
|
|
|
|
|
|
|
|
|
|
|
|
|
|
|
|
|
| S |
C
A |
G |
S |
C
B |
G |
|
S |
C |
G |
|
energy
A | B |
|
hype
A | B |
|
pop
A | B |
|
mgr
A | B |
|
FIGHT
RATING
100% |
|
|
|
|
|
|
