|
|
PBP Commentary |
Coming up we have a light heavyweight MMA rules bout between Sheamus Celtic Warrior (ranked 0 p4p, 0 weight class) and Ed Stark (ranked 0 p4p, 0 weight class). Both fighters will be looking to make this an exciting fight for the fans, I'm sure!
 |
|
 |
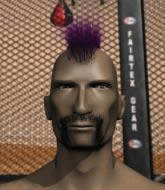
| 175 cm
25
200 lbs
0 - 0 - 0 |
|
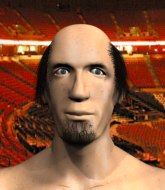
187 cm
25
209 lbs
1 - 0 - 0 |
BJJ Blue Belt
Solid boxing
Granite chin |
|
BJJ Purple Belt
Basic striking
Determined |
|
| |
|
Ladies and gentlemen. This fight is 3 rounds, in the light heavyweight division.
Introducing the fighter to my left, fighting out of the red corner.
With a record of
0 - 0 - 0, fighting out of Las Vegas, Sheamus Celtic Warrior!
And introducing the fighter to my right, fighting out of the blue corner.
With a record of
1 - 0 - 0, fighting out of Las Vegas, Ed Stark!
The judges for this bout are Gwen Towbar, Robert Twigg and Alan Glass.

The bell rings for round one and we are underway!
A really sloppy takedown attempt there from Stark.
Stark misses with a straight left.
Ed Stark seems to be the more aggressive standup fighter in this bout.

Celtic Warrior shoots in for a takedown and gets it.
Celtic Warrior moves into full mount! Stark won't be happy about that!
Celtic Warrior knows he needs to get back to his feet asap. He's simply no match for Stark on the ground.
Stark wriggling around on the bottom manages to avoid the strikes thrown by Celtic Warrior.
Stark tries to buck Celtic Warrior off but he can't manage it.
Celtic Warrior throwing sloppy strikes here. Perhaps if he tightened up his striking from such a dominant position, he'd be able to finish easier.
The ref warns both fighters not to hold the cage as they work up against the meshing.
Stark is working to get back to half guard.

That's one minute gone in the round.

Celtic Warrior stands up from the dominant position, so we're back on the feet.
Stark has a takedown stuffed.
Celtic Warrior shoots in with a lovely double leg takedown. Stark manages to land in full guard to minimise the damage.

Stark working from the bottom, still in full guard. He's managed to get a loose triangle. Celtic Warrior doesn't seem to be doing much to defend here, obviously he feels comfortable in the position. Celtic Warrior manages to throw the legs off his shoulder and he's back into guard - no problem.
Celtic Warrior has to be careful here, sitting in the guard of a superior BJJ player.
Celtic Warrior gets to his feet. Stark looking to butt scoot but the ref puts an end to that. On your feet son!

That's two minutes gone in the round.
Stark looks for a takedown but Celtic Warrior sprawls well.
Sheamus Celtic Warrior has stuffed three takedown attempts in the round now. That's going to take a lot out of Ed Stark.
Celtic Warrior drives through with a really nice takedown into side control.
Stark looks winded!
This has been an exciting period of action!
Celtic Warrior is trying to ground and pound but Stark uses the momentary lack of control by Celtic Warrior to regain half guard.
Celtic Warrior controlling the action here.

Celtic Warrior is looking for a kimura but Stark is holding onto that half guard position, so it's hard for Celtic Warrior to get the leverage.

That's three minutes gone in the round.
Celtic Warrior is thwarting Stark's attempts to control the position.
Stark gets full guard.
Celtic Warrior might be looking to lock onto one of his opponent's long limbs for a submission, whilst we're on the ground.
Celtic Warrior trying to control the position from guard on top but Stark is wriggling around, looking for whatever he can.
Stark keeping full guard, as Celtic Warrior tries to pass.
Celtic Warrior trying to control the position from guard on top but Stark is wriggling around, looking for whatever he can.

That's four minutes gone in the round.
There's a bit of a scramble here and now Stark is on top in guard.
Celtic Warrior pulls Stark in close to his closed guard and prevents Stark from doing any damage or advancing position.
Celtic Warrior is active off his back here, looking for submissions.
Stark passes Celtic Warrior's right leg, so he's now in half guard.
As the round comes to an end the crowd are showing their appreciation for a great round of action.
Celtic Warrior is trying to maintain the position but Stark is very close to passing his half guard.
Celtic Warrior pushes Stark off and gets back to his feet.
And thats the end of the round the fighters go back to their corners.
Sheamus Celtic Warrior dominated that round.
Well, the break between rounds is over. Let's get back to the scrappin!

Celtic Warrior darts in and lands a nice takedown into half guard.
Celtic Warrior looking for a kimura but he'll have to free his other leg if he wants to finish that. Perhaps he's just using it as a distraction technique.
Stark is looking for a sweep. Celtic Warrior is wise to his cunning plan and keeps the top position.
That's one minute gone in the round.
Celtic Warrior is looking for a kimura but Stark is holding onto that half guard position, so it's hard for Celtic Warrior to get the leverage.
Celtic Warrior seems content to maintain position for now, rather than mounting any offense.
Stark gets full guard.
Stark has a butterfly guard looking to sweep but Celtic Warrior has passed into side control.
Stark is looking for a sweep.
That's two minutes gone in the round.
Stark is trying to escape the position but Celtic Warrior is controlling the position.
Celtic Warrior trying to control the action but Stark is working from the bottom.
Stark manages to get back to half guard.
Celtic Warrior is trying to advance to mount but he's lost his balance and Stark reverses the position - he's now on top in Celtic Warrior's guard.
Celtic Warrior is trying to control the position but Stark postures up.
That's three minutes gone in the round.
Stark postures up as if he's going to throw some strikes but drops back for an ankle! Celtic Warrior is in big trouble! He looks ready to tap! But no, he's escaped and dives on top of Stark, into his guard.
Stark is trying to keep Celtic Warrior in close.
Celtic Warrior decides to stand up and beckons his opponent to follow.
A bone on bone clash there as Stark blocks the leg kick.
Celtic Warrior fails with an attempt to clinch.
That's four minutes gone in the round.
Stark shoots in for a takedown. "Ole!" shouts Celtic Warrior as he jumps to the side.
Celtic Warrior closes the distance and gets a trip takedown into side control. Stark quickly recovers to half guard.
Stark is staying active underneath Celtic Warrior, who seems content to just control the action from this position.
Stark wants to get back to his feet.
The fighters are pressed up against the cage, both looking to find a bit of space to work.
Stark is breathing heavily.
Celtic Warrior trying to advance position but Stark counters by regaining guard.
Celtic Warrior throws a strike but Stark rolls with it and manages to sweep. Now he's in guard on top.
We've seen a great period of action over the last minute or so - credit to both fighters for going all out!
The crowd applaud the fighters efforts here as the round comes to an end.
A big thud reverberates around the arena there as Stark accidentally thumps the mat. Hopefully he's not broken his hand.
And thats the end of the round the fighters go back to their corners.
Sheamus Celtic Warrior dominated that second round.
The fighters get back to their feet, the hooter sounds and we're back to the action! This is the final round!

Stark avoids the body shot from Celtic Warrior.
Stark shoots in with a takedown attempt and he has Celtic Warrior pinned against the cage. Celtic Warrior gets the underhooks and manages to circle away.
Stark avoids a punch combination nicely.
Stark dives in and grabs Celtic Warrior's left leg, looking for a takedown. Celtic Warrior pushes down on Stark's head and hops out.
Stark shoots in for a takedown but Celtic Warrior shows good takedown defense.
Sheamus Celtic Warrior has stuffed three takedown attempts in the round now. That's going to take a lot out of Ed Stark.
Celtic Warrior closes the distance, clinches up and gets a nice trip takedown into side control. Very smooth.
Celtic Warrior takes a little break here. Stark wants to take advantage but he is being controlled well.
Celtic Warrior has had enough of the ground for now and decides to stand.
Stark takes a big intake of breath there - he's definitely tired.
That's one minute gone in the round.
Celtic Warrior throws a head kick that misses and slips in the process. He scrambles back to his feet and the fighters circle.
Stark shoots in for a takedown. He's persisting with it as Celtic Warrior sprawls well. Celtic Warrior wins this battle and keeps the fight standing. Stark gets slowly back to his feet.
Stark fails in his attempt to clinch.

Stark feints and as Celtic Warrior raises his hands in defense, Stark changes levels and drives through with a takedown into guard.
Celtic Warrior manages to escape and get back to his feet.
Stark closes this distance looking for a takedown but Celtic Warrior circles away.
Celtic Warrior shoots in with a lovely double leg takedown. Stark manages to land in full guard to minimise the damage.
Stark is working an open guard so Celtic Warrior takes the opportunity to get back to his feet.
This has been an exciting period of action!
Stark checks a leg kick.
That's two minutes gone in the round.
Celtic Warrior fakes a strike and closes the distance, dragging Stark to the ground. Celtic Warrior is now in Stark's guard.
Celtic Warrior slows down the pace of the fight, as he sits in guard.
Stark avoiding any damage from the ground and pound.
That's three minutes gone in the round.
Celtic Warrior got a little sloppy there for a moment and Stark has worked his way into a loose triangle - can he finish it?! No, Celtic Warrior has managed to get both his arms back between Stark's legs - danger averted.
Celtic Warrior sitting in guard, not really doing much.

The ref stands the fighters back up. Sheamus Celtic Warrior wasn't doing enough on the ground.
Celtic Warrior dives in and scores a takedown into Stark's guard.
Stark keeping moving, preventing Celtic Warrior from controlling successfully.
Celtic Warrior sitting in guard, not really doing much.
That's four minutes gone in the round.
Stark is looking for a triangle here but Celtic Warrior uses the submission attempt to pass into side control.
Sheamus Celtic Warrior overall seems to be getting the better of the ground position in the fight so far.
Celtic Warrior controls the position.
As the round comes to an end the crowd are showing their appreciation for a great round of action.
Celtic Warrior looking for an arm triangle but it's way too loose to do anything.
And that's the end of the fight!
Sheamus Celtic Warrior showed his dominance in that final round.
Well Celtic Warrior has outscored his opponent in every aspect of the fight today. Only a scarily incompetent judge or two will keep him from a well deserved win... Over to the ring announcer for the scorecards.
Ladies and gentlemen, after 3 rounds of action, we go to the scorecards for a decision.
Judge Gwen Towbar scores the fight 30:27
Judge Robert Twigg scores the fight 30:27
Judge Alan Glass scores the fight 30:27
In favor of your winner, by unanimous decision... Sheamus Celtic Warrior!
|
|
|
|
|
|
|
|
|
|
|
|
|
|
|
|
|
|
|
|
|
|
|
| S |
C
A |
G |
S |
C
B |
G |
|
S |
C |
G |
|
energy
A | B |
|
hype
A | B |
|
pop
A | B |
|
mgr
A | B |
|
FIGHT
RATING
46% |
|
|
|
|
|
|
