|
|
PBP Commentary |
Coming up we have a heavyweight MMA rules bout between Tylor Livingchin (ranked 0 p4p, 0 weight class) and John Haywood (ranked 0 p4p, 0 weight class). Both fighters look fresh as a daisy as they make their way towards the cage.
 |
|
 |
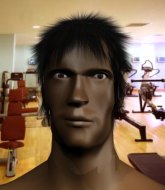
| 180 cm
18
220 lbs
1 - 1 - 0 |
|
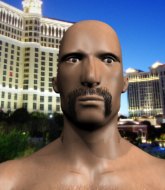
195 cm
18
250 lbs
0 - 0 - 0 |
BJJ White Belt
Counter striker
Cuts easily |
|
BJJ White Belt
Brawler
Solid chin |
|
| |
|
Ladies and gentlemen. This fight is 3 rounds, in the heavyweight division.
Introducing the fighter to my left, fighting out of the red corner.
With a record of
1 - 1 - 0, fighting out of Helsinki, Tylor Livingchin!
And introducing the fighter to my right, fighting out of the blue corner.
With a record of
0 - 0 - 0, fighting out of Helsinki, John Haywood!
The judges for this bout are Roosa Järviläinen, Marco Blurström and Matti Vanhoillinen.

The bell rings for round one and we are underway!
A swing and a miss from Haywood.
Livingchin circles away from the clinch attempt

and Livingchin decides to take the opportunity to score a takedown. He's landed in Haywood's guard.
If this pace continues, the referee will definitely step in and force a standup.
Haywood can't do much from the bottom at the moment, as Livingchin controls the pace.
Livingchin has controlled the position for a good 20 seconds, which will no doubt be starting to frustrate his opponent.

The referee decides to stand the fighters back up, due to lack of activity on the part of Tylor Livingchin.
Livingchin gets a double leg takedown into Haywood's guard.

That's one minute gone in the round.
Livingchin stays in close to Haywood's body and controls the position.
Livingchin won't allow Haywood to sweep him here.
Haywood looking to sweep using the butterfly guard but Livingchin puts pay to that idea as he passes nicely into half guard.
Haywood is trying to stand.
Livingchin trying to control the pace.
Haywood tries to get to full guard but Livingchin has control of the leg.
Still in half guard, Livingchin seems content to control.

That's two minutes gone in the round.
Haywood trying to get back to full guard but Livingchin takes advantage of the position and moves to full mount!
Livingchin content just to control the position here.

That's three minutes gone in the round.
The fighters are pressed up against the cage, both looking to find a bit of space to work.
The ref stands the fighters back up. Tylor Livingchin wasn't doing enough on the ground.
Haywood swings and misses with a hook to the body.
Livingchin shoots in for a takedown from distance. He catches Haywood napping and manages to drive through into side control!
Haywood is working hard to escape and get back to his feet. After a battle for position, Livingchin asserts his dominance and retains side control.
Haywood is trying to improve his position.

That's four minutes gone in the round.
Livingchin happy to just control the position for now.
The fighters are starting to perspire pretty heavily.
Haywood is positioning himself to get back to half guard.
As the round comes to an end the crowd are showing their appreciation for a great round of action.
You can see the frustration on Haywood's face, being in this tough position on the bottom.
And thats the end of the round the fighters go back to their corners.
Tylor Livingchin dominated that round.
The fighters get back to their feet, the hooter sounds and we're back to the action!


Livingchin clinches up with Haywood and pushes him back against the cage.
Livingchin struggles to land a body shot inside as Haywood controls his hands.
Good anti-grappling being displayed by Livingchin as Haywood tries to tie him up.
Livingchin is defending well against a takedown attempt.
Haywood is trying to push Livingchin away but Livingchin has him pressed against the cage, so he's going nowhere.

Livingchin breaks the clinch and we're back to striking at distance.
Haywood shoots in but doesn't get the takedown
and Livingchin counters with a nice double leg into guard.
The ref warns both fighters not to hold the cage as they work up against the meshing.

Haywood looking for subs off his back but Livingchin has passed one foot through into half guard.
That's one minute gone in the round.
Livingchin trying to control the pace.
Haywood tries to roll over but Livingchin keeps him under control.
Haywood trying to control but Livingchin postures up.
Livingchin prevents Haywood from improving his position.
Livingchin controlling the pace.
That's two minutes gone in the round.
We may be looking at a referee standup if the pace doesn't pick up soon.
Tylor Livingchin has forced the referee to step in and bring the fight back to the feet.
Livingchin fakes an overhand right and shoots for a takedown. Haywood sprawls well initially but Livingchin persists and gets the takedown into half guard.
Tylor Livingchin overall seems to be getting the better of the ground position in the fight so far.
Livingchin controlling the pace.
Haywood regains full guard. Nicely done.
Haywood not looking particularly offensive just at the moment.
Livingchin controlling from the guard. I say controlling but really, he's stalling.
That's three minutes gone in the round.
We've had a lack of effective grappling in the last minute or so, which could well see a referee standup.
Tylor Livingchin has forced the referee to step in and bring the fight back to the feet.
Haywood with a poor takedown
and Livingchin counters with a nice jab to the body that keeps Haywood thinking.
Tylor Livingchin has stuffed three takedown attempts in the round now. That's going to take a lot out of John Haywood.
Haywood fakes high and shoots in for a takedown but Livingchin avoids it really well and circles away.
Haywood is breathing heavily.
Haywood misses with a takedown
and Livingchin counters by moving into the clinch. Good anticipation by Livingchin.
Haywood looks like he'd prefer to be striking at range right now.
Livingchin lands an elbow that stopped Haywood in his tracks for a moment.
Haywood takes a knee to the side of the body.
That's four minutes gone in the round.
A knee to the head by Livingchin.
Haywood fails to pull the fight into his guard.
Haywood drops down looking for an ankle pick but Livingchin pulls his leg out and moves away.
Tylor Livingchin is looking to throw some combinations by the looks of things.
Livingchin rushes Haywood and presses him up against the cage.
Livingchin with the Thai clinch. He's looking to land a big knee but he's not managed it this time.
Livingchin utilising his Muay Thai to score with a knee to the body.
The crowd applaud the fighters efforts here as the round comes to an end.
Livingchin digs a right hand underneath Haywood's ribcage. Haywood let out a lung full of air as it connected.
And thats the end of the round the fighters go back to their corners.
Tylor Livingchin dominated that second round.
The referee calls time. The cornermen exit stage left and we're back to business. This is the final round!

Haywood fails to land the takedown.
Livingchin closes the distance and clinches.
Haywood tries to pull guard but Livingchin won't allow it.
Livingchin tries to throw a body punch but Haywood avoids it by throwing Livingchin back against the cage.
Haywood tries to break free but Livingchin pushes him back against the cage.
Livingchin breaks from the clinch.
Livingchin darts in and lands a nice takedown into half guard.
Livingchin seems content to maintain position for now, rather than mounting any offense.
That's one minute gone in the round.
Haywood wants to get back to full guard.
Livingchin content to control rather than advance.
Tylor Livingchin has forced the referee to step in and bring the fight back to the feet.
Livingchin darts in and lands a nice takedown into half guard.
Livingchin frees up his trapped foot and advances to mount.
That's two minutes gone in the round.
Livingchin tucks in and makes sure he doesn't lose the dominant position.
Haywood is writhing around trying to get back to his feet.
Haywood tries to reverse the position but Livingchin maintains control.
Livingchin controlling his opponent.
That's three minutes gone in the round.
The referee must be thinking about standing these guys back up.
The ref stands the fighters back up because Tylor Livingchin just wasn't active enough.
Haywood throws a good cross that connects.
That's four minutes gone in the round.
Haywood shoots in but Livingchin avoids the takedown attempt easily.
Tylor Livingchin has stuffed three takedown attempts in the round now. That's going to take a lot out of John Haywood.
Haywood misses with a body shot. Nice footwork from Livingchin.
Livingchin shoots in for a takedown - he's clinched up with Haywood but Haywood pushes him off and we're back to square one.
Haywood gets caught flat footed, as Livingchin shoots in with a quick takedown into guard.
The crowd applaud the fighters efforts here as the round comes to an end.
Livingchin controls from within his opponent's guard.
John Haywood has stepped it up - he knows he needs a finish here!
Tylor Livingchin is fighting for a decision here - he's started to take the cautious approach.
And that's the end of the fight!
Tylor Livingchin showed his dominance in that final round.
Well I reckon that's a shut out for Livingchin, winning every round. Will the judges agree? They are the ones who matter, even if they are often depressingly incompetent. Over to the ring announcer for the scorecards.
Ladies and gentlemen, after 3 rounds of action, we go to the scorecards for a decision.
Judge Roosa Järviläinen scores the fight 30:27
Judge Marco Blurström scores the fight 30:27
Judge Matti Vanhoillinen scores the fight 30:27
In favor of your winner, by unanimous decision... Tylor Livingchin!
Tylor Livingchin seemed lost for words in his post fight interview but he remembered to thank his fans and directed everyone to his website.
|
|
|
|
|
|
|
|
|
|
|
|
|
|
|
|
|
|
|
|
|
|
|
| S |
C
A |
G |
S |
C
B |
G |
|
S |
C |
G |
|
energy
A | B |
|
hype
A | B |
|
pop
A | B |
|
mgr
A | B |
|
FIGHT
RATING
40% |
|
|
|
|
|
|
