|
|
PBP Commentary |
Coming up we have a lightweight MMA rules bout between Charlie Reynolds (ranked 0 p4p, 0 weight class) and Nate Leissner (ranked 0 p4p, 0 weight class). Leissner has chosen Feuer Frei as his entrance music. Over to our ring announcer for the fighter introductions!
 |
|
 |
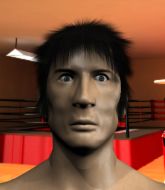
| 174 cm
25
165 lbs
15 - 8 - 0 |
|
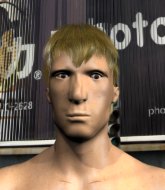
180 cm
23
165 lbs
11 - 3 - 0 |
Good wrestling
Excellent boxer
Cardio machine |
|
Good wrestler
Dangerous knees
Good gas tank |
|
| |
|
Ladies and gentlemen. This fight is 3 rounds, in the lightweight division.
Introducing the fighter to my left, fighting out of the red corner.
With a record of
15 - 8 - 0, fighting out of London, Charlie Reynolds!
And introducing the fighter to my right, fighting out of the blue corner.
With a record of
11 - 3 - 0, fighting out of St Petersburg, Nate Leissner!
The judges for this bout are Paul Tew, Andrew Berry and James Ackerman.

The bell rings for round one and we are underway!
Reynolds throws a low kick but his opponent is out of range.
Reynolds throws a series of punches but Leissner moves out of range.
Leissner uses good footwork to avoid the strikes from Reynolds.
Leissner shoots in but Reynolds avoids the takedown attempt easily.

Reynolds moves into the clinch successfully.
Leissner throws a vicious knee straight up the middle but Reynolds blocks it with crossed arms.
Reynolds gets double underhooks to prevent a takedown attempt from Leissner.
Reynolds manages to get underhooks and slows down the pace for a moment.
Reynolds throws a blind hook that connects with the side of Leissners head.
Leissner tries a knee to the head but Reynolds blocks it.
Reynolds lands a nice shot to the body.
Leissner with an attempt at a knee that misses.
Reynolds is looking to score with knees to the body. Maybe he'll change it up and go body then head. Leissner is defending well for now.

Leissner works for the underhooks and manages to get a trip takedown into guard.
The referee must be thinking about standing these guys back up.
Reynolds wants to control here, rather than go for any submissions from the bottom. At least for now.

That's one minute gone in the round.
Reynolds not looking particularly offensive just at the moment.
Reynolds looking to sweep here. No luck so far.
Reynolds wants to stand but Leissner is controlling the position.
The fighters are trapped in the ropes so we're going to have a reposition here. The ref calls for a break and repositions the fighters in the center of the ring.
Leissner trying to control but Reynolds is working from the bottom.
Leissner tries to free his leg and advance position but Reynolds is retaining full guard.
Leissner wants to control from the top but Reynolds keeps moving.

Neither fighter is doing enough for the referee's liking and he's decided to stand them back up.
Leissner looks for a takedown but Reynolds sprawls well.
Charlie Reynolds has stuffed three takedown attempts in the round now. That's going to take a lot out of Nate Leissner.

That's two minutes gone in the round.

Leissner moves into the clinch successfully.
Leissner goes for a takedown attempt but Reynolds pushes him away and we're back to fighting at a distance.
Reynolds moves into the clinch.

Leissner pushes off and circles away, back to the middle of the mat.
Charlie Reynolds seems to be the more aggressive standup fighter in this bout.
Leissner fails with the takedown.
Reynolds misses with a two punch combination.
Leissner closes the distance and pushes Reynolds back into the ropes.
Leissner tries a knee to the head but he's missed.
Reynolds lands a shoulder strike that jolts his opponent's head backwards.
Leissner drops down looking for an ankle pick but Reynolds pulls his leg out and moves away.
The crowd cheering loudly, showing their appreciation for the quality fight we're seeing here.
Reynolds pushes Leissner up against the ropes in a clinch.

That's three minutes gone in the round.
Leissner throws a vicious knee straight up the middle but Reynolds blocks it with crossed arms.
Leissner is trying to pull guard but being pressed up against the ropes enables Reynolds to keep the fight standing.
Leissner throws a knee to the head but misses.
Reynolds lands a nice knee to the body.
Reynolds misses with a knee to the head.
Leissner on the defensive, avoiding the knees to the body.
Reynolds comes over the top with an elbow. That landed flush.

It looks like Nate Leissner has been cut.
Reynolds effectively controlling the action here.
Leissner changes levels and goes for a takedown here. Reynolds fights it off and pushes away nicely.
Reynolds wants to clinch.
Reynolds gets in close and instigates a clinch.

That's four minutes gone in the round.
Leissner is trying to trip Reynolds. He has hold of a leg but Reynolds is hopping around, keeping his balance for the moment. Leissner persists though and gets the takedown into guard.
The crowd cheering loudly, showing their appreciation for the quality fight we're seeing here.
Leissner pushing down on Reynolds's thigh, trying to pass to half guard. He's managed it... Nice work.
The fighters are tangled up in the ropes here. We might need a restart if the fighters can't break free themselves.
Leissner stalling away here and it's allowed Reynolds to slip out his trapped foot and regain full guard.
Leissner trying to control the position from guard on top but Reynolds is wriggling around, looking for whatever he can.
As the round comes to an end the crowd are showing their appreciation for a great round of action.
Reynolds trying to keep a closed guard but Leissner is proving a slippery customer.
Leissner is intent on slowing down the pace of the fight, simply looking to control.
And thats the end of the round the fighters go back to their corners.
That was a close round but I would say that Charlie Reynolds will probably get the nod.
The cut man is working on Nate Leissner's cut.
That's time! Back to the action!

No luck with that takedown attempt from Leissner.
Charlie Reynolds is looking to throw some combinations by the looks of things.
Reynolds is looking to clinch but Leissner is avoiding it.
Reynolds looks to land a body kick but Leissner moved away.
Reynolds darts in trying to clinch
and Leissner counters with a nice leg kick.
Leissner walks into a stiff left hand from Reynolds.
Leissner circles away from the clinch attempt
and Leissner makes him pay by landing a nice hook to the body before moving out of range.
Leissner shoots in but Reynolds avoids the takedown attempt easily.
Reynolds moves into the clinch.
That's one minute gone in the round.
Reynolds lands a nice elbow.
Leissner fails to pull guard.
Charlie Reynolds has stuffed three takedown attempts in the round now. That's going to take a lot out of Nate Leissner.
A battle for position here, against the ropes.
Leissner drops down for a takedown but doesn't get it.
Leissner throws a vicious knee straight up the middle but Reynolds blocks it with crossed arms.
Leissner tries a knee to the head but Reynolds blocks it.
Leissner is looking for a takedown up against the ropes. Reynolds gets underhooks though and prevents the takedown attempt.
Leissner misses with a knee to the head.
Reynolds lands an elbow that stopped Leissner in his tracks for a moment.
Reynolds comes over the top with an elbow. That landed flush.
Reynolds with an attempt at a knee that misses.
Reynolds gets double underhooks to prevent a takedown attempt from Leissner.
Reynolds comes over the top with an elbow. That landed flush.
That's two minutes gone in the round.
Leissner misses with a knee strike.
Leissner looking to throw knees to the head but Reynolds is blocking nicely.
Leissner misses with a knee to the head.
Leissner changes levels and goes for a takedown here. Reynolds fights it off and pushes away nicely.
Leissner is breathing heavily.
Reynolds doesn't manage to clinch there - Leissner circles away.
Reynolds wants to clinch up but Leissner keeps it at a distance.
Reynolds is looking to clinch.
Charlie Reynolds is looking to keep the fight on the feet at all costs.
Leissner shoots in for a takedown but Reynolds shows good takedown defense.
Leissner keeping a good distance there, avoiding the body shot.
Leissner fails with a rather predictable takedown attempt.
This has been an exciting period of action!
Reynolds closes the distance and lands a vicious right hand that drops Leissner! Reynolds dives in looking to finish! Leissner is still trying to defend himself but he's taking too many shots and the referee has no choice but to stop the fight!
Ladies and gentlemen, after 2:57 of round 2, we have a winner by way of TKO (Strikes). Charlie Reynolds!
|
|
|
|
|
|
|
|
|
|
|
|
|
|
|
|
|
|
|
|
|
|
|
| S |
C
A |
G |
S |
C
B |
G |
|
S |
C |
G |
|
energy
A | B |
|
hype
A | B |
|
pop
A | B |
|
mgr
A | B |
|
FIGHT
RATING
52% |
|
|
|
|
|
|
