|
|
PBP Commentary |
Coming up we have a middleweight MMA rules bout between Ran Plan III (ranked 0 p4p, 0 weight class) and Paul Ooka (ranked 0 p4p, 0 weight class). Over to our ring announcer for the fighter introductions!
 |
|
 |
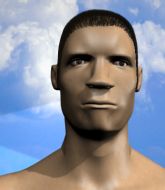
| 180 cm
26
197 lbs
14 - 9 - 1 |
|
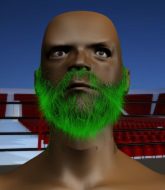
180 cm
29
202 lbs
11 - 14 - 0 |
BJJ Blue Belt
Excellent boxer
Very strong |
|
Good wrestler
Excellent boxer
Good gas tank |
|
| |
|
Ladies and gentlemen. This fight is 3 rounds, in the middleweight division.
Introducing the fighter to my left, fighting out of the red corner.
With a record of
14 - 9 - 1, fighting out of Montreal, Ran Plan III!
And introducing the fighter to my right, fighting out of the blue corner.
With a record of
11 - 14 - 0, fighting out of Montreal, Paul Ooka!
The judges for this bout are Steve Smith, Gregory Folan and Trevor Gratis.

The bell rings for round one and we are underway!
A punch combination from Plan III misses.
Plan III throws a hook but Ooka avoids it easily.
Plan III swings wildly with a right hand that was never going to find it's target.

Excellent takedown into side control there by Ooka.
The strikes coming from Ooka are missing the target in this wave of attacks.
Ooka content to control the pace. The referee will try and keep them active though.
Plan III avoids any damage from the ground and pound of Ooka.
Ooka controls the position.
Ooka wants to lay and pray for a moment but Plan III keeps working.

Ooka looking for an arm triangle but it's way too loose to do anything.
Plan III is trying to improve his position.

That's one minute gone in the round.
Ooka in side control lands a decent elbow.
Ooka is moving around in side control but his primary objective seems to be to maintain the position.
Plan III struggling a bit here.
Ooka remains in side control and seems content to stay there. It's a versatile position from which he can work both strikes and submissions, whilst maintaining that control, so maybe he'll sit here for a while.
Plan III is trying to improve his position.
Plan III is putting a lot of effort into getting back to his feet here.

That's two minutes gone in the round.
Plan III is looking to regain half guard here but Ooka keeps moving and retains side control.
Plan III is trying to escape and get back to his feet.
Ooka tries for an arm triangle. That looks pretty tight to me. Is this one over!?! Possibly, maybe, no Ooka has let go of the choke. Obviously it wasn't as tight as we thought!
The fighters are pressed up against the cage, both looking to find a bit of space to work.
Ooka misses with the ground and pound.
Ooka throwing shots but missing, from side control.
Plan III is not in a great position here, taking some shots.
Plan III parries the strikes from Ooka easily there. Ooka is wary of posturing up too much because it might enable Plan III to escape.

That's three minutes gone in the round.
Ooka sitting in side control, looking to soften his opponent up with elbows and hammerfists but Plan III is avoiding damage well and looking to escape the position.
Ooka tries for an arm triangle. That looks pretty tight to me. Is this one over!?! Possibly, maybe, no Ooka has let go of the choke. Obviously it wasn't as tight as we thought!
You can see the frustration on Plan III's face, being in this tough position on the bottom.
Ooka lands some shots froms side control.
Ooka prevents Plan III from escaping the position.
A lull in the action here.
Ooka trying to control the action but Plan III is working from the bottom.

That's four minutes gone in the round.
Ooka is trying to get an arm triangle but Plan III is defending well.
Plan III is pushing Ooka's head away, looking to escape. Ooka manages to hold on to the position though.
Ooka has the superior BJJ but he's also working some ground strikes into his gameplan.
Plan III managing to avoid any damage from the strikes thrown by Ooka.
As the round comes to an end the crowd are showing their appreciation for a great round of action.
Ooka is trying to get an arm triangle but Plan III is defending well.
Ooka throwing strikes but missing, from side control.
And thats the end of the round the fighters go back to their corners.
Paul Ooka dominated that round.
That's the end of the round. The referee orders the cornermen out of the cage so we can get back down to business.

Ooka takes a shot right to the bread basket.
Ooka scores with a nice takedown into half guard. Let's see what he's got on the ground.
Ooka stops Plan III from getting back to his feet.
Ooka not landing any meaningful shots this time.
Ooka is keen to just control but Plan III is a slippery customer.
Plan III blocking the ground and pound attempt from Ooka.
Ooka is trying a forearm choke
I don't think that's going to do much at this level of the game.
Ooka is trying to work for a kimura but Plan III is defending well.
Ooka working the head and body with strikes.
That's one minute gone in the round.
Ooka wants to take a breather but Plan III is having none of it.
Ooka not doing much here.
Ground and pound from Ooka.
Still in half guard, Ooka seems content to control.
The referee walks around the fighters to get a better view of the action. Ooka lands a nice short elbow.
Ooka wants to control but Plan III is keeping him busy.
Ooka might have to switch it up a bit here because his efforts to control Plan III kaven't been going to plan, at least at the current moment in time.
Plan III on his back here. We all know that wrestlers don't like being on their back so let's see if Plan III tries to get out of the position.
Ooka wants to free his trapped foot but Plan III is holding on for dear life with his legs.
Ooka keeping composed on the top, looking to control the action.
That's two minutes gone in the round.
We must be close to a standup if these guys don't pick up the pace.
Ooka is sneakily working for an arm triangle but Plan III sees it coming and defends easily.
Plan III wants to improve his position but Ooka is controlling well.
Ooka is looking to stall here but Plan III recovers full guard.
Plan III controls Ooka momentarily but Ooka frees himself.
The crowd cheering loudly, showing their appreciation for the quality fight we're seeing here.
Ooka slips nicely into half guard.
Paul Ooka has got the better of the ground game so far.
Ooka is looking for an arm triangle, whilst trying to pass to side control. Plan III doesn't seem that keen to cooperate though. No luck this time Ooka.
Ooka is thwarting Plan III's attempts to control the position.
That's three minutes gone in the round.
Ooka thows a huge punch but Plan III dodges it nicely.
Ooka wants to free his trapped foot but Plan III is holding on for dear life with his legs.
Plan III on the receiving end of some nice ground and pound.
Ooka slips a nice elbow through Plan III's hands, connecting with Plan III's forehead.
Ooka looks towards his corner to check for any instructions. The corner give him nothing to work with, so he cracks Plan III with a short hammerfist. I guess that's as good as any advice he could get in this position.
Ooka wants to lay and pray for a moment but Plan III keeps working.
That's four minutes gone in the round.
Plan III keeping his head moving to avoid the ground and pound.
Plan III wants to control but Ooka is keeping busy and won't allow it.
Ooka trying to control from half guard but Plan III is working away.
Ooka takes advantage of the dominant position to land a couple of big hammer fists.
This has been an exciting period of action!
Plan III wants to get back to his feet.
Plan III blocking the ground and pound attempt from Ooka.
Ooka wants to work for an arm triangle but Plan III is really keeping half guard well and defending the submission attempt.
As the round comes to an end the crowd are showing their appreciation for a great round of action.
Ooka sitting in half guard, looking to land shots. Plan III defending well though.
Plan III is refusing to be controlled, as Ooka sits in half guard.
And thats the end of the round the fighters go back to their corners.
Paul Ooka showed his class in that round. I'd imagine he'll take it on all the scorecards.
That's the end of the interval. I'm sure that seemed a lot quicker than a minute for our two fighters! Back to the action. The crowd applaud as we get ready to start the final round!

Ooka fails with a takedown attempt.
Ooka thuds his right hand into Plan III's forehead from close range. That could be painful for both fighters.
Ooka looking for a takedown here - he's got it.
Plan III keeping moving, preventing Ooka from controlling successfully.
That's one minute gone in the round.

OK we're going to have a standup here. Paul Ooka hasn't been effective enough on the ground and the referee wants a restart.
Plan III wants to clinch.
Plan III throws a leg kick but Ooka checks it.
Plan III misses the jab.
Ooka cracks Plan III with a hook to the jaw. Both fighters smile at eachother and high-five before getting back down to business.
Ran Plan III is looking to throw some combinations by the looks of things.
Ooka lands an overhand right.
Ooka lands a jab to Plan III's midsection.
Plan III keeping a good distance there, avoiding the body shot.
Ooka shoots in for a takedown but Plan III shows good takedown defense there and keeps this one on the feet.
Ooka slips a jab from Plan III.
Plan III is the aggressor but that punch slipped nicely by Ooka.
Ooka fails with a rather predictable takedown attempt.
Ran Plan III has stepped it up - he knows he needs a finish here!
Ran Plan III has stuffed three takedown attempts in the round now. That's going to take a lot out of Paul Ooka.
That's two minutes gone in the round.
Nice cross by Ooka.
The crowd are loving this. Great action here.
Ooka shoots in but no luck this time.
Plan III is looking to clinch.
Plan III connects with a looping left hand that seems like it dazed Ooka momentarily.
Plan III lands a nice shot to the body.
Plan III tries a head kick but it misses.
Plan III throws a two punch combo that lands nicely.

It looks like Paul Ooka has been cut.
Ooka shoots in looking for a single leg takedown. Plan III is trying to defend but Ooka finishes it well and ends up in half guard. Let's see if he can advance position further.
Plan III is trying to get back to full guard.
Ooka stops Plan III from getting back to his feet.
Both fighters are breathing heavily.
That's three minutes gone in the round.
Ooka wants to pass the guard but Plan III is defending well.
Ooka passes to full mount!
Ooka controlling the pace for now.
Ooka is working for a guillotine from mount but Plan III frees his head quite easily.
Plan III knows he needs to get back to his feet asap. He's simply no match for Ooka on the ground.
Ooka lands an elbow that was bordering on illegal but the referee lets it go with a warning.
Plan III is writhing around trying to get back to his feet.
That's four minutes gone in the round.
Ooka tucks in and makes sure he doesn't lose the dominant position.
Plan III tries to hold on but Ooka postures up.
Ooka controlling from mount.
Ooka dominating with strikes here.
The crowd cheering loudly, showing their appreciation for the quality fight we're seeing here.
The referee warns Plan III that he has to improve his position here as he takes two more clean shots to the head.
The crowd are going absolutely nuts as the round comes to an end - what a fantastic round of action!
Ooka working for a guillotine from mount but Plan III is in no mood to give up.
Ooka raining down hammerfists from mount.
And that's the end of the fight!
Paul Ooka comfortably won the final round on my scorecard.
Well Ooka has outworked and out performed his opponent in all aspects of the game today. He was simply too good and the decision should be no more than a formality. Over to the ring announcer for the scorecards.
Ladies and gentlemen, after 3 rounds of action, we go to the scorecards for a decision.
Judge Steve Smith scores the fight 27:30
Judge Gregory Folan scores the fight 27:30
Judge Trevor Gratis scores the fight 27:30
In favor of your winner, by unanimous decision... Paul Ooka!
Our winner, Paul Ooka, made sure he spent some time buttering up the crowd during his post fight interview, which will no doubt bring him a few more fans.
|
|
|
|
|
|
|
|
|
|
|
|
|
|
|
|
|
|
|
|
|
|
|
| S |
C
A |
G |
S |
C
B |
G |
|
S |
C |
G |
|
energy
A | B |
|
hype
A | B |
|
pop
A | B |
|
mgr
A | B |
|
FIGHT
RATING
77% |
|
|
|
|
|
|
