|
|
PBP Commentary |
Coming up we have a lightweight MMA rules bout between Kenichi Atoshi (ranked 0 p4p, 0 weight class) and Sumi Tarynomo (ranked 0 p4p, 0 weight class). Atoshi's ring entrance music is that housewives' favourite, Samourai. Over to our ring announcer for the fighter introductions!
 |
|
 |
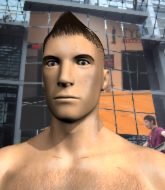
| 168 cm
22
162 lbs
1 - 1 - 0 |
|
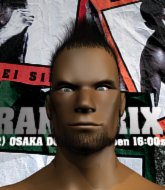
175 cm
25
166 lbs
0 - 0 - 0 |
BJJ Purple Belt
Brawler
Good in bed |
|
BJJ Purple Belt
Good kicks
Granite chin |
|
| |
|
Ladies and gentlemen. This fight is 3 rounds, in the lightweight division.
Introducing the fighter to my left, fighting out of the red corner.
With a record of
1 - 1 - 0, fighting out of Tokyo, Kenichi Atoshi!
And introducing the fighter to my right, fighting out of the blue corner.
With a record of
0 - 0 - 0, fighting out of Tokyo, Sumi Tarynomo!
The judges for this bout are Yuuki Gou, Sosuke Kotani and Yasuomi Hirokawa.

The bell rings for round one and we are underway!

Atoshi fakes a strike and closes the distance, dragging Tarynomo to the ground. Atoshi is now in Tarynomo's guard.
Tarynomo controls Atoshi momentarily but Atoshi frees himself.
Atoshi postures up in Tarynomo's guard and throws a big left but Tarynomo blocks it.
Tarynomo looking to control.
Tarynomo wants to sweep here but Atoshi controlling him for the moment.
Atoshi controls from within his opponent's guard.

The referee decides to stand the fighters back up.
Atoshi doesn't manage to clinch there - Tarynomo circles away.
Atoshi misses with a body shot.
Tarynomo dives in and grabs Atoshi's left leg, looking for a takedown. Atoshi pushes down on Tarynomo's head and hops out.

That's one minute gone in the round.
Tarynomo misses with a few strikes there.
Atoshi misses with a low kick.
Tarynomo fakes a jab and scores with a low kick.
Tarynomo throws a right and a left that both miss.
Atoshi lands with a good body shot.
Atoshi looking for a takedown here - he's got it.
Tarynomo keeping full guard, as Atoshi tries to pass.
Atoshi cracks Tarynomo with a solid left hand.
Tarynomo being controlled here, momentarily.

Atoshi gets to his feet and steps away from his opponent.

That's two minutes gone in the round.
Atoshi throws a head kick that misses.
Tarynomo feints with a shoulder and throws a nice leg kick to Atoshi's calf.
The fans in attendance giving it up for the two fighters, who have really let it all hang out in the last minute or so!
Atoshi shoots in and bounces Tarynomo off the cage to secure the takedown into guard.
Atoshi showing good wrestling skills to control the position.
Atoshi trying to control but Tarynomo is working from the bottom.
Atoshi decides he's had enough of playing guard and decides to stand. Come on Tarynomo, up you get!

That's three minutes gone in the round.
Atoshi moves in looking to clinch but Tarynomo pushes him off.
Tarynomo fails in his attempt to clinch.
Atoshi keeps the fight on the outside.
Tarynomo misses with a body kick.
Tarynomo tries to close the distance and clinch up but Atoshi swats him away and circles back towards the center.
Atoshi moves out of range of the body kick from Tarynomo.
Tarynomo keeps Atoshi at a distance using the push kick.
Atoshi's hands are dropping dangerously low here and Tarynomo connects clean with a right hook that sends him down to one knee! Atoshi scrambles back to his feet.
Tarynomo lands an overhand right.
Tarynomo throws a head kick that misses and slips in the process. He scrambles back to his feet and the fighters circle.

Atoshi clinches up with Tarynomo and pushes him back against the cage.
A frustrated look appears on Atoshi's face as he tries to break the clinch.

That's four minutes gone in the round.
Tarynomo tries to land a knee to the head but Atoshi blocks with his arms.
Tarynomo avoiding damage as Atoshi throws knees to the body.
Tarynomo is stalling here. The referee will be looking to step in if he doesn't pick up the pace.
Tarynomo tries to land a knee to the head but misses.
Tarynomo looks gassed!
Atoshi has clasped his hands together around Tarynomo's back... aaand, he's got a takedown into side control. Nicely done.
This is a great period of action - very entertaining stuff!
Tarynomo can't do much from the bottom here.
As the round comes to an end the crowd are showing their appreciation for a great round of action.
Tarynomo tries to get back to half guard but can't.
Atoshi stands up and beckons Tarynomo to his feet.
And thats the end of the round the fighters go back to their corners.
Kenichi Atoshi dominated that round.
That's the end of the round. The referee orders the cornermen out of the cage so we can get back down to business.

Tarynomo is looking to take this fight into the clinch.
A low kick from Atoshi is predictable there
and Tarynomo counters with a head kick.
Tarynomo walks forward, straight into a front kick from Atoshi.
Atoshi changes levels and drives through with a really nice takedown into side control. Tarynomo looks really pissed at himself for not defending that better.
Tarynomo prevents Atoshi from improving position.
Tarynomo gets back to half guard.
Atoshi decides he's had enough of the ground and stands up.
We've seen a great period of action over the last minute or so - credit to both fighters for going all out!
A combination from Tarynomo does no damage.

Tarynomo shoots in for a takedown! He's got it and he's managed to land in full mount! That's better than Tarynomo was expecting from the takedown attempt, I'm sure!
That's one minute gone in the round.
Tarynomo avoids the attempt from Atoshi to control.
Tarynomo is breathing heavily.
Atoshi bucks up and manages to get a nice reversal! He's in guard on the top - nicely done!
Atoshi looking to control the position here, rather than advance.
Atoshi trying to control the position from guard on top but Tarynomo is wriggling around, looking for whatever he can.

Tarynomo escapes his hips to the side and looks to be working for an armbar. Atoshi gives him a little smile and shakes his head. No chance.
That's two minutes gone in the round.
Tarynomo has Atoshi pulled in close to control his posture.
Atoshi trying to control but Tarynomo is working from the bottom.
The referee is asking the fighters to pick up the pace.
Atoshi sitting in guard, not really doing much.

The ref stands the fighters back up because Kenichi Atoshi just wasn't active enough.
Tarynomo throws a low kick but Atoshi moves out of range easily.
That's three minutes gone in the round.
Tarynomo misses with a head kick.
Atoshi tries to shoot in for a takedown. He's got hold of a leg but Tarynomo swivels and escapes.
Jab, cross, leg kick. Nice combination by Tarynomo!
Tarynomo tries to close the distance and clinch but Atoshi swats him to one side with an open hand palm strike and circles away.
Tarynomo gets his takedown attempt stuffed easily
and Atoshi counters with a takedown into full mount! That could mean trouble for Tarynomo!
Atoshi controlling the pace for now.
Atoshi with the ground and pound from mount.
Atoshi controlling from the full mount.
This has been an exciting period of action!
Tarynomo working to try and regain half guard.
That's four minutes gone in the round.
Atoshi scoring with some good ground and pound from mount here. Will he manage to finish Tarynomo?
Atoshi raining down shots from the mount!
The ref warns both fighters not to hold the cage as they work up against the meshing.
Atoshi landing strikes, looking to finish!
Tarynomo tries to lock up and control but Atoshi gives him a forearm to the face and pushes him away.
As the round comes to an end the crowd are showing their appreciation for a great round of action.
Tarynomo throwing punches from his back but nothing is landing.

Atoshi is working for a guillotine from mount but Tarynomo frees his head quite easily.
Kenichi Atoshi overall seems to be getting the better of the ground position in the fight so far.
Tarynomo is working to get back to half guard.
And thats the end of the round the fighters go back to their corners.
Kenichi Atoshi dominated that second round.
Well, the break between rounds is over. Let's get back to the scrappin! This is the final round!

Tarynomo tries to clinch but Atoshi moves out of range.
Atoshi drives through with a really nice takedown into side control.
Atoshi misses with an attempted head punch from side control.
Tarynomo wants to control but Atoshi postures up.
Tarynomo tries to work a leg under to get back to half guard but Atoshi wriggles his own leg back out and remains in side control.
Atoshi wants to work for a kimura but he's foiled early by Tarynomo, who protects the arm well.
Atoshi has control of an arm but Tarynomo manages to advance to Atoshi's back!
Atoshi rolls and manages to get back to half guard. Nicely done.
Tarynomo takes a big intake of breath there - he's definitely tired.
That's one minute gone in the round.
Tarynomo is working for a submission of some sort.
The fighters are pressed up against the cage, both looking to find a bit of space to work.
Atoshi moves into full guard.
Atoshi looking for a sweep. Not yet Atoshi, not yet.
Atoshi is doing well to control the posture of his opponent and prevent any damage.
Atoshi working a defensive guard here.
That's two minutes gone in the round.
Atoshi pulls Tarynomo in close to prevent any damage.
The referee decides to stand the fighters back up.
Tarynomo connects with a leg kick. He turned his hip over nicely there.
Tarynomo throws a combination but it was largely blocked by Atoshi.
Atoshi looking for a takedown here - he's got it.
That's three minutes gone in the round.
Tarynomo looking to control.
Atoshi stopping the sweep attempt from Tarynomo.
Atoshi stands up and looks to throw the legs aside to pass to side control. Tarynomo swivels though and keeps the full guard.
Sumi Tarynomo has stepped it up - he knows he needs a finish here!
Atoshi wants to control from the top but Tarynomo keeps moving.
Atoshi has gone for a leg lock! Tarynomo slips out almost immediately though and dives into Atoshi's guard.
Atoshi trying to control the position.
That's four minutes gone in the round.
Atoshi looking for submissions off his back, moving his hips, looking for an opening.
Atoshi manages to sweep nicely, so he's now on top. Tarynomo manages to get himself to full guard.
Tarynomo trying to control the position.
The crowd applaud the fighters efforts here as the round comes to an end.
Tarynomo throws his legs up looking to secure a triangle. Oh, that looks pretty tight, I gotta say! Atoshi escapes and throws Tarynomo's legs to the side, diving into side control!
And that's the end of the fight!
Kenichi Atoshi showed his dominance in that final round.
Well I reckon that's a shut out for Atoshi, winning every round. Will the judges agree? They are the ones who matter, even if they are often depressingly incompetent. Over to the ring announcer for the scorecards.
Ladies and gentlemen, after 3 rounds of action, we go to the scorecards for a decision.
Judge Yuuki Gou scores the fight 30:27
Judge Sosuke Kotani scores the fight 30:27
Judge Yasuomi Hirokawa scores the fight 30:27
In favor of your winner, by unanimous decision... Kenichi Atoshi!
Kenichi Atoshi seemed lost for words in his post fight interview but he remembered to thank his fans and directed everyone to his website.
|
|
|
|
|
|
|
|
|
|
|
|
|
|
|
|
|
|
|
|
|
|
|
| S |
C
A |
G |
S |
C
B |
G |
|
S |
C |
G |
|
energy
A | B |
|
hype
A | B |
|
pop
A | B |
|
mgr
A | B |
|
FIGHT
RATING
60% |
|
|
|
|
|
|
