|
|
PBP Commentary |
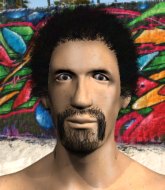
Coming up we have a welterweight MMA rules bout between David Williams (ranked 0 p4p, 0 weight class) and Hepatitis See (ranked 0 p4p, 0 weight class). The fight MMA fans around the world have waited their entire lives for!
 |
|
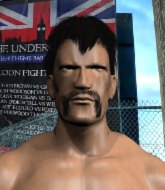 |
| 182 cm
20
176 lbs
3 - 1 - 0 |
|
175 cm
20
175 lbs
3 - 3 - 0 |
BJJ Purple Belt
Basic striking
Granite chin |
|
BJJ White Belt
Decent boxing
Determined |
|
| |
|
Ladies and gentlemen. This fight is 3 rounds, in the welterweight division.
Introducing the fighter to my left, fighting out of the red corner.
With a record of
3 - 1 - 0, fighting out of Sydney, David Williams!
And introducing the fighter to my right, fighting out of the blue corner.
With a record of
3 - 3 - 0, fighting out of Sydney, Hepatitis See!
The judges for this bout are Winston Howard, Bruno Hogan and Eliza Hachem.

The bell rings for round one and we are underway!
No joy there for Williams, who threw a few shots but didn't land.
See swats away the attempt to clinch by Williams.
See scores with a body shot.
See showing good head movement there, avoiding the strikes from Williams.
David Williams seems to be the more aggressive standup fighter in this bout.
Williams fails with a rather predictable takedown attempt.
Williams dodges the punch combination from See.
See fails to land with the punch combination there - jab, cross, hook, miss, miss, miss.
See steps to the side to avoid the strikes from Williams.
See walks into a jab.
See misses with a series of wild punches.
See swinging wildly here.

That's one minute gone in the round.
Williams slaps away a takedown attempt from See, before circling back to the center of the mat.
Williams takes a swing at See's ribcage but misses.
See misses with a jab and misses with a cross straight after too.
Williams dodges the punch combination from See.
No luck with that takedown attempt from Williams.
Williams tries to work over See's front leg with a kick but See checks it.
A slow jab from Williams misses its intended target.
Williams throws a combination but it was largely blocked by See.

See closes the distance and clinches.

That's two minutes gone in the round.
A frustrated look appears on Williams's face as he tries to break the clinch.
Williams has See pressed up against the cage and is working for takedown. See manages to improve position though and keeps the fight standing.
That's three failed takedown attempts in the round for David Williams. That's going to take a lot out of him.
Williams is trying to push See away but See has him pressed against the cage, so he's going nowhere.
Come on See - let's have some action - none of this stalling nonsense.
Williams tries to break free but See pushes him back against the cage.
Williams has had enough of the clinch but See keeps him there for the moment.

See escapes the clinch and we're back to striking.
See is looking to clinch but Williams is avoiding it.
Williams swings away but doesn't land with a series of punches.
See thows a body shot but no joy.
See connects with a body shot that sends Williams's belly button to the back.
Williams will need to close the distance a bit before he attacks - that leg kick was thrown from too far away.

That's three minutes gone in the round.
Williams dodges the punch combination from See.
Williams throws a leg kick that misses.
See misses with a head kick.
See tries to close the distance and clinch up but Williams swats him away and circles back towards the center.
See avoids the clinch attempt nicely.
Williams swings away but doesn't land with a series of punches.
See defending well as Williams loads up on a big left hand.
See misses with a wild combination.
Williams misses with a low kick.
See throws a nice looking combination but Williams bobs and weaves to avoid any damage.
Williams throws a shot to the body.

That's four minutes gone in the round.
See tries to close the distance and clinch up but Williams swats him away and circles back towards the center.
See lands a two punch combo.
Williams showing good head movement there, avoiding the strikes from See.
See tries to bum rush Williams with a series of wild strikes but Williams uses good footwork to avoid the assault.
Williams throws the left hand but See avoids the punch easily.
Williams misses with a takedown attempt - See sprawls well and throws a nice strike on the way out which just misses.
Williams swings wildly with a hook that is half blocked by See.
The crowd applaud the fighters efforts here as the round comes to an end.
See throws a head kick but Williams moves out of range.
Williams throws a hook but See avoids it easily.
Williams misses with a low kick.
And thats the end of the round the fighters go back to their corners.
A close round but Hepatitis See will probably get the nod.
The fighters' corners scream their final instructions, as the referee calls time. Here we go, back to the action!

Williams looks for a takedown here. Will he get it? See is fending him off so far but Williams persists. Nope, See circles away and we're back to standing.
Williams misses with a jab, cross combination.
See closes the distance and clinches.
See stops a takedown attempt from Williams.
Williams drops to a knee looking for a takedown but See gets the underhooks and prevents it.
That's three failed takedown attempts in the round for David Williams. That's going to take a lot out of him.
Williams blocks a body shot from See.
See controlling the action here for a moment.
See prevents Williams from breaking the clinch.
See just leaning against Williams, taking a breather.
That's one minute gone in the round.
See breaks the clinch.
A really sloppy takedown attempt there from Williams.
See tries to clinch there but Williams circles away.
Williams stuffs the takedown.
Williams lands with a nice combination. See backs away looking to recover.
See scores with a jab to the body.
A combination from Williams does no damage.
Williams cracks See with a good shot that sees him stumbling back into the cage.
Williams shakes his hands off, looking to compose himself, but takes a jab to the jaw whilst he does it.
Williams throws a hard body shot but it just misses.
See throws a right and a left that Williams avoids nicely.
Williams takes a punch to the jaw and another one to the bread basket.
That's two minutes gone in the round.
Williams tries to score a power double leg takedown but See sees that one coming and sprawls well. That will dishearten Williams somewhat.
Hepatitis See seems to be getting the better of the standup.
See keeping a good distance there, avoiding the body shot.
See tries to clinch but is not successful on this occasion.
Williams throws a series of punches but See avoids them all with ease.
Good standup being displayed there by Williams as he connects with a hook.
The crowd cheering loudly, showing their appreciation for the quality fight we're seeing here.
A combination from Williams does no damage.
Williams lands a pitter patter jab to the forehead of his opponent.
Williams fails with a takedown attempt from distance.
Williams throws out a token jab with nothing on it.
David Williams is looking to throw some combinations by the looks of things.
See tries to clinch but Williams is having none of it.
See tries to clinch up.
That's three minutes gone in the round.
See pulls out of a head kick attempt.
Williams throws a wild combination but nothing lands.
Williams lands a jab. Then a cross. Then finally a nice hook to the body. Good work there by Williams.
Williams dodges the punch combination from See.
Williams tried to score with a low kick but See checks it.
See moving in and out of range nicely, whilst landing the scoring shot.
See tests Williams's chin there with a solid looking shot.
Williams walks straight into an uppercut. Luckily it didn't land flush.
Left hook, right uppercut from Williams.
Williams misses with a few strikes there.
That's four minutes gone in the round.
See throws a nice looking combination but Williams bobs and weaves to avoid any damage.
See tries a head kick but it misses.
Williams shoots in for a takedown. "Ole!" shouts See as he jumps to the side.
Both fighters are absolutely exhausted here.
Williams shoots in for a double leg but See sprawls well. That's going to sap some energy.
See shoots in for a takedown but doesn't get it.
Williams keeps the fight on the outside.
Williams scores with a crisp jab that stopped See in his tracks.
Williams lands a really nice looking cross but See seems unphased.
We've seen a great period of action over the last minute or so - credit to both fighters for going all out!
As the round comes to an end the crowd are showing their appreciation for a great round of action.
See tries a switch kick but it misses it's target.
Williams scores with a big left there. The judges will like that one.
See tries a switch kick but it misses it's target.
And thats the end of the round the fighters go back to their corners.
A close second round but Hepatitis See will probably get the nod - 10:9.
The referee calls time. The cornermen exit stage left and we're back to business. This is the final round!

Williams lands a nice shot that snaps See's head back.
See throws a wild combination but nothing lands.
See throws a sloppy head kick and Williams moves out of range easily.
See takes a shot to the nose. Hopefully that hasn't broken it.
Williams scores with a one two! See had his feet all tangled up there and couldn't avoid the strikes.
Williams misses with the combination.
See misses with a two punch combination.
Williams throws a low kick but See avoids it.
See tries to close the distance and clinch up but Williams swats him away and circles back towards the center.
Williams circles away from the clinch attempt.
Williams moves into range and throws a lovely three punch combination.
Williams lunges in with swinging rights and lefts but See circles away quickly and effectively.
That's one minute gone in the round.
See comes forward and lands a shot to the body, then darts back out of range.
Williams takes a body punch but keeps moving.
Both fighters are breathing heavily.
Williams takes a swing at See's ribcage but misses.
See misses with a jab and misses with a cross straight after too.
Williams misses with a low kick.
See misses with a jab and misses with a cross straight after too.
Williams moves out of range as See strikes.
Williams misses with a jab to the body
and See holds on and brings the fighters into a clinch.
See tries to pull guard but Williams won't allow it.
See misses with a punch to the body.
See breaks the clinch and we return to the middle of the mat.
That's two minutes gone in the round.
Williams misses with a looping right.
See throws a sloppy head kick and Williams moves out of range easily.
See swats away the attempt to clinch by Williams.
Williams with a jab.
Williams misses with a jab, cross combination.
See checks a leg kick nicely.
Some wild striking there from Williams.
This has been an exciting period of action!
Williams lands with an uppercut that bounces See off the cage and back into rage.
Williams throws a looping overhand right but See ducks down to avoid it.
That's three minutes gone in the round.
See paws at his opponent with the jab and then lunges in with a straight, right on the button.
See throws a series of strikes that have Williams backpedaling.
See fails with a takedown attempt from distance.
Williams is using his height advantage well here, landing a good percentage of his punches.
Williams swinging wildly here.
See stuffs a takedown. It's all about dictating where the fight takes place and See wants it to stay on the feet.
See misses with a two punch combination.
Williams throws a combination but comes up with nothing but fresh air.
See fails to land with a series of punches.
See tries a head kick but it misses.
See wants to clinch.
Williams shoots in for a takedown but See shows good takedown defense there and keeps this one on the feet.
Hepatitis See is fighting for a decision - hopefully he's judged it right and he's actually winning the fight.
That's four minutes gone in the round.
Williams fails to land with a series of punches.
Williams shoots for a takedown but See saw that one coming a mile off and avoided it easily.
That's three failed takedown attempts in the round for David Williams. That's going to take a lot out of him.

See throws the overhand right but ducks down into a quick takedown attempt. Williams was covering up waiting for the punch and See finishes the takedown easily into guard.
The referee is asking the fighters to pick up the pace.
See trying to land body shots but he keeps hitting the mat.
See wants to control from the top but Williams keeps moving.
Wooooo! Give it up for these two warriors! They are putting on a show!
As the round comes to an end the crowd are showing their appreciation for a great round of action.
David Williams has stepped it up - he knows he needs a finish here!

Williams looking for submissions from the bottom but instead See passes into side control.
And that's the end of the fight!
Hepatitis See comfortably won the final round on my scorecard.
Well See has outworked and out performed his opponent in all aspects of the game today. He was simply too good and the decision should be no more than a formality. Over to the ring announcer for the scorecards.
Ladies and gentlemen, after 3 rounds of action, we go to the scorecards for a decision.
Judge Winston Howard scores the fight 27:30
Judge Bruno Hogan scores the fight 27:30
Judge Eliza Hachem scores the fight 27:30
In favor of your winner, by unanimous decision... Hepatitis See!
|
|
|
|
|
|
|
|
|
|
|
|
|
|
|
|
|
|
|
|
|
|
|
| S |
C
A |
G |
S |
C
B |
G |
|
S |
C |
G |
|
energy
A | B |
|
hype
A | B |
|
pop
A | B |
|
mgr
A | B |
|
FIGHT
RATING
52% |
|
|
|
|
|
|
