|
|
PBP Commentary |
Coming up we have a welterweight MMA rules bout between Jeremy Durden (ranked 0 p4p, 0 weight class) and Grant Horwick (ranked 0 p4p, 0 weight class). Over to our ring announcer for the fighter introductions!
 |
|
 |
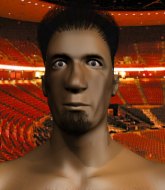
| 180 cm
24
170 lbs
3 - 1 - 0 |
|
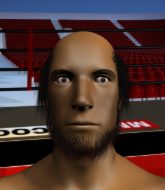
170 cm
25
170 lbs
2 - 2 - 0 |
BJJ Blue Belt
Basic striking
Good chin |
|
BJJ Blue Belt
Good kicks
Solid chin |
|
| |
|
Ladies and gentlemen. This fight is 5 rounds, in the welterweight division.
Introducing the fighter to my left, fighting out of the red corner.
With a record of
3 - 1 - 0, fighting out of Montreal, Jeremy Durden!
And introducing the fighter to my right, fighting out of the blue corner.
With a record of
2 - 2 - 0, fighting out of Montreal, Grant Horwick!
The judges for this bout are Steve Smith, Ian Loll and Trevor Gratis.

The bell rings for round one and we are underway!
Horwick keeps the fight standing with a nice sprawl.
Durden swinging wildly here.
Durden fails with a takedown attempt.
Horwick slaps away a takedown attempt from Durden, before circling back to the center of the mat.
That's three failed takedown attempts in the round for Jeremy Durden. That's going to take a lot out of him.
Durden scores with a nice one two combo and darts back out of range to avoid anything coming in the opposite direction.
Durden fails to land with the punch combination there - jab, cross, hook, miss, miss, miss.
Durden keeps the fight standing with a nice sprawl.
Horwick defends well against a solid takedown attempt from Durden.
Horwick swinging wildly here.
Durden shoots in looking for a takedown. Horwick tries to sprawl out of it but Durden keeps driving through. The fighters are pinned against the ropes. Horwick manages to get underhooks and after a bit of a struggle, circles away and we're back to standing.
Durden shoots in for a takedown but Horwick shows good takedown defense there and keeps this one on the feet.

That's one minute gone in the round.
Durden stuffs the takedown.
Durden misses with a wild combination.
Horwick fails with the takedown.
Durden avoids a punch combination nicely.
Durden swats away the attempt to clinch by Horwick.
A combination from Durden does no damage.
Some wild striking there from Durden.
Durden fails with the takedown.
Horwick thows a body kick. Durden tries to catch it but that hurt him.
Horrible takedown by Durden or perhaps it was just good defense by Horwick which made him look bad.

Durden gets caught flat footed, as Horwick shoots in with a quick takedown into guard.

That's two minutes gone in the round.
Horwick passes Durden's right leg, so he's now in half guard.
Horwick thows a big elbow that misses, also allowing Durden to regain full guard.
Durden is breathing heavily.
Horwick trying to control the position from guard on top but Durden is wriggling around, looking for whatever he can.
This is a great period of action - very entertaining stuff!
Horwick slips nicely into half guard.
As the round comes to an end the crowd are showing their appreciation for a great round of action.
Horwick is trying to control. Durden wants to improve his position but can't escape this time.
And thats the end of the round the fighters go back to their corners.
Grant Horwick dominated that round.
OK. That's time! The bell goes and we're back to the action.

Durden uses some good footwork to avoid the body shot by Horwick.
Horwick shoots in for a double leg but Durden sprawls well. That's going to sap some energy.
Horwick shoots in for a takedown but Durden shows good takedown defense.
Durden shoots in for a takedown but doesn't get it.
Nice sprawl there from Horwick as Durden shoots in.
Horwick closes this distance looking for a takedown but Durden circles away.
Jeremy Durden has stuffed three takedown attempts in the round now. That's going to take a lot out of Grant Horwick.
Sloppy strikes from Durden. Those never looked like landing.
Durden throws a series of punches but Horwick avoids them all with ease.
Durden fails miserably with a takedown attempt.
Horwick tries to clinch but is not successful on this occasion.
Horwick shoots in but no luck this time.
Durden misses with a jab, cross combination.

Horwick moves into range and clinches up with Durden.
Durden can't break the clinch.
Durden looks like he'd prefer to be striking at range right now.
That's one minute gone in the round.

Horwick manages to break the clinch.
Durden misses with a series of wild punches.
Durden fails with a rather predictable takedown attempt.
Durden fails with a rather predictable takedown attempt.
Both fighters are absolutely exhausted here.
Sloppy strikes from Durden. Those never looked like landing.
A right-left combo lands from Horwick.
Durden tries to score a power double leg takedown but Horwick sees that one coming and sprawls well. That will dishearten Durden somewhat.
Horwick dodges the punch combination from Durden.
Durden misses with a few strikes there.
Durden rushes forward with a series of wild hooks but Horwick moves out of range and avoids them all easily.
That's two minutes gone in the round.
Horwick doesn't manage to clinch there - Durden circles away.
Horwick shoots for a takedown but Durden saw that one coming a mile off and avoided it easily.
Jeremy Durden seems to be the more aggressive standup fighter in this bout.
Durden lands a jab-cross combination.
Horwick shoots in for a takedown and gets it. Oh and he's advanced to full mount straight away.
Durden knows he needs to get back to his feet asap. He's simply no match for Horwick on the ground.

Horwick working for a submission but Durden is keeping him at bay.
The fans in attendance giving it up for the two fighters, who have really let it all hang out in the last minute or so!
Horwick lands a big elbow.
As the round comes to an end the crowd are showing their appreciation for a great round of action.
Horwick wants to control the pace but Durden is squirming around nicely.
And thats the end of the round the fighters go back to their corners.
Grant Horwick showed his class in that round. I'd imagine he'll take it on all the scorecards.
That's time! Durden's corner gives him a slap on the ass as he gets ready to fight.


Durden dives in and scores a takedown into Horwick's guard.
Horwick is working from a closed guard but he's struggling to control his opponent.
Horwick might have to switch it up a bit here because his efforts to control Durden kaven't been going to plan, at least at the current moment in time.
Horwick is looking to get back to his feet but can't, whilst Durden is controlling him.
Durden working some strikes from top position.
Durden in full guard, throwing the ground and pound. No damage this time.
Horwick wants to sweep here but Durden controlling him for the moment.
Horwick is working from a closed guard but he's struggling to control his opponent.
Horwick trying to punch from his back but it's not doing any damage.
Durden postures up in Horwick's guard and throws a big left but Horwick blocks it.
That's one minute gone in the round.
Horwick has his foot on Durden's thigh. He's trying to push off and get in position for a triangle, I think. Durden works his way back into a safe position though.
Durden has to be careful here, sitting in the guard of a superior BJJ player.
Durden avoids a guillotine attempt easily.
The fighters are trapped in the ropes so we're going to have a reposition here. The ref calls for a break and repositions the fighters in the center of the ring.
Horwick takes a big intake of breath there - he's definitely tired.
Durden loading up with the ground and pound but he's missing more than he's landing in this flurry.
Horwick controlling Durden's posture.
Horwick preventing the ground and pound from doing any damage.
Durden throws and elbow that misses. Horwick uses the momentum to reverse the position. He's now in Durden's guard. Nice move by Horwick!

Durden is looking for a triangle here but Horwick uses the submission attempt to pass into side control.
Horwick wants to control but Durden is keeping him busy.
That's two minutes gone in the round.
Durden bucks up and tries to throw Horwick off but instead Horwick has got his back!
The crowd hopeful of a finish here - Horwick's supporters are on their feet, screaming for him to go for the rear naked choke.
The crowd applaud the fighters efforts here as the round comes to an end.
Durden defending nicely against the rear naked choke attempt.
And thats the end of the round the fighters go back to their corners.
A close third round but Grant Horwick just about did enough to take it.
That's the end of the round. The referee orders the cornermen out of the ring so we can get back down to business.

Durden fails to land with a series of punches.
Durden scores with a slapping inside leg kick.
Jeremy Durden is looking to throw some combinations by the looks of things.
Durden swings away but doesn't land with a series of punches.
Horwick fails to land the takedown.
Horwick tries to clinch but Durden is having none of it.
Horwick leaves Durden with his face pressed against the mat as he sprawls beautifully, defending against a solid takedown attempt.
Durden tries a head kick but it misses.
Durden shoots in but Horwick avoids the takedown attempt easily.
Durden feints a jab promting Horwick to slip. Durden then demonstrates his capabilities by jabbing again. Horwick slips again and ducks right into an uppercut.
Durden fakes high and shoots in for a takedown but Horwick avoids it really well and circles away.
That's three failed takedown attempts in the round for Jeremy Durden. That's going to take a lot out of him.
That's one minute gone in the round.
Durden tries to keep at a distance but Horwick has taken the fight into the clinch.
Horwick has Durden pressed against the ropes, preventing Durden from circling away and getting back to striking at range.
Durden wants to break free but Horwick has control.
Horwick breaks the clinch.
Durden shoots in with a lovely double leg takedown. Horwick manages to land in full guard to minimise the damage.
Horwick preventing the ground and pound from doing any damage.
Durden throwing shots from guard but he's hitting more mat than opponent.
Horwick is throwing his legs up, looking for submissions. Durden is aware though and is defending well.
Horwick has his foot on Durden's thigh. He's trying to push off and get in position for a triangle, I think. Durden works his way back into a safe position though.
Durden thows a big elbow that misses.
Durden throwing shots from guard but he's hitting more mat than opponent.
That's two minutes gone in the round.

Horwick pushes Durden off for just long enough to get back to his feet. Very athletic spring there.
It's got to the stage where if one of these guys blows hard enough, the other might fall over.
Horwick tries to clinch up.
Durden fails with a rather predictable takedown attempt.
The fans in attendance giving it up for the two fighters, who have really let it all hang out in the last minute or so!
Durden dives in and scores a takedown into Horwick's guard.
Horwick working the defensive guard well to avoid strikes from Durden.
Horwick tries to land a sweep but no joy.
Horwick has butterfly guard. He's looking to stand up here. He pushes Durden off him and springs to his feet nicely. The crowd applauds.
No luck with that takedown attempt from Durden.
As the round comes to an end the crowd are showing their appreciation for a great round of action.
Durden moves out of range of the body kick from Horwick.
Some wild striking there from Durden.
Durden keeps the fight on the outside.
And thats the end of the round the fighters go back to their corners.
Jeremy Durden had his way with Grant Horwick in that round.
The fighters' corners scream their final instructions, as the referee calls time. Here we go, back to the action! This is the final round!

Horwick looks for a takedown but Durden sprawls well.
Durden tries for a takedown but Horwick sees it coming a mile off and avoids it easily.
Horwick slips a jab and a cross from Durden.
Durden fakes high and shoots in for a takedown but Horwick avoids it really well and circles away.
Horwick walks into a left hand.
Durden throws a combination but comes up with nothing but fresh air.
Left hook, right uppercut from Durden.
No luck for Durden with that takedown attempt.
That's three failed takedown attempts in the round for Jeremy Durden. That's going to take a lot out of him.
Both of our modern day gladiators look out of it here - an gruelling 5 rounds of action taking it's toll on them, no doubt.
Horwick closes the distance and clinches up with Durden, looking for a takedown. Horwick pushes Durden against the ropes but Durden circles to the side and manages to break the clinch.
Durden moves out of range of the body kick.
The fight stays on the outside here - Horwick looks like he's thinking about clinching though.
Horrible takedown by Durden or perhaps it was just good defense by Horwick which made him look bad.
That's one minute gone in the round.
Horwick gets to the clinch - let's see what his plan is here.
Horwick gets control of Durden's arms and successfully pulls guard. Horwick will no doubt be looking for submissions off his back.
Horwick wants to sweep here but Durden controlling him for the moment.
Durden throws and elbow that misses. Horwick uses the momentum to reverse the position. He's now in Durden's guard. Nice move by Horwick!
Horwick trying to control but Durden is working from the bottom.
Horwick sitting in guard, not really doing much.
That's two minutes gone in the round.
The referee is asking the fighters to pick up the pace.

The ref calls for a clean break and stands the fighters back up. Grant Horwick wasn't active enough on the ground.
Horwick shoots in but Durden avoids the takedown attempt easily.
Durden stuffs a takedown. It's all about dictating where the fight takes place and Durden wants it to stay on the feet.
Jeremy Durden has stepped it up - he knows he needs a finish here!
Durden fails with a takedown attempt from distance.
Nice takedown defense from Durden. No joy for Horwick on that attempt.
Durden throws a wild combination but nothing lands.
Durden fails to land with a series of punches.
The crowd applaud the fighters efforts here as the round comes to an end.
Durden swinging wildly here.
Some wild striking there from Durden.
Grant Horwick is fighting for a decision - hopefully he's judged it right and he's actually winning the fight.
Horwick fails to land the takedown.
And that's the end of the fight!
I would just about give that final round to Grant Horwick.
I think Horwick has won this one but let's see whether the judges agree with me. Over to the ring announcer for the scorecards.
Ladies and gentlemen, after 5 rounds of action, we go to the scorecards for a decision.
Judge Steve Smith scores the fight 46:49
Judge Ian Loll scores the fight 46:49
Judge Trevor Gratis scores the fight 46:49
In favor of your winner, by unanimous decision... Grant Horwick!
|
|
|
|
|
|
|
|
|
|
|
|
|
|
|
|
|
|
|
|
|
|
|
| S |
C
A |
G |
S |
C
B |
G |
|
S |
C |
G |
|
energy
A | B |
|
hype
A | B |
|
pop
A | B |
|
mgr
A | B |
|
FIGHT
RATING
100% |
|
|
|
|
|
|
