|
|
PBP Commentary |
Coming up we have a lightweight MMA rules bout between Samoa Rome (ranked 0 p4p, 0 weight class) and Dale Bellido (ranked 0 p4p, 0 weight class). Rome comes to the cage accompanied by Samoan Death. Well, the cameraman is lingering on a pretty young lady for a bit too long there. Keep your eyes on the fighters buddy or you'll miss the fighter intros!
 |
|
 |
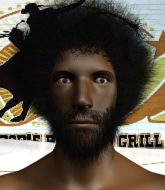
| 188 cm
30
164 lbs
15 - 9 - 0 |
|
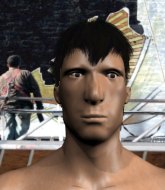
178 cm
30
168 lbs
14 - 10 - 0 |
Powerful takedowns
Solid boxing
Very strong |
|
Good wrestler
Decent boxing
Powerful |
|
| |
|
Ladies and gentlemen. This fight is 3 rounds, in the lightweight division.
Introducing the fighter to my left, fighting out of the red corner.
With a record of
15 - 9 - 0, fighting out of St Petersburg, Samoa Rome!
And introducing the fighter to my right, fighting out of the blue corner.
With a record of
14 - 10 - 0, fighting out of St Petersburg, Dale Bellido!
The judges for this bout are Fedor Mirinova, Dmitry Maklakov and Vladimir Khabensky.

The bell rings for round one and we are underway!
A really sloppy takedown attempt there from Rome.
Bellido looks for a takedown but Rome sprawls well.
Rome fails with a takedown attempt.
Rome jabs at Bellido's body.
Rome cracks Bellido with a right hand to the side of the head.
Bellido takes a jab right on the kisser.
Rome swings for the body but Bellido moves out of range.
Bellido gets cracked with a nice right hand there by Rome.

That's one minute gone in the round.
Rome pushes forward with a 1-2 combination that forces Bellido back to the cage. Rome follows up with a solid lead hook to the liver.
Rome connects with a body shot.
Bellido shoots in looking for a double leg takedown. Rome defends it nicely.
Bellido on the wrong end of a vicious looking body shot.
Rome connects with a slap. Keep your fist closed son.
Rome stuffs the takedown attempt from Bellido. Bellido gets slowly back to his feet.
Samoa Rome has stuffed three takedown attempts in the round now. That's going to take a lot out of Dale Bellido.
Rome misses with a jab to the body

and Bellido counters by clinching up.
Rome tries to circle away but Bellido has him pinned against the cage.

That's two minutes gone in the round.
The pace really dropping off here, momentarily.
Rome working hard to break the clinch.
Rome tries to circle away but Bellido has him pinned against the cage.
Bellido gets underhooks to prevent Rome's takedown attempt.
Rome has had enough of the clinch and is looking to separate.
Rome is trying to work out of this bad position, with his back against the cage.
The two fighters are working to gain dominance in the clinch.
Rome tries for a takedown but Bellido manages to get underhooks.
We've seen a great period of action over the last minute or so - credit to both fighters for going all out!
The two fighters are working to gain dominance in the clinch.
A nice left hand lands by Bellido.
Rome is trying to break the clinch but Bellido is controlling him.
Rome tries to break free but Bellido pushes him back against the cage.

Rome breaks the clinch and we're back to striking at distance.
Bellido looks for a takedown here. Will he get it? Rome is fending him off so far but Bellido persists. Nope, Rome circles away and we're back to standing.

That's three minutes gone in the round.
Bellido is trying hard to land a takedown here. Rome sprawls well and keeps this one on the feet.
Rome throws a sloppy body shot

and Bellido counters with a nice double leg into side control. Rome won't be happy with that.
The ref warns both fighters not to hold the cage as they work up against the meshing.
Bellido is looking to take a break and control but Rome is keeping him honest, looking to work from the bottom.

Bellido wants to work for a kimura but he's foiled early by Rome, who protects the arm well.
Bellido looks gassed!
Bellido working the body and head with strikes.

That's four minutes gone in the round.
Bellido taking a break here but Rome is having none of it and regains half guard.
Bellido is nestled in close to Rome, controlling him well. He's worked in a nice elbow to the side of the head as well, for good measure.
This has been an exciting period of action!
Bellido thows a big elbow that misses, also allowing Rome to regain full guard.
Bellido trying to control the position from guard on top but Rome is wriggling around, looking for whatever he can.
Bellido is looking to work some ground and pound but Rome has wrist control.
As the round comes to an end the crowd are showing their appreciation for a great round of action.
Bellido throwing strikes from guard but Rome blocks nicely.
And thats the end of the round the fighters go back to their corners.
A close round but Dale Bellido will probably get the nod.
The fighters' corners scream their final instructions, as the referee calls time. Here we go, back to the action!

A really sloppy takedown attempt there from Bellido.
Rome displays good takedown defense there as he swats away a double leg from Bellido.
Rome shoots in looking for a takedown. Bellido tries to sprawl out of it but Rome keeps driving through. The fighters are pinned against the cage. Bellido manages to get underhooks and after a bit of a struggle, circles away and we're back to standing.
Rome defends well against a solid takedown attempt from Bellido.
Samoa Rome has stuffed three takedown attempts in the round now. That's going to take a lot out of Dale Bellido.
Rome avoids a punch combination nicely.
That's one minute gone in the round.
Rome takes a swing at Bellido's ribcage but misses.
Dale Bellido is looking to throw some combinations by the looks of things.
A big right from Rome misses.
Rome lands a nice looking body shot.
Bellido shoots for a takedown but Rome saw that one coming a mile off and avoided it easily.
Rome connects with a looping right hand.
Bellido on the wrong end of a nice jab.
Rome throws a hook to the body but it doesn't connect.
Rome is looking to wear down Bellido with body shots, infact he's throwing more body shots than head shots at the moment.
Rome misses with a body shot. Nice footwork from Bellido.
Rome misses with a wild body shot.
That's two minutes gone in the round.
Rome throws a hook to the body but it doesn't connect.
A lazy left from Rome finds it's target.
Bellido avoids the body shot from Rome.
Rome scores to the head and body with a nice combination!
Rome lands a jab to Bellido's midsection.
Rome stuffs the takedown attempt from Bellido. Bellido gets slowly back to his feet.
No luck with that takedown attempt from Bellido.
Bellido is breathing heavily.
Rome cracks Bellido with a right hand to the side of the head.
That's three minutes gone in the round.
Rome lunges in with swinging rights and lefts but Bellido circles away quickly and effectively.
Rome shoots in looking for a double leg takedown. Bellido defends it nicely.
Bellido misses with a takedown attempt. He shot from a bit too far out.
Rome is using his height advantage well here, landing a good percentage of his punches.
Rome swings and misses with a hook to the body.
Bellido will have to do better than that with his takedown attempts.
That's four minutes gone in the round.
Rome throws a one two combo.
Rome throws a hard body shot but it just misses.
Bellido gets a takedown into half guard.
Rome blocking the ground and pound attempt from Bellido.
Rome is defending against the submission attempts here by Bellido.
The crowd applaud the fighters efforts here as the round comes to an end.
Rome is staying active underneath Bellido, who seems content to just control the action from this position.
And thats the end of the round the fighters go back to their corners.
Samoa Rome dominated that second round.
Well, the break between rounds is over. Let's get back to the scrappin! This is the final round!

Rome avoids the clinch attempt nicely.
Samoa Rome seems to be the more aggressive standup fighter in this bout.
Rome shoots for a takedown but Bellido saw that one coming a mile off and avoided it easily.
Rome connects with a looping right hand.
Rome shoots in for a double leg but Bellido sprawls well. That's going to sap some energy.
A telegraphed takedown attempt from Rome is defended easily by Bellido.
That's three failed takedown attempts in the round for Samoa Rome. That's going to take a lot out of him.
Bellido will have to do better than that with his takedown attempts.
Rome keeping his hands up high there, blocking the jab from Bellido.
Bellido slips a jab and a cross from Rome.
That's one minute gone in the round.
Rome thows a body shot but no joy.
Bellido shoots in looking for a takedown. Rome tries to sprawl out of it but Bellido keeps driving through. The fighters are pinned against the cage. Rome manages to get underhooks and after a bit of a struggle, circles away and we're back to standing.
Rome misses with a body shot. Nice footwork from Bellido.
Bellido bobs and weaves into range and then changes levels and scores with a nice takedown into side control.
Bellido working the strikes but Rome uses the opportunity to regain half guard.
Bellido thows a big elbow that misses, also allowing Rome to regain full guard.
Bellido wants to control from the top but Rome keeps moving.
That's two minutes gone in the round.
Bellido's corner is telling him to maintain position.
Bellido takes a big intake of breath there - he's definitely tired.
Bellido trying to control the position from guard on top but Rome is wriggling around, looking for whatever he can.
Bellido sitting in guard, not really doing much.

Dale Bellido has forced the referee to step in and restart the fight on the feet.
A really sloppy takedown attempt there from Bellido.
Samoa Rome is winning the standup battle so far.
That's three minutes gone in the round.
Rome throws a body punch but Bellido moves out of range.
Bellido uses some good footwork to avoid the body shot by Rome.
Bellido shoots in looking for a takedown. Rome tries to sprawl out of it but Bellido keeps driving through. The fighters are pinned against the cage. Rome manages to get underhooks and after a bit of a struggle, circles away and we're back to standing.
Bellido shoots in but no luck this time.
Nice cross by Rome.
Bellido with poor footwork there. He got himself in a bit of a tangle, enabling Rome to score with a decent uppercut.
That's four minutes gone in the round.
Rome lands a nice hook to Bellido's body. Bellido takes it in his stride and looks to land his own strikes.
Bellido doesn't manage to clinch there - Rome circles away.
Rome lunges at Bellido with a hook that half lands and is half blocked by Bellido's hand.
Bellido changes levels and looks for a double leg takedown. Rome tries to avoid it but Bellido manages to keep hold of a leg and drag Rome to the ground. Rome escapes though and pops straight back up to his feet.
Bellido keeping a good distance there, avoiding the body shot.
Bellido keeping a good distance there, avoiding the body shot.
Rome throws a right and a left that Bellido avoids nicely.
Bellido looks for a takedown here. Will he get it? Rome is fending him off so far but Bellido persists. Nope, Rome circles away and we're back to standing.
The crowd applaud the fighters efforts here as the round comes to an end.
Bellido fails with a takedown attempt.
And that's the end of the fight!
I would just about give that final round to Dale Bellido.
I think Bellido has won this one but let's see whether the judges agree with me. Over to the ring announcer for the scorecards.
Ladies and gentlemen, after 3 rounds of action, we go to the scorecards for a decision.
Judge Fedor Mirinova scores the fight 28:29
Judge Dmitry Maklakov scores the fight 29:29
Judge Vladimir Khabensky scores the fight 28:29
In favor of your winner, by majority decision... Dale Bellido!
|
|
|
|
|
|
|
|
|
|
|
|
|
|
|
|
|
|
|
|
|
|
|
| S |
C
A |
G |
S |
C
B |
G |
|
S |
C |
G |
|
energy
A | B |
|
hype
A | B |
|
pop
A | B |
|
mgr
A | B |
|
FIGHT
RATING
42% |
|
|
|
|
|
|

