|
|
PBP Commentary |
Coming up we have a light heavyweight MMA rules bout between Kido Moon (ranked 0 p4p, 0 weight class) and Nathan Mackenzie (ranked 0 p4p, 0 weight class). I can't wait for this one - let's get the fighter introductions out of the way and get this one started!
 |
|
 |
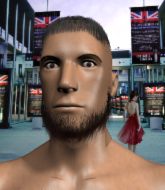
| 180 cm
18
210 lbs
0 - 1 - 0 |
|
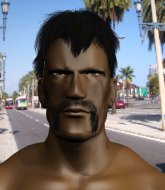
200 cm
25
205 lbs
2 - 2 - 0 |
BJJ White Belt
Solid Muay Thai
Big heart |
|
Dangerous GnP
Excellent boxer
Heavy handed |
|
| |
|
Ladies and gentlemen. This fight is 3 rounds, in the light heavyweight division.
Introducing the fighter to my left, fighting out of the red corner.
With a record of
0 - 1 - 0, fighting out of Los Angeles, Kido Moon!
And introducing the fighter to my right, fighting out of the blue corner.
With a record of
2 - 2 - 0, fighting out of Los Angeles, Nathan Mackenzie!
The judges for this bout are , and Jack Bonds.

The bell rings for round one and we are underway!
Moon tries to clinch but Mackenzie moves out of range.
Moon with poor footwork there. He got himself in a bit of a tangle, enabling Mackenzie to score with a decent uppercut.
Mackenzie getting the better of the striking in that exchange.
Mackenzie ducks down and throws a hook to the body.
Mackenzie lands an overhand left. A wild punch that just about connected.
Moon has his hands up protecting his head but a hook from Mackenzie finds it's way round the side to connect with Moon's head.
Moon tries to clinch up against the cage, rushing in the close the distance. Mackenzie manages to break the clinch and circles back to the middle of the mat.
Moon fails with an attempt to clinch.
Moon tries to clinch but is not successful on this occasion.
Mackenzie lands a nice looking body shot.
Mackenzie bobs and weaves and throws out a fast jab that snaps Moon's head backwards.
Moon is looking to clinch but Mackenzie is avoiding it.
Moon tries to close the distance and clinch up but Mackenzie swats him away and circles back towards the center.
Moon tries to clinch but is not successful on this occasion.
Mackenzie fakes a head punch and goes low to the body. Nicely done.
Moon drops his hands and takes a jab to the jaw for his troubles.
Moon is looking to clinch but Mackenzie is avoiding it.
Moon moves to clinch but Mackenzie breaks away
and Moon takes a counter punch right on the button for his troubles.
Moon tries to move into range but Mackenzie moves to the side and lands with a nice right hand.
Moon tries to close the distance and clinch but Mackenzie swats him to one side with an open hand palm strike and circles away.
Moon tries to close the distance and clinch up but Mackenzie swats him away and circles back towards the center.
Moon could do with loosing a few pounds - he looks very soft around the mid section, to put it politely.

That's one minute gone in the round.
Mackenzie lands with a cross.
Moon ducks right into an uppercut from Mackenzie.
Mackenzie connects with a looping right hand.
Moon tries to close the distance and clinch but Mackenzie swats him to one side with an open hand palm strike and circles away.
Moon fails with an attempt to clinch.
Mackenzie bobbing and weaving, closes the distance and lands a hook to the side of Moon's head.
Moon wants to clinch
enabling Mackenzie to counter with a crisp jab.
Mackenzie is using his reach advantage to land shots from outside his opponent's range.

Moon has Mackenzie up against the cage in a clinch.
Moon tries to throw a body punch but Mackenzie avoids it by throwing Moon back against the cage.
Moon keeps control of Mackenzie as he tries to wriggle out of the double underhooks.
Mackenzie is trying to push Moon away but Moon has him pressed against the cage, so he's going nowhere.
Mackenzie is trying to break free.
Mackenzie is trying to break the clinch but Moon has him pressed against the cage.
A knee to the head by Moon.

It looks like Nathan Mackenzie has been cut.
Moon is struggling to control the position.
Mackenzie is trying to force a seperation but Moon has the dominant position.
Mackenzie can't break the clinch.
Moon will no doubt start fighting again in a minute but for now he's just having a little rest, leaning Mackenzie up against the cage.
Mackenzie avoiding damage as Moon throws knees to the body.

That's two minutes gone in the round.
Mackenzie has had enough of the clinch but Moon keeps him there for the moment.
Mackenzie has had enough of the clinch but Moon keeps him there for the moment.
Mackenzie avoiding damage as Moon throws knees to the body.
Moon leaning his opponent against the cage.
Mackenzie avoids a wild elbow strike from Moon.
Mackenzie goes for a takedown in the clinch but Moon prevents it.
Mackenzie is looking to break free of the clinch but Moon has double underhooks.
Mackenzie can't break the clinch.
Mackenzie can't break the clinch.
Moon leaning his opponent against the cage.
Moon lands a good knee to the midsection. Mackenzie won't want to take too many of those.
Moon tries to land a shot to the body but it's blocked.
Mackenzie tries to break free but Moon pushes him back against the cage.
Mackenzie is trying to force a seperation but Moon has the dominant position.
Moon misses with a short punch on the inside.
Mackenzie is trying to work out of this bad position, with his back against the cage.
Moon is looking to score with knees to the body. Maybe he'll change it up and go body then head. Mackenzie is defending well for now.
Mackenzie is trying to break the clinch but Moon is controlling him.
Mackenzie wants to strike at distance but he can't break free of the clinch.
Moon goes for a body shot but it's blocked.
Moon gets an overhook and lands an elbow to the side of the head.

That's three minutes gone in the round.
Mackenzie blocks a knee to the body. He'll have a nicely bruised forearm in the morning.
Moon tries a knee to the head but Mackenzie blocks it.
Moon keeps control of Mackenzie as he tries to wriggle out of the double underhooks.
Mackenzie wants to get back to striking at distance but Moon won't allow it.
Mackenzie looks gassed!
Mackenzie takes a knee right on the jaw!
Mackenzie wants to break free. God knows he wants to breaaaak freeee.
Moon misses with a hook to the ribs.
A knee to the head by Moon.
Moon throws an elbow but it misses.
Mackenzie takes a knee right on the jaw!
Mackenzie has had enough of the clinch but Moon keeps him there for the moment.
Mackenzie is looking to break free of the clinch but Moon has double underhooks.
Moon has Mackenzie pushed against the cage.
Moon with the Thai clinch, lands a knee to the head.
Mackenzie letting Moon take a breather here.
Moon misses with an elbow strike.
Moon unloads a knee to the mid-section. Mackenzie lets out a prehistoric sounding urrrrgh.
Moon unloads a knee to the mid-section. Mackenzie lets out a prehistoric sounding urrrrgh.
Mackenzie wants to break the clinch but can't.
Moon stalling here - the referee won't stand for too much of that.

That's four minutes gone in the round.
Moon fails to land with a short punch on the inside.
Moon unloads a knee to the mid-section. Mackenzie lets out a prehistoric sounding urrrrgh.
Moon keeps control of Mackenzie as he tries to wriggle out of the double underhooks.
Moon misses the knee to the body. Nice hip positioning from Mackenzie.
Moon using the Thai plumb to throw knees but Mackenzie has his back arched nicely, preventing the strike.
Moon lands a good knee to the midsection. Mackenzie won't want to take too many of those.
Moon struggles to land a body shot inside as Mackenzie controls his hands.
Moon tries to land a knee to the head but misses.
Mackenzie is trying to work out of this bad position, with his back against the cage.
Moon can't find room to land a body shot as Mackenzie controls the action.
Mackenzie working hard to break the clinch.
Mackenzie tries to break the clinch but Moon is controlling the position.
Moon landing knees to the head.
Moon landing some nice looking knees to the body.
Moon using the Thai plumb to throw knees but Mackenzie has his back arched nicely, preventing the strike.
Moon stalling here - the referee won't stand for too much of that.
Mackenzie takes a knee to the side of the body.
Mackenzie tries to pull guard but can't drag his opponent to the mat. Moon just stands there and leans against the cage.
Moon unloads a knee to the mid-section. Mackenzie lets out a prehistoric sounding urrrrgh.
Moon pressing his opponent against the cage.
Moon working aggressively here.
And thats the end of the round the fighters go back to their corners.
Nathan Mackenzie dominated that round.
The cut man is working on Nathan Mackenzie's cut.
That's the end of the round. The referee orders the cornermen out of the cage so we can get back down to business.

Moon tries to close the distance and clinch but Mackenzie swats him to one side with an open hand palm strike and circles away.
Mackenzie has used his reach advantage pretty well so far tonight.
Moon takes a body punch that cleary hurt but he's trying not to show any weakness.
Mackenzie smiles there as he lands a nice right hand right on the button.
Moon wants to clinch.
Moon wants to clinch.
Moon darts in trying to clinch
The fighters are starting to get sweaty, which will make takedowns a bit more tricky.
and Mackenzie counters with a lovely shot to the body.
Moon doesn't react quick enough there as he takes a shot to the body.
Mackenzie circles away from the clinch attempt
letting Mackenzie counter with a right hand.
We've had a slow start to the round here - hopefully the action picks up.
Mackenzie scores with a hook to the body. Moon takes a step back and tries to catch his breath.
Moon wants to clinch up but Mackenzie keeps it at a distance.
Mackenzie thuds a left hand into Moon's body.
Mackenzie is breathing heavily.
Moon wants to clinch.
That's one minute gone in the round.
Mackenzie avoids the clinch attempt nicely.
Moon on the wrong end of an overhand right that came out of nowhere.
Mackenzie lands a jab-cross combination.
Moon is looking to clinch.
Moon tries to close the distance and clinch but Mackenzie swats him to one side with an open hand palm strike and circles away.
Moon tries to clinch up but Mackenzie circles away and keeps his distance.
Mackenzie scores with a body shot.
Moon on the wrong end of a vicious looking body shot.
Mackenzie wings a very wild body shot but it does the job and lands to the midsection.
Mackenzie swats away the attempt to clinch by Moon.
Mackenzie scores with a reasonable looking shot to the body. Moon doesn't seem bothered though.
Mackenzie cracks Moon with a hook to the jaw. Both fighters smile at eachother and high-five before getting back down to business.
Moon wants to clinch up but Mackenzie keeps it at a distance.
Kido Moon is looking to throw some combinations by the looks of things.
Moon tries to move into range but Mackenzie moves to the side and lands with a nice right hand.
That's two minutes gone in the round.
Mackenzie fakes and then throws a beautiful body shot. Moon looks a bit winded and takes a step backwards to take a breath.
Moon tries to clinch there but Mackenzie circles away.
Mackenzie connects with a nice looking jab.
Moon takes a shot right to the liver - Bas would have been proud of that punch.
Mackenzie lands a glancing blow to the side of Moon's head.
Mackenzie scores with a jab.
Moon gets in close and instigates a clinch.
Mackenzie wants to get back to striking at distance but Moon won't allow it.
Moon has Mackenzie pressed against the cage, preventing Mackenzie from circling away and getting back to striking at range.
Mackenzie avoiding damage as Moon throws knees to the body.
Mackenzie looks like he'd prefer to be striking at range right now.
Mackenzie is trying to force a seperation but Moon has the dominant position.
Moon will no doubt start fighting again in a minute but for now he's just having a little rest, leaning Mackenzie up against the cage.
Moon lands a nice knee to the body.
Mackenzie is trying to break the clinch but Moon has him pressed against the cage.
Moon unloads a knee to the mid-section.
Moon with the Thai clinch. He's looking to land a big knee but he's not managed it this time.
Mackenzie tries to circle away but Moon has him pinned against the cage.
Kneeeeees! The crowd are calling for knees to the body. Moon obliges.
Moon misses with a hook to the ribs.
That's three minutes gone in the round.
Moon lands a nice knee to the body.
The pace really dropping off here, momentarily.
Moon scores with a knee to the head.
Moon with a knee to the head.
Moon pressing his opponent against the cage.
Moon using the Thai clinch to land knees to the body.
Moon lands a knee to the body.
Moon looks like he's developed a pretty tasty lump over his left eye. He'll need to avoid taking much more damage to that.
A bit of stalling here from Moon.
Knees in the clinch landing for Moon.
Moon misses with a punch to the body.
Knees to the body from Moon.
Mackenzie takes a knee right on the jaw!
Moon scores a nice knee to the body.
Moon working Mackenzie over with knees to the body.
Mackenzie has had enough of the clinch and is looking to separate.
Moon with the Thai clinch. He's looking to land a big knee but he's not managed it this time.
Mackenzie wants to break free but Moon has control.
Knees to the body from Moon.
Mackenzie is trying to push Moon away but Moon has him pressed against the cage, so he's going nowhere.
That's four minutes gone in the round.
The referee calls for Moon to work.
Moon crunches a lovely knee into Mackenzie's ribcage.
Mackenzie wants to break the clinch but can't.
Moon leaning against his opponent.
Mackenzie on the defensive, avoiding the knees to the body.
Mackenzie wants to break the clinch but can't.
Moon tried to land a shot to the body but connects with Mackenzie's elbow.
Mackenzie takes a knee to the side of the body.
Moon misses the knee to the body. Nice hip positioning from Mackenzie.
Moon is looking to score with knees to the body. Maybe he'll change it up and go body then head. Mackenzie is defending well for now.
Moon unloads a knee to the mid-section.
Moon has Mackenzie pressed against the cage, preventing Mackenzie from circling away and getting back to striking at range.
Mackenzie on the defensive, avoiding the knees to the body.
Moon lands a good knee to the midsection. Mackenzie won't want to take too many of those.
Moon misses with an elbow strike.
Moon utilising his Muay Thai to score with a knee to the body.
Moon misses with a punch on the inside.
Mackenzie is looking to break free of the clinch but Moon has double underhooks.
Moon scores a nice knee to the body.
Moon taking a breather.
Mackenzie tries to break the clinch but Moon is controlling the position.
And thats the end of the round the fighters go back to their corners.
That was a close second round but I would say that Kido Moon will probably get the nod.
The cut man is working on Nathan Mackenzie's cut.
The referee calls time. The cornermen exit stage left and we're back to business. This is the final round!

Moon moves in looking to clinch but Mackenzie pushes him off.
Moon tries to clinch there but Mackenzie circles away.
Mackenzie fakes a head shot and lands one to the body.
Moon fails in his attempt to clinch.
Mackenzie throws a nice hook to the body that draws an oooh from the crowd.
Moon tries to close the distance and clinch up against the cage but Mackenzie paws at him with a jab and circles away.
Moon wants to clinch.
Mackenzie scores with a sloppy right hand. Moon should have avoided that one.
Mackenzie keeps the fight on the outside.
Moon fails with an attempt to clinch.
We've had a slow start to the round here - hopefully the action picks up.
Mackenzie digs a good body shot into Moon's ribs.
Mackenzie takes a big intake of breath there - he's definitely tired.
Mackenzie keeps the fight on the outside.
Mackenzie connects with a lovely right hand, straight down the pipe.
Mackenzie works Moon's body with a nice hook.
Mackenzie scores with a shot to the body.
That's one minute gone in the round.
Moon tries to clinch there but Mackenzie circles away.
Moon tries to clinch
and Mackenzie connects with a straight left hand counter down the middle.
Moon tries to clinch but Mackenzie moves out of range.
Good standup being displayed there by Mackenzie as he connects with a hook.
The fight stays on the outside here - Moon looks like he's thinking about clinching though.
Moon is looking to clinch but Mackenzie is avoiding it.
Moon closes the distance but Mackenzie moves to the side
letting Mackenzie counter with a right hand.
Mackenzie punishes Moon's body with a nice straight punch.
Mackenzie cracks Moon with a good shot that sees him stumbling back into the cage.
Moon doesn't manage to clinch there - Mackenzie circles away.
Mackenzie circles away from the clinch attempt.
Moon darts in trying to clinch
enabling Mackenzie to counter with a crisp jab.
A jab from Mackenzie finds it's way through Moon's defenses.
Moon is looking to clinch but Mackenzie is avoiding it.
That's two minutes gone in the round.
The crowd are getting on the fighters' backs, as the pace has dropped off in the last minute or so.
Moon tries to close the distance and clinch up but Mackenzie swats him away and circles back towards the center.
Mackenzie throws a good cross that connects.
Moon moves in looking to clinch but Mackenzie pushes him off.
Mackenzie jabs at Moon's body.
Mackenzie lands with a good body shot.
Moon tries to clinch up against the cage, rushing in the close the distance. Mackenzie manages to break the clinch and circles back to the middle of the mat.
Mackenzie avoids the clinch attempt nicely.
Moon doesn't manage to clinch there - Mackenzie circles away.
Mackenzie swats away the attempt to clinch by Moon.
Mackenzie scores with a jab to the jaw of his opponent.
Moon walks into a jab.
A shot to the liver by Mackenzie. Beautiful body shot.
Mackenzie lands a nice hook to Moon's body. Moon takes it in his stride and looks to land his own strikes.
Moon is looking to take this fight into the clinch.
Nice uppercut there from Mackenzie.
That's three minutes gone in the round.
Mackenzie tests Moon's chin there with a solid looking shot.
Moon is looking to clinch but Mackenzie is avoiding it.
Moon darts in trying to clinch
and Mackenzie counters with a nice body shot.
Moon wants to clinch.
A cross from Mackenzie lands.
Mackenzie swats away the attempt to clinch by Moon.
Moon fails with an attempt to clinch.
Moon tries to close the distance and clinch up but Mackenzie swats him away and circles back towards the center.
Mackenzie swats away the attempt to clinch by Moon.
Moon wants to clinch.
That's four minutes gone in the round.
A lull in the action here being met with boos from the crowd.
Nice uppercut there from Mackenzie.
Moon takes one to the chin there.
Moon is looking to clinch but Mackenzie is avoiding it.
Mackenzie jabs at Moon's body.
Moon tries to clinch but is not successful on this occasion.
Mackenzie works the jab nicely.
Mackenzie connects with the punch.
Mackenzie circles away from the clinch attempt.
Moon tries to clinch there but Mackenzie circles away.
Moon is looking to clinch.
Mackenzie throws out a powerful jab.
The crowd thankful this round is nearly over.
Moon wants to clinch up but Mackenzie keeps it at a distance.
Mackenzie slips in close and lands a nice hook before moving back out of range.
Moon moves in looking to clinch but Mackenzie pushes him off.
Moon is looking to clinch but Mackenzie is avoiding it.
Mackenzie circles away from the clinch attempt
and Mackenzie counters with a quick right hand to the jaw.
And that's the end of the fight!
Nathan Mackenzie comfortably won the final round on my scorecard.
I think Mackenzie has won this one but let's see whether the judges agree with me. Over to the ring announcer for the scorecards.
Ladies and gentlemen, after 3 rounds of action, we go to the scorecards for a decision.
Judge Suge Night scores the fight 28:29
Judge Percy O'Donnell scores the fight 27:30
Judge Jack Bonds scores the fight 27:30
In favor of your winner, by unanimous decision... Nathan Mackenzie!
|
|
|
|
|
|
|
|
|
|
|
|
|
|
|
|
|
|
|
|
|
|
|
| S |
C
A |
G |
S |
C
B |
G |
|
S |
C |
G |
|
energy
A | B |
|
hype
A | B |
|
pop
A | B |
|
mgr
A | B |
|
FIGHT
RATING
48% |
|
|
|
|
|
|

