|
|
PBP Commentary |
Coming up we have a heavyweight MMA rules bout between Mark Cunns II (ranked 0 p4p, 0 weight class) and Logan Walker (ranked 0 p4p, 0 weight class). The key to victory for Mark Cunns II has got to be keeping the fight on the feet.
 |
|
 |
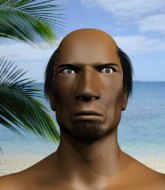
| 194 cm
21
280 lbs
8 - 4 - 0 |
|
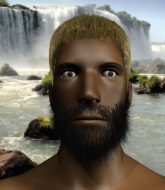
197 cm
26
278 lbs
8 - 8 - 0 |
BJJ Blue Belt
Solid boxing
Good chin |
|
Good takedowns
Basic striking
Granite chin |
|
| |
|
Ladies and gentlemen. This fight is 3 rounds, in the heavyweight division.
Introducing the fighter to my left, fighting out of the red corner.
With a record of
8 - 4 - 0, fighting out of London, Mark Cunns II!
And introducing the fighter to my right, fighting out of the blue corner.
With a record of
8 - 8 - 0, fighting out of London, Logan Walker!
The judges for this bout are Donald Grub, Andrew Berry and William Gold.

The bell rings for round one and we are underway!
Jab, cross, leg kick. Nice combination by Cunns II!

It looks like Logan Walker has been cut.
Logan Walker seems to be the more aggressive standup fighter in this bout.
We've seen a great period of action over the last minute or so - credit to both fighters for going all out!

Walker shoots in and gets a takedown into half guard. Walker showed some decent athleticism there.
Cunns II keeping his head moving to avoid the ground and pound.

Cunns II makes some distance and scrambles quickly back to his feet. Nice work!
Cunns II digs a good body shot into Walker's ribs.
Walker looks gassed!
Cunns II swings and misses with a hook to the body.
Cunns II just misses with a punch to the body.
Walker shoots in and bounces Cunns II off the cage to secure the takedown into guard.
Cunns II is edging up against the cage. He's using the cage to get back to his feet. Nice work there - the fighters are clinched.

Cunns II's corner calls for him to break the clinch, which he does.

That's one minute gone in the round.
Cunns II slaps away a takedown attempt from Walker, before circling back to the center of the mat.
Cunns II throws a jab to the body, straight down the pipe. Boom. That sent Walker stumbling backwards but he manages to regain his composure quickly.
Cunns II ducks down and throws a hook to the body.
A punch combination from Cunns II misses.
Walker bobs and weaves well there to avoid the strikes.
Cunns II lands with a straight right. Walker didn't see that one coming.
This is a great period of action - very entertaining stuff!
Walker takes a jab on the nose there. A little bit of blood seems to be coming out. Hopefully that won't affect his breathing.
Cunns II throws a wild combination but nothing lands.
Walker uses some good footwork to avoid the body shot by Cunns II.
Cunns II shoots in for a takedown - he's clinched up with Walker but Walker pushes him off and we're back to square one.
Cunns II scores with a takedown into Walker's guard.

Walker is looking for a triangle but Cunns II pushes his legs off easily.
Cunns II wants to stand but Walker has a closed guard, so he can't escape.
The ref warns both fighters not to hold the cage as they work up against the meshing.
Walker looking to sweep here. No luck so far.

That's two minutes gone in the round.
Cunns II's corner is telling him to maintain position.
Cunns II stopping the sweep attempt from Walker.

The ref stands the fighters back up. Mark Cunns II wasn't doing enough on the ground.
Cunns II uses good footwork to get in and out and land a nice right hand before Walker has time to react.
Walker fails with the takedown
and Cunns II counters with a crisp hook to the side of the head.
Cunns II is looking to wear down Walker with body shots, infact he's throwing more body shots than head shots at the moment.

That's three minutes gone in the round.
Cunns II misses with a body shot. Nice footwork from Walker.
A cross from Cunns II lands.
Cunns II swings wildly with a right hand that was never going to find it's target.
Walker closes the distance and gets a trip takedown into side control. Cunns II quickly recovers to half guard.
Walker stops Cunns II from getting back to his feet.
The fighters are starting to perspire pretty heavily.
Cunns II won't allow Walker to pass to mount.
Walker throwing shots but they're hitting the canvas more than the man.
Walker wants to work for an arm triangle but Cunns II is really keeping half guard well and defending the submission attempt.
Walker is keen to just control but Cunns II is a slippery customer.
Walker is sneakily working for an arm triangle but Cunns II sees it coming and defends easily.

That's four minutes gone in the round.
Walker trying to control from half guard but Cunns II is working away.
Walker is looking for a kimura but he's never going to get it from there.
Walker tries to pass to full mount but Cunns II defends it.
The crowd are going absolutely nuts as the round comes to an end - what a fantastic round of action!
And thats the end of the round the fighters go back to their corners.
Mark Cunns II dominated that round.
The cut man is working on Logan Walker's cut.
That's the end of the round. The referee orders the cornermen out of the cage so we can get back down to business.

Cunns II closes the distance and gets a double leg, slamming Walker to the mat! Walker manages to get full guard.
Walker had isolated an arm as going for a kimura. Cunns II defends it easily.
Walker looking to hit a scissor sweep but Cunns II is one step ahead there.
Cunns II controls from within his opponent's guard.
The fighters are pressed up against the cage, both looking to find a bit of space to work.
Walker has his foot on Cunns II's thigh. He's trying to push off and get in position for a triangle, I think. Cunns II works his way back into a safe position though.
Cunns II wants to stand but Walker is controlling his posture from full guard.
Cunns II has to be careful here, sitting in the guard of a superior BJJ player.
That's one minute gone in the round.
Cunns II stands up and looks to throw the legs aside to pass to side control. Walker swivels though and keeps the full guard.
Walker is trying to control the position but Cunns II postures up.
Walker has a closed guard, preventing Cunns II from standing up.
Walker wants to sweep but no luck.
Cunns II wants to control from the top but Walker keeps moving.
Mark Cunns II has forced the referee to step in and bring the fight back to the feet.
Cunns II looks to land a combination but Walker avoids it well.
Wow, both these guys are really going for it!
Both fighters are absolutely exhausted here.
That's two minutes gone in the round.
Neither fighter has done anything of merit for a good minute or two here and the crowd are not happy about it.
Walker shoots in but doesn't get the takedown
and Cunns II cracks him with a counter punch right on the button.
Walker drives through with a really nice takedown into side control.
You can see the frustration on Cunns II's face, being in this tough position on the bottom.
Walker throws a knee to the body but it doesn't do much damage.
Walker trying to control the position but Cunns II is working away.
Walker goes for an armbar! This could be all over! Wait, no, Cunns II rolls with the submission and now he's on top in Walker's guard! Nice work there by Cunns II!
Cunns II got a little sloppy there for a moment and Walker has worked his way into a loose triangle - can he finish it?! No, Cunns II has managed to get both his arms back between Walker's legs - danger averted.
That's three minutes gone in the round.
Cunns II forces his way into half guard.
Walker is doing well to control the position and prevent Cunns II from advancing to side control.
Cunns II tries to stand but his hand is stuck under Walker.
Cunns II slows the pace down in half guard.
Walker trying to hold on to Cunns II's head to control him but Cunns II postures up.
That's four minutes gone in the round.
Well. There's a bit of a lull in the action here and the crowd are starting to get restless.
Walker controlling the position for now.
Walker gets full guard.
The referee is asking the fighters to pick up the pace.
Walker is looking for a guillotine. You can't force these things though and Cunns II defends well.
Walker is throwing his legs up, looking for submissions. Cunns II is aware though and is defending well.
Cunns II has decided he wants to stand but the closed guard of Walker is proving hard to escape from.
Walker bucks up whilst keeping hold of a body lock, managing to reverse the position. Now he's in top in Cunns II's guard.
And thats the end of the round the fighters go back to their corners.
Mark Cunns II dominated that second round.
The cut man is working on Logan Walker's cut.
That's time! Cunns II's corner gives him a slap on the ass as he gets ready to fight. This is the final round!

Walker shoots in but Cunns II avoids the takedown attempt easily.
Walker showing good head movement there, avoiding the strikes from Cunns II.
Walker drops down and drives through with a powerful takedown into guard.
Walker throws a strike but Cunns II rolls with it and manages to sweep. Now he's in guard on top.
Walker has his foot on Cunns II's thigh. He's trying to push off and get in position for a triangle, I think. Cunns II works his way back into a safe position though.
Cunns II stays in close to Walker's body and controls the position.
Walker is pulling down on Cunns II's head to control his posture.
Cunns II trying to control but Walker is working from the bottom.
Both fighters are breathing heavily.
That's one minute gone in the round.
Walker is looking for a triangle but Cunns II pushes his legs off easily.
Walker is working an open guard here, looking to improve his position. No doubt that will leave him open to counters but at least he's being more offensive.
Walker has a loose triangle. He'll be looking to tighten that up but Cunns II can see exactly what he's planning and manages to posture up and free himself.
Cunns II stands up and waves to Walker to follow him.
Cunns II keeps the fight standing with a nice sprawl.
Walker misses with a takedown
and Cunns II counters with a stiff right hand.
Mark Cunns II has stuffed three takedown attempts in the round now. That's going to take a lot out of Logan Walker.
That's two minutes gone in the round.
Cunns II connects with a good right hand that stumbles Walker. Walker circles away out of range and recomposes himself.
A combination from Cunns II does no damage.
Mark Cunns II is winning the standup battle so far.
Cunns II cracks Walker with a right hand to the side of the head.
Cunns II with a jab.
Cunns II closes the distance and gets a trip takedown into side control. Walker quickly recovers to half guard.
This is a great period of action - very entertaining stuff!
Walker looking for submissions off his back.
Walker is trying to get back to full guard.
Walker gets back to full guard.
Cunns II is really dominating this fight. Is there anything that Walker can do to turn this around?
Walker working a defensive guard here.
That's three minutes gone in the round.
Cunns II is looking to stand up but Walker won't let him.
Walker keeping moving, preventing Cunns II from controlling successfully.
Walker trying to keep a closed guard but Cunns II is proving a slippery customer.
Walker managing to control the position.
Cunns II stopping the sweep attempt from Walker.
Mark Cunns II has forced the referee to step in and bring the fight back to the feet.
Walker fakes an overhand right and shoots for a takedown. Cunns II sprawls well initially but Walker persists and gets the takedown into half guard.
That's four minutes gone in the round.
Walker wants to work for an arm triangle but Cunns II is really keeping half guard well and defending the submission attempt.
Cunns II is pressing down on Walker's left leg trying to get back to full guard. He's managed it.
Mark Cunns II is fighting for a decision here - he's started to take the cautious approach.
Cunns II keeping moving, preventing Walker from controlling successfully.
Cunns II is working an open guard here, looking to improve his position. No doubt that will leave him open to counters but at least he's being more offensive.
Logan Walker has stepped it up - he knows he needs a finish here!
Cunns II utilising some decent striking defenses from the guard, preventing the ground and pound.
Walker with a nice head shot there.
And that's the end of the fight!
Mark Cunns II showed his dominance in that final round.
Well I reckon that's a shut out for Cunns II, winning every round. Will the judges agree? They are the ones who matter, even if they are often depressingly incompetent. Over to the ring announcer for the scorecards.
Ladies and gentlemen, after 3 rounds of action, we go to the scorecards for a decision.
Judge Donald Grub scores the fight 30:27
Judge Andrew Berry scores the fight 30:27
Judge William Gold scores the fight 30:27
In favor of your winner, by unanimous decision... Mark Cunns II!
|
|
|
|
|
|
|
|
|
|
|
|
|
|
|
|
|
|
|
|
|
|
|
| S |
C
A |
G |
S |
C
B |
G |
|
S |
C |
G |
|
energy
A | B |
|
hype
A | B |
|
pop
A | B |
|
mgr
A | B |
|
FIGHT
RATING
80% |
|
|
|
|
|
|
