|
|
PBP Commentary |
Coming up we have a bantamweight MMA rules bout between Makua Koa (ranked 0 p4p, 0 weight class) and Dick Davenport (ranked 0 p4p, 0 weight class). Dick Davenport acknowledges the crowd's support as he enters the cage.
 |
|
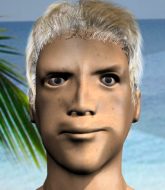 |
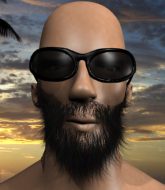
| 173 cm
22
135 lbs
0 - 5 - 0 |
|
183 cm
19
146 lbs
2 - 2 - 0 |
BJJ White Belt
Solid boxing
Experienced |
|
Good wrestler
Brawler
Powerful |
|
| |
|
Ladies and gentlemen. This fight is 3 rounds, in the bantamweight division.
Introducing the fighter to my left, fighting out of the red corner.
With a record of
0 - 5 - 0, fighting out of Hilo, Makua Koa!
And introducing the fighter to my right, fighting out of the blue corner.
With a record of
2 - 2 - 0, fighting out of Hilo, Dick Davenport!
The judges for this bout are , and .

The bell rings for round one and we are underway!
Nice sprawl there from Davenport as Koa shoots in.
Koa has a takedown stuffed.
Davenport leaves Koa with his face pressed against the mat as he sprawls beautifully, defending against a solid takedown attempt.
That's three failed takedown attempts in the round for Makua Koa. That's going to take a lot out of him.
Davenport showing good head movement there, avoiding the strikes from Koa.
Davenport shoots for a takedown but Koa saw that one coming a mile off and avoided it easily.
Koa dodges the punch combination from Davenport.

Koa gets to the clinch - let's see what his plan is here.

Davenport's corner calls for him to break the clinch, which he does.
Koa throws a combination but it was largely blocked by Davenport.
Koa fails to land with a series of punches.
We've had a slow start to the round here - hopefully the action picks up.
Davenport looks to land a left hand but Koa moved out of range nicely.
Davenport is a painfully thin specimen of a man. You do wonder whether a good body kick would snap him clean in two.
Koa fails in his attempt to clinch.

Koa looking for a takedown here - he's got it.
We get told so often about how wrestlers don't like to be on their backs. Let's see if Davenport can do anything to dispel that myth.
Koa wants to pass the guard but Davenport is keeping the position.

That's one minute gone in the round.
Davenport manages to sweep nicely, so he's now on top. Koa manages to get himself to full guard.
Davenport controlling from the guard. I say controlling but really, he's stalling.
Davenport trying to control the position from guard on top but Koa is wriggling around, looking for whatever he can.

That's two minutes gone in the round.
The crowd are hurling abuse towards the fighters... You can hardly blame them though because there isn't a lot going on in the fight.

Davenport avoids a guillotine attempt easily.
Davenport stands up and looks to throw the legs aside to pass to side control. Koa swivels though and keeps the full guard.

That's three minutes gone in the round.
Davenport not doing a lot at the moment. He'll have to show some more aggression or the fight will get stood up.
The ref warns both fighters not to hold the cage as they work up against the meshing.
Koa working a defensive guard but Davenport passes into half guard.
Davenport wants to stand up but Koa has a hold of him and won't allow it.

That's four minutes gone in the round.
There's not a lot going on here and the crowd are letting the fighters know they're not willing to tolerate a lack of action.
Koa is looking to control Davenport's leg but it's slowly edging free. Can Koa avoid being mounted?
The fighters are starting to perspire pretty heavily.
Koa wants to get back to full guard.
Boooooooooooooooooooo!!! God, this has been a terrible round. Come on you two, sort yourselves out!
Davenport wants to control but Koa is keeping him busy.
And thats the end of the round the fighters go back to their corners.
A close round but Dick Davenport will probably get the nod.
The referee calls time. The cornermen exit stage left and we're back to business.

Koa shoots in for a takedown. "I don't think so" says Davenport as he avoids it easily.
Koa changes levels and looks for a double leg takedown. Davenport tries to avoid it but Koa manages to keep hold of a leg and drag Davenport to the ground. Davenport escapes though and pops straight back up to his feet.
Koa scores to the head and body with a nice combination!
Koa throws a right hand that Davenport ducks under and follows up with a left that Davenport also avoids with ease.
Koa closes the distance and clinches up with Davenport, looking for a takedown. Koa pushes Davenport against the cage but Davenport circles to the side and manages to break the clinch.
That's three failed takedown attempts in the round for Makua Koa. That's going to take a lot out of him.
Koa shoots in for a takedown. He's persisting with it as Davenport sprawls well. Davenport wins this battle and keeps the fight standing. Koa gets slowly back to his feet.
Koa looks to land a combination but Davenport avoids it well.
Koa rushes forward with a series of wild hooks but Davenport moves out of range and avoids them all easily.
Koa throws a combination. Davenport tries to block but a couple of punches get through.
Davenport closes the distance and clinches up with Koa, looking for a takedown. Davenport pushes Koa against the cage but Koa circles to the side and manages to break the clinch.
We've had a slow start to the round here - hopefully the action picks up.
Koa tries to bum rush Davenport with a series of wild strikes but Davenport uses good footwork to avoid the assault.
Koa throws a one two combo.
Koa fakes high and shoots in for a takedown but Davenport avoids it really well and circles away.
Koa shoots in looking for a double leg takedown. Davenport defends it nicely.
That's one minute gone in the round.
Davenport fails miserably with a takedown attempt.
Davenport moves into the clinch successfully.
Davenport pulls guard successfully.
Davenport pulls Koa in close to his closed guard and prevents Koa from doing any damage or advancing position.
Koa looking to pass the guard.
Koa wants to stand and escape but instead Davenport has hit a sweep and he's now on top in guard.
Davenport wants to stand but Koa has a closed guard, so he can't escape.
That's two minutes gone in the round.
Koa seems keen to control Davenport's posture.
Davenport looking to pass the guard.
Davenport drops back for a leg but he's not going to get it - he lets go and Koa dives on top into guard.
That's three minutes gone in the round.
Davenport preventing the ground and pound from doing any damage.
Koa with a flurry of punches that miss.
Koa loading up with the ground and pound but he's missing more than he's landing in this flurry.

Koa gets to his feet and steps away from his opponent.
Koa fails to land the takedown.
Koa shoots in but Davenport avoids the takedown attempt easily.
Koa throws a wild combination but nothing lands.
Makua Koa is looking to throw some combinations by the looks of things.
Davenport with a lazy takedown attempt
and Koa counters with a nice double leg into side control. Davenport won't be happy with that.
Koa fails to land a wild elbow strike.
That's four minutes gone in the round.
Koa landing a few strikes.
Koa sitting in side control, looking to soften his opponent up with elbows and hammerfists but Davenport is avoiding damage well and looking to escape the position.
Koa lands some shots froms side control.
Koa working the ground and pound from side control.
Davenport gets back to half guard.
Both fighters are absolutely exhausted here.
Davenport won't allow Koa to pass to mount.
Davenport makes his way to full guard. A much better position for Davenport.
And thats the end of the round the fighters go back to their corners.
Makua Koa dominated that second round.
That's time! Back to the action! This is the final round!

Davenport fakes high and shoots in for a takedown but Koa avoids it really well and circles away.
Koa misses with a double jab.
Koa shoots in for a takedown - he's clinched up with Davenport but Davenport pushes him off and we're back to square one.
Koa fails to land with the punch combination there - jab, cross, hook, miss, miss, miss.
Koa throws a right and a left that Davenport avoids nicely.
No joy there for Koa, who threw a few shots but didn't land.
The fight stays on the outside here - Koa looks like he's thinking about clinching though.
We've had a slow start to the round here - hopefully the action picks up.
Koa doesn't manage to clinch there - Davenport circles away.
Koa throws a one two combo.
No joy there for Koa, who threw a few shots but didn't land.
Some wild striking there from Koa.
That's one minute gone in the round.
Davenport shoots in with a takedown attempt and he has Koa pinned against the cage. Koa gets the underhooks and manages to circle away.
Koa scores with a nice one two combo and darts back out of range to avoid anything coming in the opposite direction.
Koa tries to score a power double leg takedown but Davenport sees that one coming and sprawls well. That will dishearten Koa somewhat.
Koa defending well as Davenport loads up on a big left hand.
Some wild striking there from Koa.
Koa closes the distance and clinches up with Davenport, looking for a takedown. Koa pushes Davenport against the cage but Davenport circles to the side and manages to break the clinch.
That's three failed takedown attempts in the round for Makua Koa. That's going to take a lot out of him.
Davenport throws a jab, cross combination which is slipped
and Koa counters with a left and a right that stings Davenport.
Koa lunges in with swinging rights and lefts but Davenport circles away quickly and effectively.
Davenport looks to score with a jab to the body but Koa is just out of range.
Davenport tries for a takedown but Koa sees it coming a mile off and avoids it easily.
That's two minutes gone in the round.
Well. There's a bit of a lull in the action here and the crowd are starting to get restless.
Koa shoots in for a takedown but Davenport shows good takedown defense.
Davenport misses with a low kick.
Koa looks to land a combination but Davenport avoids it well.
The fight stays on the outside here - Koa looks like he's thinking about clinching though.
Koa misses with a series of wild punches.
Koa shoots in for a takedown but Davenport shows good takedown defense there and keeps this one on the feet.
Koa shoots in for a takedown but doesn't get it.
Koa doesn't manage to clinch there - Davenport circles away.
Koa throws a nice looking combination but Davenport bobs and weaves to avoid any damage.
Koa misses with a double jab.
Koa misses with a takedown attempt. He shot from a bit too far out.
Both fighters are breathing heavily.
Davenport swats away the attempt to clinch by Koa.
Koa closes the distance and looks for a trip takedown... aaaand he's got it - Koa lands in his opponent's guard.
That's three minutes gone in the round.
Koa throwing elbows and punches but not connecting, as Davenport works some decent striking defense from the bottom.
Davenport managing to control the position.
Koa preventing the sweep.
Koa with a flurry of punches that miss.
Davenport has his foot on Koa's thigh. He's trying to push off and get in position for a triangle, I think. Koa works his way back into a safe position though.
Davenport has control of Koa's left arm, preventing Koa from doing any damage.
That's four minutes gone in the round.
Neither fighter has done anything of merit for a good minute or two here and the crowd are not happy about it.
Davenport can't keep his opponent in guard - Koa advances to half guard, no doubt looking to mount.
Koa looks towards his corner to check for any instructions. The corner give him nothing to work with, so he cracks Davenport with a short hammerfist. I guess that's as good as any advice he could get in this position.
Davenport wants to get back to his feet.
Koa trying to pass the guard but Davenport defending well.
Davenport wants to control but Koa is keeping busy and won't allow it.
Boooooooooooooooooooo!!! God, this has been a terrible round. Come on you two, sort yourselves out!
Koa passes to full mount!
And that's the end of the fight!
Makua Koa showed his dominance in that final round.
I think Koa has won this one but let's see what the judges have to say. Over to the ring announcer for the scorecards.
Ladies and gentlemen, after 3 rounds of action, we go to the scorecards for a decision.
Judge Andi Peters scores the fight 30:28
Judge Gordon Ramsey scores the fight 29:28
Judge Frank Skinner scores the fight 30:27
In favor of your winner, by unanimous decision... Makua Koa!
|
|
|
|
|
|
|
|
|
|
|
|
|
|
|
|
|
|
|
|
|
|
|
| S |
C
A |
G |
S |
C
B |
G |
|
S |
C |
G |
|
energy
A | B |
|
hype
A | B |
|
pop
A | B |
|
mgr
A | B |
|
FIGHT
RATING
28% |
|
|
|
|
|
|
