|
|
PBP Commentary |
Coming up we have a super heavyweight MMA rules bout between Brad Nelson (ranked 0 p4p, 0 weight class) and Back Yard Brawler (ranked 0 p4p, 0 weight class). Nelson comes to the cage accompanied by Black Flood Diesel - Lost Cause. Over to our ring announcer for the fighter introductions!
 |
|
 |
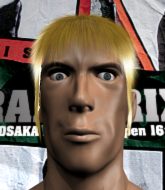
| 205 cm
24
277 lbs
4 - 0 - 0 |
|
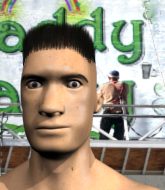
190 cm
20
165 lbs
2 - 1 - 0 |
Powerful takedowns
Basic striking
KO power |
|
BJJ Brown Belt
Solid Muay Thai
Prefers standup |
|
| |
|
Ladies and gentlemen. This fight is 3 rounds, in the super heavyweight division.
Introducing the fighter to my left, fighting out of the red corner.
With a record of
4 - 0 - 0, fighting out of London, Brad Nelson!
And introducing the fighter to my right, fighting out of the blue corner.
With a record of
2 - 1 - 0, fighting out of London, Back Yard Brawler!
The judges for this bout are Paul Tew, Sam Margolis and Colin Fotheringham.

The bell rings for round one and we are underway!
Brawler is looking to take this fight into the clinch.
Nelson shoots in and drives through. Brawler sprawls well.
Nelson fakes high and swings low for a body shot but Brawler manages to avoid it.
Brawler avoids a lazy jab quite easily.
Brawler is a painfully thin specimen of a man. You do wonder whether a good body kick would snap him clean in two.
Nelson avoids the clinch attempt nicely.
Brawler wants to clinch.
Brawler throws the left hand but Nelson avoids the punch easily.
Nelson throws a looping left and ducks down for a takedown. He's got his arms around Brawler's waist but Brawler gets an underhook and avoids the takedown by throwing Nelson off to one side.
Brawler looking to throw a kick but he's pulled out of it.
Brad Nelson seems to be the more aggressive standup fighter in this bout.
Brawler staying out of range there.
We've had a slow start to the round here - hopefully the action picks up.
Nelson keeps the fight on the outside.

Brawler clinches up with Nelson and pushes him back against the cage.

Brawler breaks from the clinch.
Brawler is looking to clinch.
Brawler steps to the side to avoid the strikes from Nelson.
Nelson throws a lazy right hand but Brawler sees it coming a mile off and sidesteps it easily.

That's one minute gone in the round.

Nelson throws the overhand right but ducks down into a quick takedown attempt. Brawler was covering up waiting for the punch and Nelson finishes the takedown easily into guard.

Nelson drops back for a leg! It's a sloppy attempt though and Nelson jumps back into guard quickly, to retain the dominant position.
Brawler trying to strike from the bottom but really, it's not the best position to be doing that from!
Nelson throws a big right hand that misses.
Nelson prevents Brawler from getting back to his feet.
Nelson tries to free his leg and advance position but Brawler is retaining full guard.
Nelson is trying to work a guillotine from the top, or something like that? Don't know how he thinks he's going to get a finish from there.
Both fighters really going for it on the ground here!
Brawler keeping full guard, as Nelson tries to pass.

Well, the referee has seen enough. Neither fighter is active enough on the ground so he's stood them back up.
Brawler avoids a lazy jab quite easily.
Brawler has Nelson up against the cage in a clinch.
Brawler breaks the clinch and we return to the middle of the mat.

That's two minutes gone in the round.
Nelson tries to land with a swinging hook to the body but Brawler was well out of range. Poor timing from Nelson.
The fight stays on the outside here - Brawler looks like he's thinking about clinching though.
Brawler instigates a clinch.
Brawler manages to break the clinch.
Brawler ducks under an overhand right and circles away with a smile on his face.
Brawler slips a jab from Nelson.
Nelson misses with a double jab.
Nelson steps to the side to avoid the strikes from Brawler.
Nelson moving in and out of range nicely, whilst landing the scoring shot.
Nelson misses with a looping left.
Nelson thows a left - swing and a miss!
Brawler throws a head kick that misses.
Nelson throws a series of punches but Brawler avoids them all with ease.
Nelson drops down and drives through with a powerful takedown into guard.
Brawler has the superior BJJ but he's also working some ground strikes into his gameplan.
Brawler doesn't do any damage with a couple of strikes from the bottom.

That's three minutes gone in the round.
Nelson pressing down on his opponent's thigh, looking to pass guard. Brawler is keeping the position for now.
Nelson won't allow Brawler to get back to his feet.
Nelson sneaks a leg through and gets to half guard. That was like a knife through butter how easily he passed Brawler's guard.
Brawler tries to strike from the bottom but it doesn't land.
Brawler wants to get back to his feet.
Brawler is looking to regain full guard. Not this time though.
Nelson prevents Brawler from standing back up.
The referee decides to stand the fighters back up.
Nelson throws the overhand right but ducks down into a quick takedown attempt. Brawler was covering up waiting for the punch and Nelson finishes the takedown easily into guard.
Brawler is looking to stand up but Nelson isn't so interested in that idea.
Nelson drops back for a leg! It's a sloppy attempt though and Nelson jumps back into guard quickly, to retain the dominant position.
Nelson passes into half guard.

That's four minutes gone in the round.
Brawler tries to strike from the bottom but it doesn't land.
Nelson is thinking about going for an arm triangle but he can't free his leg.
Brawler tries to kick Nelson off but Nelson keeps his base steady and stays in half guard.
Brawler throws a strike from the bottom that misses.
Brawler punching from the bottom.
Nelson is looking for a kimura. It's going to be difficult to finish that from half guard though and Brawler defends it well.
Nelson is keeping good posture, landing some ground and pound.
Nelson is trying to work for a kimura but Brawler is defending well.
Brawler is trying to stand up here but Nelson is controlling him well.
And thats the end of the round the fighters go back to their corners.
Brad Nelson dominated that round.
That's the end of the interval. I'm sure that seemed a lot quicker than a minute for our two fighters! Back to the action.

Nelson ducks down and throws a hook to the body but Brawler moves away.
Nelson tries to land with a swinging hook to the body but Brawler was well out of range. Poor timing from Nelson.
A decent looking cross lands there for Nelson.
Nelson swings and misses with a hook to the body.
Nelson throws a right and a left that both miss.
Brawler tries to clinch but Nelson is having none of it.
Brawler slaps away a takedown attempt from Nelson, before circling back to the center of the mat.
Nelson will have to do better than that with his takedown attempts.
Brawler clinches up against the cage.
We've had a slow start to the round here - hopefully the action picks up.
Brawler prevents a takedown attempt there.
That's three failed takedown attempts in the round for Brad Nelson. That's going to take a lot out of him.
Brawler stalling in the clinch but Nelson improves position.
Brawler gets underhooks to prevent Nelson's takedown attempt.
Brawler's corner calls for him to break the clinch, which he does.
Brawler tries to clinch but Nelson is having none of it.
Brawler closes the distance and pushes Nelson back into the cage.
Brawler with the Thai clinch. He's looking to land a big knee but he's not managed it this time.
That's one minute gone in the round.
Brawler is looking to score with knees to the body. Maybe he'll change it up and go body then head. Nelson is defending well for now.
Nelson fails to pull the fight into his guard.
Brawler with a knee to the head.
Brawler throws a head punch that misses.
Nelson has hold of a leg and is looking for a trip takedown. Brawler avoids it nicely though and we remain in the clinch.
Brawler wants to get back to striking at distance but Nelson won't allow it.
Brawler misses with a knee strike.
Nelson keeps the fight in the clinch, despite Brawler's efforts to push away.
Brawler breaks the clinch.
Nelson throws a hard body shot but it just misses.
A looping hook to the body misses from Nelson. Brawler does a little dance to reset his feet.
Nelson shoots in for a takedown. "Ole!" shouts Brawler as he jumps to the side.
Brawler fails with an attempt to clinch.
Nelson swings wildly with a right hand that was never going to find it's target.
Nelson closes the distance and clinches up with Brawler, looking for a takedown. Nelson pushes Brawler against the cage but Brawler circles to the side and manages to break the clinch.
Nelson throws a jab but it's blocked by Brawler.
Nelson shoots in for a takedown. "I don't think so" says Brawler as he avoids it easily.
That's two minutes gone in the round.
A few boos can be heard. I'm sure they will multiply if the fighters don't pick up the pace.
Nelson misses with an uppercut.
Back Yard Brawler is looking to keep the fight on the feet at all costs.
Brawler tries to clinch but Nelson moves out of range.
Nelson ducks under a wild hook from Brawler.
Nelson throws an overhand right that lands on Brawler's shoulder, as Brawler tries to avoid the shot.
Brawler shakes his hands off, looking to compose himself, but takes a jab to the jaw whilst he does it.
Nelson throws a right and a left that both miss.
Nelson shoots in but Brawler avoids the takedown attempt easily.
Brawler slips a jab and a cross from Nelson.
Nelson throws a hook but Brawler blocks it.
Nelson fails with a takedown attempt.
Nelson lands a jab.
Brawler is looking to clinch.
That's three minutes gone in the round.
Nelson decides to change it up a bit and drives through with a nice takedown into half guard.
Brawler tries to kick Nelson off but Nelson keeps his base steady and stays in half guard.
Ground and pound from Nelson.
Nelson tries to pass to full mount but Brawler defends it.
Brawler wants to get back to his feet.
Nelson tries to pass to full mount but Brawler defends it.
Brawler is looking to sinch up a guillotine here but Nelson pulls his head out easily.
Brawler is looking to escape.
Nelson is trying for a guillotine from the top but the pressure isn't in the right place so Brawler is just riding it out for now. Nelson eventually gives up the hold.
The fighters are pressed up against the cage, both looking to find a bit of space to work.
Nelson prevents Brawler from standing back up.
That's four minutes gone in the round.
It looks like we're going to have a standup here. Neither fighter is doing enough on the ground.
Nelson missing with a left hand there. Brawler was out of range so wasted energy throwing that one.
Brawler tries to close the distance and clinch up but Nelson swats him away and circles back towards the center.
Nelson dips down and scores with a jab to the body.
Nelson swings wildly with a right hand that was never going to find it's target.
Brawler is looking to clinch.
Nelson throws a good cross that connects.
Nelson thows a body shot but no joy.
Nelson looks to land a left hand but Brawler moved out of range nicely.
Nelson gets a takedown into half guard.
Nelson blocks the strikes from Brawler.
And thats the end of the round the fighters go back to their corners.
Brad Nelson dominated that second round.
The referee calls time. The cornermen exit stage left and we're back to business. And we move into the final round!

Nelson shoots in for a takedown from distance. He catches Brawler napping and manages to drive through into side control!
Nelson thinks about going for a far side armbar but bails out and retains the dominant position instead.
Brawler is trying to escape and get back to his feet.
Nelson tries for an arm triangle. That looks pretty tight to me. Is this one over!?! Possibly, maybe, no Nelson has let go of the choke. Obviously it wasn't as tight as we thought!
Nelson tries for a kimura but Brawler is defending well.
Nelson tries to advance to mount but can't.
Nelson tries for a kimura but Brawler is defending well.
That's one minute gone in the round.
Brawler gets back to half guard.
Both fighters are breathing heavily.
Nelson is looking for a kimura but Brawler is holding onto that half guard position, so it's hard for Nelson to get the leverage.
Brawler looks like he's trying to stand up.
Nelson is working for a kimura but Brawler is defending it quite comfortably.
Brawler actively working from the bottom here.
Brawler avoiding damage under a succession of punches from Nelson.
Brad Nelson overall seems to be getting the better of the ground position in the fight so far.
That's two minutes gone in the round.
The crowd are getting on the fighters' backs, as the pace has dropped off in the last minute or so.
Brawler tries to kick Nelson off but Nelson keeps his base steady and stays in half guard.
Nelson is working for a kimura but Brawler is defending it quite comfortably.
It looks like we're going to have a standup here. Neither fighter is doing enough on the ground.
Brawler drives through and clinches with Nelson against the cage.
Brawler tries to throw a body punch but Nelson avoids it by throwing Brawler back against the cage.
Nelson tries to pull guard but Brawler won't allow it.
Brawler tries to circle away but Nelson has him pinned against the cage.
Brawler misses with a knee to the head.
Nelson drops down looking for an ankle pick but Brawler pulls his leg out and moves away.
Brawler tries to clinch there but Nelson circles away.
A jab lands there for Nelson.
Nelson shoots in but no luck this time.
That's three failed takedown attempts in the round for Brad Nelson. That's going to take a lot out of him.
That's three minutes gone in the round.
Nelson keeps the fight on the outside.
Nelson has a takedown stuffed.
Brawler is looking to clinch but Nelson is avoiding it.
Nelson closes the distance and clinches up with Brawler, looking for a takedown. Nelson pushes Brawler against the cage but Brawler circles to the side and manages to break the clinch.
Nelson shoots in for a takedown! He's got it and he's managed to land in full mount! That's better than Nelson was expecting from the takedown attempt, I'm sure!
Brawler swinging wildly from the bottom but he's not landing.
Back Yard Brawler has stepped it up - he knows he needs a finish here!
Nelson wants to take Brawler's back but he can't do it this time.
Nelson moves into side control, trying to work for a kimura. That looks painful! Will he finish!!?? No, Brawler has worked his arm free - good work by Brawler!
Nelson avoids the strikes from the bottom by Brawler.
Nelson goes for an armbar here - this could be all over! But no, Brawler has escaped beautifully and is now on top in side control! Oh, that's unlucky for Nelson but great work by Brawler.
That's four minutes gone in the round.

Brawler decides to take the fight back to the feet.
Nelson jabbing away but nothing is landing.
Brawler doesn't react quick enough there as he takes a shot to the body.
Brawler doesn't manage to clinch there - Nelson circles away.
Brad Nelson is fighting for a decision here - he's started to take the cautious approach.
Jab, cross, leg kick. Nice combination by Nelson!
Nelson is using his reach advantage well here, landing the more effective single shots from range.
Brawler tries to clinch but Nelson is having none of it.
Nelson looks to score with a jab to the body but Brawler is just out of range.
Nelson is the aggressor but that punch slipped nicely by Brawler.
Brawler walks into a straight right hand from Nelson.
Nelson takes a swing at Brawler's ribcage but misses.
Brawler tries to clinch up but Nelson circles away and keeps his distance.
Nelson throws a series of punches but Brawler avoids them all with ease.
Brawler leaves Nelson with his face pressed against the mat as he sprawls beautifully, defending against a solid takedown attempt.
And that's the end of the fight!
Brad Nelson showed his dominance in that final round.
Well I reckon that's a shut out for Nelson, winning every round. Will the judges agree? They are the ones who matter, even if they are often depressingly incompetent. Over to the ring announcer for the scorecards.
Ladies and gentlemen, after 3 rounds of action, we go to the scorecards for a decision.
Judge Paul Tew scores the fight 30:27
Judge Sam Margolis scores the fight 30:27
Judge Colin Fotheringham scores the fight 30:27
In favor of your winner, by unanimous decision... Brad Nelson!
|
|
|
|
|
|
|
|
|
|
|
|
|
|
|
|
|
|
|
|
|
|
|
| S |
C
A |
G |
S |
C
B |
G |
|
S |
C |
G |
|
energy
A | B |
|
hype
A | B |
|
pop
A | B |
|
mgr
A | B |
|
FIGHT
RATING
46% |
|
|
|
|
|
|
