|
|
PBP Commentary |
Coming up we have a lightweight MMA rules bout between Jenji Ueda (ranked 0 p4p, 0 weight class) and KoKo Beware (ranked 0 p4p, 0 weight class). Ueda comes to the ring accompanied by Requiem for a Dream. Rumors backstage are that the fighters have been paid to keep it standing but we know that would never happen in MMA!
 |
|
 |
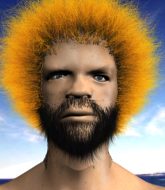
| 172 cm
24
161 lbs
7 - 2 - 0 |
|
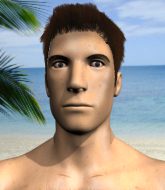
175 cm
24
163 lbs
10 - 7 - 0 |
BJJ Blue Belt
Counter striker
Granite chin |
|
BJJ Purple Belt
Decent boxing
Knockout power |
|
| |
|
Ladies and gentlemen. This fight is 5 rounds, for the lightweight championship of the world!
Introducing the champion to my left, fighting out of the red corner.
With a record of
7 - 2 - 0, fighting out of Tokyo, Jenji Ueda!
And introducing the challenger to my right, fighting out of the blue corner.
With a record of
10 - 7 - 0, fighting out of Tokyo, KoKo Beware!
The judges for this bout are Shigeki Sano, Tatsuya Matsuyama and Sosuke Kotani.

The bell rings for round one and we are underway!
Beware throws a combination but it was largely blocked by Ueda.
Beware misses the shot to the body.
Ueda checks a leg kick nicely.
Beware connects with a lovely right hand, straight down the pipe.

Ueda bobs and weaves into range and then changes levels and scores with a nice takedown into side control.
Beware is trying to get back to half guard.
Ueda throwing ground and pound but whilst doing so, he forgets to control position and Beware works his way back to half guard. Good composure under pressure.
Ueda is pressing down on Beware's thigh, looking to free his foot. Beware is holding on for now.
Beware preventing any damage for now, controlling his opponent's head.
Ueda looking to pass the half guard. Not this time.
Beware controlling the position well.

That's one minute gone in the round.
Ueda keeping composed on the top, looking to control the action.
Ueda prevents Beware from standing back up.
Beware tries to get to full guard but Ueda has control of the leg.
Beware taking some punishment here, with Ueda in his half guard.
Neither fighter is being very active at the moment, with Ueda in particular looking to stall.
Ueda is trying to control. Beware wants to improve his position but can't escape this time.
Beware is trying to stand up here but Ueda is controlling him well.

That's two minutes gone in the round.
A lull in the action here being met with boos from the crowd.
Beware wants to improve his position but Ueda is controlling well.
Ueda wants to lay and pray for a moment but Beware keeps working.
Ueda thows a huge punch but Beware dodges it nicely.
Ueda wants to pass the guard but Beware is defending well.
Beware tries to kick Ueda off but Ueda keeps his base steady and stays in half guard.

It looks like we're going to have a standup here. Neither fighter is doing enough on the ground.
Ueda throws a nice outside leg kick.
Beware looks gassed!
The fight stays on the outside here - Ueda looks like he's thinking about clinching though.
Beware's corner calls for a 1-2. Beware obliges with the 1 part as he scores the single shot and moves back out of range.
Ueda throws a mid kick that lands with a slap.
Ueda doesn't manage to clinch there - Beware circles away.
Ueda staying out of range there.

That's three minutes gone in the round.
Ueda scores with a takedown into Beware's guard.
Ueda pressing down on his opponent's thigh, looking to pass guard. Beware is keeping the position for now.
Ueda with a flurry of punches that miss.
Ueda thows a big elbow that misses.
Ueda trying to control but Beware is working from the bottom.
Ueda is really struggling to control Beware but he's trying to hold on to the position.
Ueda with a flurry of punches that miss.
Beware wants to stand but Ueda is controlling the position.
Ueda stays in close to Beware's body and controls the position.

That's four minutes gone in the round.
It looks like we're going to have a standup here. Neither fighter is doing enough on the ground.

The fight moves into the clinch position.
Beware takes an elbow to the forehead.

It looks like KoKo Beware has been cut.
Ueda with the Thai clinch, lands a knee to the head.
Ueda creates a bit of distance and throws an elbow that only just misses.
Ueda looking to throw knees to the head but Beware is blocking nicely.
Beware is looking to break free of the clinch but Ueda has double underhooks.
Ueda misses with a knee to the head.
Ueda lands a knee to the body.
Ueda tries to score a body lock takedown but Beware shows good agility there to stay on his feet.
Beware is pressed up against the ropes. Ueda has hold of a leg and is looking to drag Beware down to the mat. Beware avoids the attempt though and has circled away. We're back to striking at a distance.
Ueda clinches up with Beware and pushes him back against the ropes.
Ueda tries for a takedown but Beware manages to get underhooks.
That's three failed takedown attempts in the round for Jenji Ueda. That's going to take a lot out of him.
Ueda looking to throw knees to the head but Beware is blocking nicely.
Beware on the defensive, avoiding the knees to the body.
Beware wants to stall.
Ueda goes for a takedown attempt but Beware pushes him away and we're back to fighting at a distance.
Ueda bobs and weaves well there to avoid the strikes.
And thats the end of the round the fighters go back to their corners.
Jenji Ueda dominated that round.
The cut man is working on KoKo Beware's cut.
That's time! Ueda's corner gives him a slap on the ass as he gets ready to fight.

Ueda misses with a straight right.
KoKo Beware is looking to throw some combinations by the looks of things.
Ueda is on the wrong end of a nice combination from Beware.
Ueda takes a jab on the nose. He smiles like he loves it and keeps coming.
Beware misses with a looping left.
Ueda uses decent footwork to sidestep a right hand from Beware.
Ueda slips a jab from Beware.
KoKo Beware seems to be the more aggressive standup fighter in this bout.
Ueda buckles his opponent's knee momentarily with a nice leg kick.
Ueda on the wrong end of a vicious looking body shot.
A combination from Beware does no damage.
Ueda tries to clinch up but Beware circles away and keeps his distance.
Ueda looks shocked there as he takes a right hand to the temple.
Ueda fails to land the takedown.
Ueda lands a two punch combo.
Beware is breathing heavily.
Beware lands with a hook. Ueda tried to avoid it but it clipped the top of his head.
Ueda has closed the distance and engaged Beware in a clinch.
That's one minute gone in the round.
Ueda misses the knee to the body. Nice hip positioning from Beware.
Ueda is working for a takedown up against the ropes. He can't get it on this occasion though.
Ueda misses with a knee to the head.
Beware working hard to break the clinch.
Beware stops a takedown attempt from Ueda.
That's three failed takedown attempts in the round for Jenji Ueda. That's going to take a lot out of him.
Beware tries to circle away but Ueda has him pinned against the ropes.
Beware is trying to work out of this bad position, with his back against the ropes.
Beware prevents the takedown attempt.
Ueda is working for takedown but Beware is calmly controlling the position for now.

Ueda manages to break the clinch.
Ueda takes an uppercut right on the jaw but it doesn't phase him.
Beware with a jab.
Ueda thows a left - swing and a miss!
A big left from Beware misses.
A swing and a miss from Beware.
Beware looks to score with a jab to the body but Ueda is just out of range.
Beware throws an overhand right that lands on Ueda's shoulder, as Ueda tries to avoid the shot.
Ueda looking to throw a kick but he's pulled out of it.
That's two minutes gone in the round.
Beware misses with a body shot.
A looping hook to the body misses from Ueda. Beware does a little dance to reset his feet.
Ueda misses the shot to the body.
Ueda is looking to take this fight into the clinch.
Beware misses the jab.
Ueda tests Beware's chin there with a solid looking shot.
Ueda gets in close and instigates a clinch.
Beware is trying to work out of this bad position, with his back against the ropes.
Both guys are working to get underhooks.
Beware's corner calls for him to break the clinch, which he does.
Beware misses with an uppercut.
Beware swings for the body but Ueda moves out of range.
Ueda wants to clinch up but Beware keeps it at a distance.
Ueda moves into range and clinches up with Beware.
That's three minutes gone in the round.
Beware manages to break the clinch.
Ueda moves into range and lands a nice leg kick.
Beware on the receiving end of a decent leg kick there by Ueda. Ueda obviously looking to wear him down.
Ueda shoots in for a takedown but doesn't get it.
Ueda takes the fight into the clinch.
Ueda wants a takedown.
Beware tries to break the clinch but Ueda is controlling the position.
Ueda escapes the clinch and we're back to striking.
Beware circles away from the clinch attempt.
Ueda keeping his hands up high there, blocking the jab from Beware.
Ueda tries to clinch but Beware is having none of it.
A telegraphed right hand from Beware misses the target.
Beware tries to keep at a distance but Ueda has taken the fight into the clinch.
Ueda with the Thai clinch. He's looking to land a big knee but he's not managed it this time.
Beware tries to break the clinch but Ueda is controlling the position.
That's four minutes gone in the round.
Beware manages to break the clinch.
Beware circles away from the clinch attempt.
Ueda throws a hook but Beware blocks it.
Beware misses with a wild combination.
Ueda misses with a kick to the body.
Ueda fails to land the takedown.
Ueda takes a jab on the nose. He smiles like he loves it and keeps coming.
Ueda throws out a token jab with nothing on it.
Beware looks to land a left hand but Ueda moved out of range nicely.
Ueda tries to clinch up.
Beware catches Ueda with a nice straight right. He seems pissed - ooooh, it's on now! On like donkey kong!
Ueda displays some good footwork, moving neatly out of range as Beware throws out the jab.
Ueda instigates a clinch.
The crowd applaud the fighters efforts here as the round comes to an end.
Ueda fails to pull the fight into his guard.
And thats the end of the round the fighters go back to their corners.
A close second round but KoKo Beware will probably get the nod - 10:9.
The cut man is working on KoKo Beware's cut.
The referee calls time. The cornermen exit stage left and we're back to business.

Ueda is looking to take this fight into the clinch.
Beware misses the shot to the body.
Beware looks to land a left hand but Ueda moved out of range nicely.
Beware misses with the combination.
Like a baseball bat into the meat of his leg there - nice leg kick by Ueda.
Beware misses with a hook. Ueda ducked under it nicely.
KoKo Beware seems to be getting the better of the standup.
Beware misses with a straight left.
Ueda rushes Beware and presses him up against the ropes.
Ueda manages to break the clinch.
Beware throws a nice looking combination but Ueda bobs and weaves to avoid any damage.
Beware throws a hook but Ueda blocks it.
Beware pushing out the jab but it's not landing.
Beware avoids a punch combination nicely.
Beware takes a big intake of breath there - he's definitely tired.
A telegraphed right hand from Beware misses the target.
That's one minute gone in the round.
Beware misses with a straight left.
A punch combination from Beware misses.
Beware avoids a lazy jab quite easily.
Ueda lands a jab.
Ueda tries to close the distance and clinch but Beware swats him to one side with an open hand palm strike and circles away.
Ueda tries to clinch but Beware is having none of it.
Beware circles away from the clinch attempt.
Beware misses with a hook.
Beware misses with a shot to the body
and Ueda counters with a leg kick that reverborates around the arena.
Beware avoids the clinch attempt nicely.
Ueda misses with a half-hearted attempt at a head kick.
Ueda plants his feet and lands a nice head kick!
Ueda gets in close and instigates a clinch.
Ueda manages to break the clinch.
Ueda tries to clinch but Beware is having none of it.
That's two minutes gone in the round.
Ueda gets in close and instigates a clinch.
Ueda misses the knee to the body. Nice hip positioning from Beware.
Ueda breaks the clinch.
Ueda misses with a head kick.
Beware might want to mix his strikes up a bit more. He's just going for head shots at the moment and that can become a bit predictable.
Ueda connects with a slap. Keep your fist closed son.
Beware misses with a looping left.
Ueda throws a sloppy head kick and Beware moves out of range easily.
A good leg kick by Ueda.
Ueda throws a nice head kick!
The fans in attendance giving it up for the two fighters, who have really let it all hang out in the last minute or so!
Ueda throws a head kick that connects with a bit of head and a bit of hand.
A head kick misses from Ueda.
Ueda is looking to clinch but Beware is avoiding it.
Ueda is looking to clinch but Beware is avoiding it.
Ueda tries to clinch up.
Ueda has closed the distance and engaged Beware in a clinch.
That's three minutes gone in the round.
Beware is trying to force a seperation but Ueda has the dominant position.
Ueda misses the knee to the body. Nice hip positioning from Beware.
Beware avoiding damage as Ueda throws knees to the body.
A knee to the head by Ueda.
Ueda wants to stall.
Beware is working hard here but doesn't seem to be able to control effectively, up against the ropes.
Beware blocks a knee to the body. He'll have a nicely bruised forearm in the morning.
Beware swings wildly with an uppercut but Ueda uses good head movement to avoid it.
Beware managing to block the knees to the body from Ueda.
Ueda's corner calls for him to break the clinch, which he does.
Ueda dances in quickly and lands a nice inside leg kick on Beware. That did some damage!
Ueda lands a with a good body shot.
Ueda scores with a slapping inside leg kick.
Ueda looking to land some kicks to the body here.
Ueda tries a switch kick but it misses it's target.
Ueda thows a body shot but no joy.
That's four minutes gone in the round.
Ueda throws a leg kick which misses Beware's front leg but catches the back leg as Beware tries to avoid it.
Ueda takes the fight into the clinch.
Ueda misses with a knee strike.
Ueda breaks the clinch and we return to the middle of the mat.
Beware moves out of range of the body kick from Ueda.
Ueda throws a body kick that misses.
Ueda has a takedown stuffed.
Ueda tries to clinch up.
Ueda fails in his attempt to clinch.
A telegraphed takedown attempt from Ueda is defended easily by Beware.
The crowd applaud the fighters efforts here as the round comes to an end.
Ueda takes a jab on the nose. He smiles like he loves it and keeps coming.
And thats the end of the round the fighters go back to their corners.
Jenji Ueda clearly takes that round.
The cut man is working on KoKo Beware's cut.
That's the end of the round. The referee orders the cornermen out of the ring so we can get back down to business.

Ueda has taken the fight to the clinch.
Beware pushes off and circles away, back to the middle of the mat.
Ueda tries a head kick but it misses.
Beware lunges in with swinging rights and lefts but Ueda circles away quickly and effectively.
Beware thows a body shot but no joy.
Beware with a jab.
Ueda instigates a clinch.
Ueda is looking to score with knees to the body. Maybe he'll change it up and go body then head. Beware is defending well for now.
Beware tries to break the clinch but Ueda is controlling the position.
Beware is trying to force a seperation but Ueda has the dominant position.
Beware looks like he'd prefer to be striking at range right now.
Beware tries to circle away but Ueda has him pinned against the ropes.
Ueda tries to pull guard but Beware holds him up against the ropes and eventually Ueda drops back down to his feet.
Ueda breaks the clinch and we're back to striking at distance.
Ueda scores with a jab to the head.
Ueda slips in close and lands a nice hook before moving back out of range.
Beware lands an overhand left. A wild punch that just about connected.
KoKo Beware is looking to keep the fight on the feet at all costs.
Beware is absolutely dripping with sweat - he looks exhausted.
That's one minute gone in the round.
Beware bobs and weaves well there to avoid the strikes.
Beware misses with a hook.
Ueda is looking for a takedown here. He's shot in and has managed to get it, finishing up in Beware's half guard.
Beware wants to get back to full guard.
Beware trying to hold on to Ueda's head to control him but Ueda postures up.
The two fighters exchange a few words. I couldn't hear what they were saying but maybe it's more fun if you make it up yourself. Ueda connects with a nice short shot to Beware's temple.
Ueda trying to control from half guard but Beware is working away.
Ueda missing with some ground and pound from the half guard.
Ueda wants to free his trapped foot but Beware is holding on for dear life with his legs.
The fighters are tangled up in the ropes here. We might need a restart if the fighters can't break free themselves.
Beware wants to improve his position but Ueda is controlling well.
That's two minutes gone in the round.
Ueda seems very keen to just sit and control from half guard but Beware does not like that idea so much and is remaining active off his back.
It looks like we're going to have a standup here. Neither fighter is doing enough on the ground.
Ueda closes the distance and clinches.
Ueda prevents Beware from breaking the clinch.
Knees to the body from Ueda.
Ueda unloads a knee to the mid-section. Beware lets out a prehistoric sounding urrrrgh.
Ueda throws an elbow but it's blocked.
Ueda lands a hook that snaps the head of Beware backwards.
Ueda stalling in the clinch but Beware improves position.
Ueda throws a vicious knee straight up the middle but Beware blocks it with crossed arms.
Ueda trying to land knees to the body.
Ueda tries to land a knee to the body but he is off balance and Beware avoids it.
Ueda breaks the clinch.
Beware's leg has a nasty welt from taking a succession of leg kicks. That must be slowing him down.
Beware circles away from the clinch attempt.
Ueda wants to clinch.
That's three minutes gone in the round.
Ueda misses with a two punch combination.
Beware stumbles momentarily as he takes a strong leg kick from Ueda.
Beware misses with a hook to the body
and Ueda counters with a good low kick that Beware was not able to check.
Ueda chopping away at his opponent's legs.
Ueda lands a glancing blow to the side of Beware's head.
Ueda misses with a jab, cross combination.
Beware displaying good standup as he scores with a three punch combination.
Ueda connects with a leg kick. He turned his hip over nicely there.
Ueda moves into range and lands a nice body kick.
Ueda dodges the punch combination from Beware.
Ueda changes levels and looks for a double leg takedown. Beware tries to avoid it but Ueda manages to keep hold of a leg and drag Beware to the ground. Beware escapes though and pops straight back up to his feet.
Ueda scores with a body shot.
That's four minutes gone in the round.
Beware circles away from the clinch attempt.
Ueda rushes Beware and pushes him back against the ropes in a clinch.
Ueda gets control of Beware's arms and successfully pulls guard. Ueda will no doubt be looking for submissions off his back.
Beware wants to stand but Ueda is controlling his posture from full guard.
A big thud reverberates around the arena there as Beware accidentally thumps the mat. Hopefully he's not broken his hand.
Ueda is looking to stand up but Beware isn't so interested in that idea.
Beware throws and elbow that misses. Ueda uses the momentum to reverse the position. He's now in Beware's guard. Nice move by Ueda!
And thats the end of the round the fighters go back to their corners.
Jenji Ueda had his way with KoKo Beware in that round.
The cut man is working on KoKo Beware's cut.
The corners get their ten second warning. Both fighters stand from their stools and stare eachother down, ready to get back to the action. This is the final round!

Ueda with a nice looking leg kick. You could hear that one land in a back row.
Beware stumbles momentarily as he takes a strong leg kick from Ueda.
Beware looks to score with a combo but nothing lands.
Ueda clinches with his opponent.
Ueda tries to land knees in the clinch but Beware avoids the damage to the body.
Ueda tries to pull guard but can't drag his opponent to the mat. Beware just stands there and leans against the ropes.
Ueda tries a knee to the head but Beware blocks it.
Beware wants to break free but Ueda has control.
Ueda is trying to wear down his opponent with knees to the body.
Good anti-grappling being displayed by Beware as Ueda tries to tie him up.
Ueda tries to land knees in the clinch but Beware avoids the damage to the body.
Ueda fails to pull guard.
Beware wants to break free but Ueda has control.
Beware is wobbling all over the place through exhaustion. Will he make it to the final bell?
Ueda misses the knee to the body. Nice hip positioning from Beware.
The pace slowing considerably in the clinch, as Ueda takes a break from that fighting nonsense to think about the finer things in life.
Beware is looking to break free of the clinch but Ueda has double underhooks.
That's one minute gone in the round.
Ueda is trying to work for a single leg takedown but Beware pulls him back up using the underhooks.
That's three failed takedown attempts in the round for Jenji Ueda. That's going to take a lot out of him.
Ueda stalls.
Ueda decides to pull guard.

Ueda scrambles and gets back to his feet.
Ueda keeping his hands up high there, blocking the jab from Beware.
Beware moves out of range of the body kick from Ueda.
Jab, jab by Beware - just one landing.
Ueda lands a head shot.
Ueda keeping his hands up high there, blocking the jab from Beware.
Beware misses with a straight left.
Ueda closes the distance and clinches.
Ueda tries to land a shot to the body but it's blocked.
That's two minutes gone in the round.
Ueda with an attempt at a knee that misses.
Ueda trying to land knees to the body.
Beware is trying to force a seperation but Ueda has the dominant position.
Beware is working hard here but doesn't seem to be able to control effectively, up against the ropes.
Ueda breaks the clinch.
Beware throws a sloppy head kick
and Ueda counters with a low kick, right behind Beware 's knee.
Beware keeps the fight on the outside.
Beware misses with a series of wild punches.
Ueda closes the distance and clinches.
Stalling in the clinch from Ueda.
Knees in the clinch landing for Ueda.
Beware blocks an elbow strike.
Ueda working some nice short punches in the clinch.
Ueda lands an elbow that stopped Beware in his tracks for a moment.
Ueda using the Thai plumb to throw knees but Beware has his back arched nicely, preventing the strike.
The two fighters are working to gain dominance in the clinch.
That's three minutes gone in the round.
Ueda drops to a knee looking for a takedown but Beware gets the underhooks and prevents it.
Ueda comes over the top with an elbow. That landed flush.
Ueda taking a breather.
Ueda tries to land knees in the clinch but Beware avoids the damage to the body.
Ueda looking to throw knees to the head but Beware is blocking nicely.
Beware breaks the clinch and we return to the middle of the mat.
Ueda is really dominating this fight. Is there anything that Beware can do to turn this around?
A looping hook to the body misses from Ueda. Beware does a little dance to reset his feet.
Beware pushing out the jab but it's not landing.
Beware fails to land with a series of punches.
A swing and a miss from Ueda.
Ueda tries to clinch but Beware is having none of it.
Beware takes a thudding leg kick, right into the meat of the thigh.
Beware looks to score with a jab to the body but Ueda is just out of range.
Ueda scores with a kick to the midsection.
That's four minutes gone in the round.
A lull in the action here being met with boos from the crowd.
Beware takes a push kick to the midsection and stumbles backwards.
Ueda tries to clinch but Beware moves out of range.
Ueda scores with a body shot.
Jenji Ueda is fighting for a decision here - he's started to take the cautious approach.
Ueda looking to take his opponent's legs away with the low kicks.
Ueda scores with a nice takedown into half guard. Let's see what he's got on the ground.
Beware trying to control from the bottom.
Ueda not landing any meaningful shots this time.
Beware wants to get back to his feet.
Beware avoiding damage under a succession of punches from Ueda.
Beware has no desire to be mounted, so is trying to control. Ueda is working away from the top position though.
KoKo Beware has stepped it up - he knows he needs a finish here!
Ueda seems very keen to just sit and control from half guard but Beware does not like that idea so much and is remaining active off his back.
Ueda slips a nice elbow through Beware's hands, connecting with Beware's forehead.
And that's the end of the fight!
Jenji Ueda showed his dominance in that final round.
Well Ueda has outscored his opponent in every aspect of the fight today. Only a scarily incompetent judge or two will keep him from a well deserved win... Over to the ring announcer for the scorecards.
Ladies and gentlemen, after 5 rounds of action, we go to the scorecards for a decision.
Judge Shigeki Sano scores the fight 50:46
Judge Tatsuya Matsuyama scores the fight 50:46
Judge Sosuke Kotani scores the fight 49:46
In favor of your winner, by unanimous decision... Jenji Ueda!
Jenji Ueda retains his lightweight title!
|
|
|
|
|
|
|
|
|
|
|
|
|
|
|
|
|
|
|
|
|
|
|
| S |
C
A |
G |
S |
C
B |
G |
|
S |
C |
G |
|
energy
A | B |
|
hype
A | B |
|
pop
A | B |
|
mgr
A | B |
|
FIGHT
RATING
79% |
|
|
|
|
|
|
