|
|
PBP Commentary |
Coming up we have a middleweight MMA rules bout between Hidehiko Sakuraba (ranked 0 p4p, 0 weight class) and Diziet Sma (ranked 0 p4p, 0 weight class). Sma is bouncing up and down as he enters the arena, backed by In For the Kill. Diziet Sma will no doubt be trying to keep this one on the feet, where he has a distinct advantage.
 |
|
 |
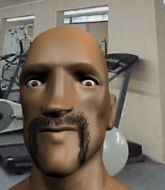
| 188 cm
23
189 lbs
4 - 2 - 0 |
|
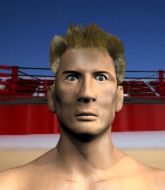
185 cm
20
190 lbs
2 - 0 - 0 |
BJJ Brown Belt
Counter striker
Good chin |
|
BJJ Blue Belt
Decent knees
Determined |
|
| |
|
Ladies and gentlemen. This fight is 3 rounds, in the middleweight division.
Introducing the fighter to my left, fighting out of the red corner.
With a record of
4 - 2 - 0, fighting out of Rio de Janeiro, Hidehiko Sakuraba!
And introducing the fighter to my right, fighting out of the blue corner.
With a record of
2 - 0 - 0, fighting out of Rio de Janeiro, Diziet Sma!
The judges for this bout are Daniel Cesar, Leandro Rodrigues and Mauricio Rocha.

The bell rings for round one and we are underway!

Sma moves into range and clinches up with Sakuraba.
Sma lands a knee to the head.

It looks like Hidehiko Sakuraba has been cut.
Sma gets underhooks to prevent Sakuraba's takedown attempt.
Sma wants to stall.
Sma working Sakuraba over with knees to the body.
Sma tries to stall but Sakuraba uses the opportunity to gain a better position.
Sma seems frustrated at his inability to get double underhooks.
Sakuraba can't get the takedown.
Sma displaying some good clinch control by pressing Sakuraba up against the cage.
Sakuraba drops down looking for an ankle pick but Sma pulls his leg out and moves away.
That's three failed takedown attempts in the round for Hidehiko Sakuraba. That's going to take a lot out of him.
Sma tries to clinch but Sakuraba is having none of it.
Sma clinches up against the cage.
Sakuraba has Sma pressed up against the cage and is working for takedown. Sma manages to improve position though and keeps the fight standing.
Sma is trying to wear down his opponent with knees to the body.
Sakuraba is breathing heavily.
The crowd are loving this. Great action here.
Sakuraba is looking to break free of the clinch but Sma has double underhooks.
Sma lands a good knee to the midsection. Sakuraba won't want to take too many of those.
Sakuraba has a body lock and is looking for a takedown. Sma is bouncing around trying to prevent the takedown and somehow he has indeed managed to stay on his feet.
Sma lands a knee to the head there! That was nasty!

That's one minute gone in the round.
Sma lands a knee to the head there! That was nasty!

Sma breaks the clinch and we return to the middle of the mat.
Sma throws a nice looking combination but Sakuraba bobs and weaves to avoid any damage.
Sma scores with a body shot.
Sakuraba swats away the attempt to clinch by Sma.
Sakuraba shoots in for a takedown but Sma shows good takedown defense there and keeps this one on the feet.
Sma is looking to clinch.
Sma fails with an attempt to clinch.
The fight stays on the outside here - Sma looks like he's thinking about clinching though.
Sakuraba throws a looping left and ducks down for a takedown. He's got his arms around Sma's waist but Sma gets an underhook and avoids the takedown by throwing Sakuraba off to one side.

That's two minutes gone in the round.
Sakuraba shoots in for a takedown. "I don't think so" says Sma as he avoids it easily.
A really sloppy takedown attempt there from Sakuraba.
Sma bobs and weaves and unloads with a good uppercut.
The fight stays on the outside here - Sma looks like he's thinking about clinching though.
Jab by Sma.
Sma gets to the clinch - let's see what his plan is here.

That's three minutes gone in the round.
Sakuraba tries to jump guard but he falls flat on his backside. Sma smiles and moves away.
Sakuraba circles away from the clinch attempt.
Nice sprawl there from Sma as Sakuraba shoots in.
Sma stuffs a takedown. It's all about dictating where the fight takes place and Sma wants it to stay on the feet.
Sakuraba shoots in for a takedown. He's persisting with it as Sma sprawls well. Sma wins this battle and keeps the fight standing. Sakuraba gets slowly back to his feet.
Sma connects with a lovely right hand, straight down the pipe.

That's four minutes gone in the round.
Sma fails in his attempt to clinch.
Sma clinches up with Sakuraba and pushes him back against the cage.
Sma lands a hook to the body. It's hard to tell if that hurt Sakuraba or not.
Sakuraba tries to score a body lock takedown but Sma shows good agility there to stay on his feet.
Sma pushes off and circles away, back to the middle of the mat.
Like a baseball bat into the meat of his leg there - nice leg kick by Sma.
Sma is looking to clinch.
A telegraphed takedown attempt from Sakuraba is defended easily by Sma.
Sakuraba gets cracked there but stands up to it.
As the round comes to an end the crowd are showing their appreciation for a great round of action.
Sma is looking to clinch.
And thats the end of the round the fighters go back to their corners.
Diziet Sma dominated that round.
The cut man is working on Hidehiko Sakuraba's cut.
The minute break is over - no more time for sponges and pep talks - back to the action!

Sma is looking to clinch.
Sma leaves Sakuraba with his face pressed against the mat as he sprawls beautifully, defending against a solid takedown attempt.
Sma scores with a hook to the body. Sakuraba takes a step back and tries to catch his breath.
Sma tries to close the distance and clinch up but Sakuraba swats him away and circles back towards the center.
Nice takedown defense from Sma. No joy for Sakuraba on that attempt.
A really sloppy takedown attempt there from Sakuraba.
That's three failed takedown attempts in the round for Hidehiko Sakuraba. That's going to take a lot out of him.
Sma clinches up with Sakuraba and pushes him back against the cage.
Sma with the Thai clinch, lands a knee to the head.
Sma manages to break the clinch.
Sakuraba shoots in for a double leg but Sma sprawls well. That's going to sap some energy.
Both fighters are absolutely exhausted here.
That's one minute gone in the round.
Sma tries to clinch there but Sakuraba circles away.
Sakuraba circles away from the clinch attempt.
Sakuraba takes an uppercut right on the button but keeps his composure.
Sakuraba avoids the clinch attempt nicely.
Sakuraba gets cracked with a nice right hand there by Sma.
Sma doesn't manage to clinch there - Sakuraba circles away.
Sakuraba swings wildly with a couple of big hooks
and Sma counters with a quick right hand to the jaw.
Sma defends well against a solid takedown attempt from Sakuraba.
Sma darts in and out, connecting with a jab.
Hidehiko Sakuraba's cut is getting worse.
That's two minutes gone in the round.
Sma is looking to take this fight into the clinch.
Sma tries to clinch there but Sakuraba circles away.
Sma lands a pitter patter jab to the forehead of his opponent.
This is turning into a torrid day at the office for Sakuraba. He's trying desperately to land a takedown but he's failing miserably and getting slapped silly on the feet to compound his misery.
Sma is looking to clinch.
Sakuraba fails with a takedown attempt from distance.
Sakuraba uses some good footwork to avoid the body shot by Sma.
Sma moves into the clinch.
Sma lands a good knee to the midsection. Sakuraba won't want to take too many of those.
The fans in attendance giving it up for the two fighters, who have really let it all hang out in the last minute or so!
Sma lands a nice elbow from the clinch.
Sma breaks the clinch.
That's three minutes gone in the round.
Sma moves in looking to clinch but Sakuraba pushes him off.
Sakuraba will have to do better than that with his takedown attempts.
Sma is looking to take this fight into the clinch.
Sma moves in looking to clinch but Sakuraba pushes him off.
Sma lands a jab.
Sma connects with a slap. Keep your fist closed son.
Sma is looking to clinch.
Sma tries to clinch up.
That's four minutes gone in the round.
Sma goes to the watering hole and comes back with a big thumbs up from the judges as he scores a three punch combo.
Sma lands a jab to the head.
Hidehiko Sakuraba's cut is bleeding quite badly. He's got to try and protect it.
Sakuraba changes levels and looks for a double leg takedown. Sma tries to avoid it but Sakuraba manages to keep hold of a leg and drag Sma to the ground. Sma escapes though and pops straight back up to his feet.
No luck with that takedown attempt from Sakuraba.
Sma leaves Sakuraba with his face pressed against the mat as he sprawls beautifully, defending against a solid takedown attempt.
Sma fails with an attempt to clinch.
As the round comes to an end the crowd are showing their appreciation for a great round of action.
Sakuraba swats away the attempt to clinch by Sma.
And thats the end of the round the fighters go back to their corners.
Diziet Sma showed his class in that round. I'd imagine he'll take it on all the scorecards.
The cut man is working on Hidehiko Sakuraba's cut.
The minute break is over - no more time for sponges and pep talks - back to the action! Let's get this one finished - here comes the final round!

Good shot there by Sma.
Sma tries to clinch up.
Sma misses with a few strikes there.
Sma stuffs the takedown.
Sakuraba tries to score a power double leg takedown but Sma sees that one coming and sprawls well. That will dishearten Sakuraba somewhat.
Sma fakes with an overhand right and moves in to clinch with Sakuraba, pushing him back against the cage.
Sma pushes off and circles away, back to the middle of the mat.
Sma might want to mix his strikes up a bit more. He's just going for head shots at the moment and that can become a bit predictable.
Sakuraba shoots in and drives through. Sma sprawls well.
That's three failed takedown attempts in the round for Hidehiko Sakuraba. That's going to take a lot out of him.
That's one minute gone in the round.
Sakuraba with poor footwork there. He got himself in a bit of a tangle, enabling Sma to score with a decent uppercut.
Sakuraba gets his head snapped back by a nice shot there.
Good exchange - Sma coming out on top.
Sakuraba shoots in and drives through. Sma sprawls well.
Sakuraba fails miserably with a takedown attempt.
A telegraphed takedown attempt from Sakuraba is defended easily by Sma.
Diziet Sma is looking to keep the fight on the feet at all costs.
Both fighters are breathing heavily.
Sma gets a clinch.
That's two minutes gone in the round.
Sakuraba changes levels and goes for a takedown here. Sma fights it off and pushes away nicely.
Sakuraba fails with a rather predictable takedown attempt.
Nice cross by Sma.
Sma lands a nice shot that snaps Sakuraba's head back.
Jeez, Hidehiko Sakuraba's cut is really nasty now. The referee must be thinking about getting that checked.
Hidehiko Sakuraba is looking to throw some combinations by the looks of things.
Sma tries to clinch but is not successful on this occasion.
That's three minutes gone in the round.
Sakuraba shoots in and drives through. Sma sprawls well.
Sakuraba shoots in but no luck this time.
Sakuraba tries to shoot in for a takedown. He's got hold of a leg but Sma swivels and escapes.
Sma has been the more effective fighter overall so far.
Sakuraba misses with a takedown attempt. He shot from a bit too far out.
Sma scores with a decent looking hook.
The referee calls the doctor in to look at Hidehiko Sakuraba's cut. Oh no, the doctor has called an end to the bout!
Ladies and gentlemen, after 3:45 of round 3, we have a winner by way of TKO (Cut). Diziet Sma!
|
|
|
|
|
|
|
|
|
|
|
|
|
|
|
|
|
|
|
|
|
|
|
| S |
C
A |
G |
S |
C
B |
G |
|
S |
C |
G |
|
energy
A | B |
|
hype
A | B |
|
pop
A | B |
|
mgr
A | B |
|
FIGHT
RATING
71% |
|
|
|
|
|
|

