|
|
PBP Commentary |
Coming up we have a lightweight MMA rules bout between Bilbo Baggins (ranked 0 p4p, 0 weight class) and Crack Atoa (ranked 0 p4p, 0 weight class). The key to victory for Bilbo Baggins has got to be keeping the fight on the feet.
 |
|
 |
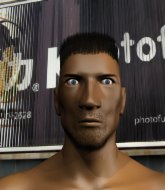
| 180 cm
18
155 lbs
0 - 0 - 0 |
|
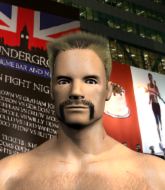
185 cm
22
130 lbs
1 - 0 - 0 |
BJJ Blue Belt
Brawler
Good chin |
|
Good wrestler
Basic striking
Granite chin |
|
| |
|
Ladies and gentlemen. This fight is 3 rounds, in the lightweight division.
Introducing the fighter to my left, fighting out of the red corner.
With a record of
0 - 0 - 0, fighting out of London, Bilbo Baggins!
And introducing the fighter to my right, fighting out of the blue corner.
With a record of
1 - 0 - 0, fighting out of London, Crack Atoa!
The judges for this bout are James Atkins, James Glass and Donald Grub.

The bell rings for round one and we are underway!
Baggins moves in looking to clinch but Atoa pushes him off.

Baggins clinches with his opponent.
Atoa gets double underhooks to prevent a takedown attempt from Baggins.
Baggins gets underhooks to prevent Atoa's takedown attempt.

Baggins gets control of Atoa's arms and successfully pulls guard. Baggins will no doubt be looking for submissions off his back.
Baggins is working an open guard here, looking to improve his position. No doubt that will leave him open to counters but at least he's being more offensive.
Atoa trying to stand up but can't free himself from Baggins's guard.
Baggins is trying to stand up but he's not managed so far.
We've had a slow start to the round here - hopefully the action picks up.
Atoa is looking to stand up but Baggins won't let him.

That's one minute gone in the round.
Baggins is working from a closed guard but he's struggling to control his opponent.
Atoa won't allow Baggins to sweep him here.

Well, the referee has seen enough. Neither fighter is active enough on the ground so he's stood them back up.
Baggins is trying hard to land a takedown here. Atoa sprawls well and keeps this one on the feet.
Atoa will need to tighten up his combinations if he doesn't want to gas himself out, swinging at thin air.
Atoa moves out of range as Baggins throws a body kick.
Atoa looking to throw a kick but he's pulled out of it.
Atoa lands a jab to Baggins's midsection.
Baggins dips to his left and cracks Atoa with an uppercut!
Atoa shoots in from a long way out. He's driving through with the takedown attempt and he eventually gets it, landing in Baggins's guard.

That's two minutes gone in the round.
Atoa wants to stand but Baggins is controlling his posture from full guard.
Atoa postures up.
Atoa wants to stand but Baggins has a closed guard, so he can't escape.
Baggins looking to control.

That's three minutes gone in the round.
Atoa has decided he wants to stand but the closed guard of Baggins is proving hard to escape from.
Neither fighter is doing enough for the referee's liking and he's decided to stand them back up.
Atoa keeps the fight on the outside.
Baggins on the wrong end of a nice hook.
Atoa throws a body punch but Baggins moves out of range.
Atoa shoots in with a lovely double leg takedown. Baggins manages to land in full guard to minimise the damage.
Atoa looks gassed!
Atoa trying to stand up but can't free himself from Baggins's guard.

That's four minutes gone in the round.
Atoa really doesn't want to stay on the ground with Baggins. If he can't get it back to his feet, it's only a matter of time before he'll be tapping out.
The fighters are pressed up against the cage, both looking to find a bit of space to work.
Baggins working a defensive guard here.
Atoa must be cautious of submissions here, given that his opponent has the superior Jiu Jitsu.
The crowd thankful this round is nearly over.
There's a bit of a scramble here and now Baggins is on top in guard.
The ref warns both fighters not to hold the cage as they work up against the meshing.

Atoa kicks Baggins off and gets to his feet.
And thats the end of the round the fighters go back to their corners.
Crack Atoa dominated that round.
The fighters get back to their feet, the hooter sounds and we're back to the action!

Baggins checks a low kick. Bone on bone - not my idea of a good time.
Atoa is a painfully thin specimen of a man. You do wonder whether a good body kick would snap him clean in two.
Atoa looking to throw a kick but he's pulled out of it.
Atoa throws a right hand that Baggins ducks under and follows up with a left that Baggins also avoids with ease.
Baggins tries to clinch up.
Baggins throws a head kick but Atoa moves out of range.
Atoa gets a takedown into half guard.
Atoa tries to stand but his hand is stuck under Baggins.
Atoa decides to stand up and try his luck on the feet.
Both fighters are absolutely exhausted here.
Baggins with a lazy takedown attempt
and Atoa counters with a series of strikes. Baggins will be more careful next time no doubt.
That's one minute gone in the round.
Baggins tries to grapple but his opponent circles
and Atoa counters with a nice double leg into guard.
Atoa has decided he wants to stand but the closed guard of Baggins is proving hard to escape from.
Baggins is looking to get back to his feet but can't, whilst Atoa is controlling him.
Baggins trying to control the position.
That's two minutes gone in the round.
Baggins is working an open guard so Atoa takes the opportunity to get back to his feet.
Atoa bobs and weaves and throws out a fast jab that snaps Baggins's head backwards.
Atoa feints and then dives in with a takedown. That was a long way out but the feint bought him enough time to close the distance and complete the takedown. Now we'll play guard for a bit and see who can get the better of that position.
Baggins has a closed guard, preventing Atoa from standing up.
Baggins wants to get back to his feet but Atoa is in a dominant position and won't allow it.
Atoa stands up from Baggins's guard - Atoa perhaps looking for a knockout.
That's three minutes gone in the round.
Baggins misses with a takedown attempt
and Atoa counters with a driving takedown into guard. Nice work there by Atoa.
Atoa trying to stand up but can't free himself from Baggins's guard.
Atoa gets to his feet and steps away from his opponent.
Baggins throws a body kick but he was well out of range there.
Atoa connects with a high kick.
Some wild striking there from Atoa.
Atoa throws a right and a left that both miss.
Baggins looking to land some kicks to the body here.
Atoa shoots in with a lovely double leg takedown. Baggins manages to land in full guard to minimise the damage.
Crack Atoa has got the better of the ground game so far.
That's four minutes gone in the round.
Atoa would like to get this fight back to the feet but can't get free from the closed guard.
Atoa is using up a lot of energy trying to get back to his feet. Perhaps he should improve his position first.
Baggins wants to get back to his feet but Atoa is in a dominant position and won't allow it.
The crowd applaud the fighters efforts here as the round comes to an end.
Baggins is trying to keep Atoa in close.
Atoa won't allow Baggins to sweep him here.
And thats the end of the round the fighters go back to their corners.
Crack Atoa showed his class in that round. I'd imagine he'll take it on all the scorecards.
Well, the break between rounds is over. Let's get back to the scrappin! This is the final round!

Baggins misses with the combination.
Baggins shoots in but doesn't get the takedown
and Atoa counters with a nice shoot takedown that brings the fighters to the ground.
Atoa decides he's had enough of playing guard and decides to stand. Come on Baggins, up you get!
Atoa gets the takedown into side control.
Baggins struggling a bit here.
Atoa decides to take the fight back to the feet.
Atoa tries to bum rush Baggins with a series of wild strikes but Baggins uses good footwork to avoid the assault.
Atoa gets a takedown into half guard.
This has been an exciting period of action!
Atoa stands up out of the half guard.
Bilbo Baggins is looking to throw some combinations by the looks of things.
Both fighters are breathing heavily.
That's one minute gone in the round.
Baggins gets his takedown attempt stuffed easily
so Atoa counters with a double leg into guard. Good agility.
Atoa decides he's had enough of playing guard and decides to stand. Come on Baggins, up you get!
Atoa scores with a big left there. The judges will like that one.
Baggins tries for a takedown but Atoa circles away easily
and Atoa counters with a two punch combo.
That's three failed takedown attempts in the round for Bilbo Baggins. That's going to take a lot out of him.
Atoa fakes and then throws a beautiful body shot. Baggins looks a bit winded and takes a step backwards to take a breath.
Baggins fails with the takedown
and Atoa counters with a single leg into guard. Baggins didn't expect that.
That's two minutes gone in the round.
This is a great period of action - very entertaining stuff!
There's a bit of a scramble here and now Baggins is on top in guard.
Atoa wants to stand and escape but Baggins is having none of it.
Baggins works over Atoa with some ground and pound from guard.
Baggins trying to control the position from guard on top but Atoa is wriggling around, looking for whatever he can.
Baggins won't allow Atoa to get back to his feet.
That's three minutes gone in the round.
Atoa has momentary wrist control but Baggins slips an elbow through the middle.
Atoa wants to stand and escape but Baggins is having none of it.
It looks like we're going to have a standup here. Neither fighter is doing enough on the ground.
Baggins avoids the head kick by Atoa.
Atoa looking to shoot here. He's gone for it and he's landed a takedown into mount! Oh, that's bad for Baggins!
Atoa looking to control but Baggins is working nicely, looking to advance position himself.
Atoa is standing up, even though he is in mount.
Atoa just misses with a punch to the body.
That's four minutes gone in the round.
Atoa shoots in and bounces Baggins off the cage to secure the takedown into guard.
Atoa would like to get this fight back to the feet but can't get free from the closed guard.
Crack Atoa is fighting for a decision here - he's started to take the cautious approach.
As the round comes to an end the crowd are showing their appreciation for a great round of action.
Atoa stops Baggins from standing up.
Bilbo Baggins has stepped it up - he knows he needs a finish here!
Atoa stands up and waves to Baggins to follow him.
And that's the end of the fight!
Crack Atoa comfortably won the final round on my scorecard.
I've got Atoa winning every round here. Surely the decision will go his way and he'll pick up a well deserved decision victory. Over to the ring announcer for the scorecards.
Ladies and gentlemen, after 3 rounds of action, we go to the scorecards for a decision.
Judge James Atkins scores the fight 26:30
Judge James Glass scores the fight 25:30
Judge Donald Grub scores the fight 25:30
In favor of your winner, by unanimous decision... Crack Atoa!
|
|
|
|
|
|
|
|
|
|
|
|
|
|
|
|
|
|
|
|
|
|
|
| S |
C
A |
G |
S |
C
B |
G |
|
S |
C |
G |
|
energy
A | B |
|
hype
A | B |
|
pop
A | B |
|
mgr
A | B |
|
FIGHT
RATING
67% |
|
|
|
|
|
|
