|
|
PBP Commentary |
Coming up we have a light heavyweight MMA rules bout between Kileki Kawike (ranked 0 p4p, 0 weight class) and Bud Bongwater (ranked 0 p4p, 0 weight class). Chooooooooon! I think Kawike might be my favorite fighter, now he's come out to Ms. Fat Booty - Mos Def. Bongwater is bobbing his head along to his entrance song: Peter Tosh - Speech about Herb. Rumors backstage are that the fighters have been paid to keep it standing but we know that would never happen in MMA!
 |
|
 |
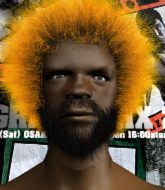
| 189 cm
23
215 lbs
7 - 2 - 0 |
|
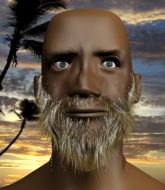
196 cm
19
214 lbs
5 - 2 - 0 |
BJJ Brown Belt
Brawler
Experienced |
|
Good wrestler
Basic striking
Determined |
|
| |
|
Ladies and gentlemen. This fight is 3 rounds, in the light heavyweight division.
Introducing the fighter to my left, fighting out of the red corner.
With a record of
7 - 2 - 0, fighting out of Hilo, Kileki Kawike!
And introducing the fighter to my right, fighting out of the blue corner.
With a record of
5 - 2 - 0, fighting out of Hilo, Bud Bongwater!
The judges for this bout are , and .

The bell rings for round one and we are underway!

Kawike gets caught on his heels momentarily as he allows Bongwater to score an easy takedown into full guard.
Bongwater wants to pass the guard but Kawike is keeping the position.
Bongwater trying to control but Kawike is working from the bottom.
Bongwater throws and elbow that misses. Kawike uses the momentum to reverse the position. He's now in Bongwater's guard. Nice move by Kawike!
Kawike throwing shots from guard but he's hitting more mat than opponent.
Kawike wants to control from the top but Bongwater keeps moving.
Bongwater is trying to keep Kawike in close.
Bongwater pulls Kawike in close to prevent any damage.
Kawike wants to pass the guard but Bongwater is keeping the position.
The fighters are pressed up against the cage, both looking to find a bit of space to work.

That's one minute gone in the round.

The referee decides to stand the fighters back up.
Bongwater looking for a takedown here - he's got it.
Kawike tries to land a sweep but no joy.
Bongwater thows a big elbow that misses.
Bongwater stays in close to Kawike's body and controls the position.
Kawike will have to put a bit more behind his punches if he's going to do any damage from this position.
Bongwater throwing strikes but missing.
Bongwater is in close to Kawike's body, working some short punches and elbows.
Bongwater showing good wrestling skills to control the position.
Bongwater trying to control the position from guard on top but Kawike is wriggling around, looking for whatever he can.
Bongwater postures up in Kawike's guard and throws a big left but Kawike blocks it.
Both fighters really going for it on the ground here!

That's two minutes gone in the round.

Kawike working from the bottom, still in full guard. He's managed to get a loose triangle. Bongwater doesn't seem to be doing much to defend here, obviously he feels comfortable in the position. Bongwater manages to throw the legs off his shoulder and he's back into guard - no problem.
Bongwater lands a couple of digs.
Kawike trying to keep a closed guard but Bongwater is proving a slippery customer.
Hammerfist, elbow! yells Bongwater's corner. There ya go! There ya go!
Bongwater trying to land body shots but he keeps hitting the mat.
Bongwater with a flurry of punches that miss.
Bongwater lands a couple of decent looking shots.
Kawike keeping moving, preventing Bongwater from controlling successfully.
Kawike throwing his legs up looking for a triangle.
Bongwater wants to pass the guard but Kawike is keeping the position.
Bongwater wants to control from the top but Kawike keeps moving.

That's three minutes gone in the round.
Bongwater postures up.
Kawike is working the butterfly guard. He manages to land a nice scissor sweep and is now in half guard on the top. Nice move.
Kawike throwing shots but they're hitting the canvas more than the man.
Kawike is trying for a guillotine from the top but the pressure isn't in the right place so Bongwater is just riding it out for now. Kawike eventually gives up the hold.
Bongwater is in trouble now - Kawike has advanced to mount!
Bongwater wriggling around on the bottom manages to avoid the strikes thrown by Kawike.

That's four minutes gone in the round.
Neither fighter has done anything of merit for a good minute or two here and the crowd are not happy about it.
Bongwater wriggling around on the bottom manages to avoid the strikes thrown by Kawike.
Kawike unloads with some shots from mount but Bongwater bucks and avoids them well.
Kawike has been looking to land a fair amount of strikes on the ground. He might be looking to soften his opponent up in order to work for a submission.
Kawike throws some wild stikes that Bongwater manages to avoid easily.
Bongwater holding onto his opponent's waist for dear life, as Kawike tries to land some strikes to get him to release his grip.
Bongwater wants to control but Kawike is having none of it.
Kawike lands with some strikes.
And thats the end of the round the fighters go back to their corners.
Bud Bongwater dominated that round.
The fighters get back to their feet, the hooter sounds and we're back to the action!

Kawike misses with the combination.
Bongwater shoots in with a takedown attempt and he has Kawike pinned against the cage. Kawike gets the underhooks and manages to circle away.
Bongwater has his head slapped from side to side by a 3 punch combination. That must have hurt him.

It looks like Bud Bongwater has been cut.
Kawike throws a series of punches but Bongwater moves out of range.
Kawike misses with a double jab.
Kawike tries to land with a swinging hook to the body but Bongwater was well out of range. Poor timing from Kawike.
Bud Bongwater seems to be the more aggressive standup fighter in this bout.
Bongwater shoots in and gets a takedown into half guard. Bongwater showed some decent athleticism there.
Bongwater not throwing his punches with enough precision this time.
Bongwater lands with an elbow from half guard - that looked like it hurt.
Kawike avoiding damage under a succession of punches from Bongwater.
Bongwater really doesn't want to stay on the ground with Kawike. If he can't get it back to his feet, it's only a matter of time before he'll be tapping out.
Bongwater missing with some ground and pound from the half guard.
Kawike is pressing down on Bongwater's left leg trying to get back to full guard. He's managed it.
That's one minute gone in the round.
Bongwater tries to free his leg and advance position but Kawike is retaining full guard.
Kawike has a loose triangle. He'll be looking to tighten that up but Bongwater can see exactly what he's planning and manages to posture up and free himself.
Bongwater works over Kawike with some ground and pound from guard.
Kawike utilising some decent striking defenses from the guard, preventing the ground and pound.
The ref warns both fighters not to hold the cage as they work up against the meshing.
Bongwater with a nice head shot there.
Bongwater stopping the sweep attempt from Kawike.
Kawike manages to land a sweep and now he's in mount on top!
Bongwater is wriggling around trying to escape.
Kawike is in full mount, looking to secure a guillotine but Bongwater is surviving well by controlling Kawike's body position as best he can.
That's two minutes gone in the round.
Bongwater is desperately trying to get back to half guard.
Bongwater tries to hold on but Kawike postures up.
Bongwater holding onto his opponent's waist for dear life, as Kawike tries to land some strikes to get him to release his grip.
Kawike misses with a series of strikes from mount. He'll no doubt be working on his ground and pound when he gets back to the gym.
Bongwater is desperately trying to improve his position but Kawike has a good base and remains in mount.
We get told so often about how wrestlers don't like to be on their backs. Let's see if Bongwater can do anything to dispel that myth.
That's three minutes gone in the round.
Bongwater suckers Kawike into throwing a sloppy strike and uses the momentum to reverse the position beautifully! Bongwater is now in Kawike's guard!
Bongwater postures up.
Well, the referee has seen enough. Neither fighter is active enough on the ground so he's stood them back up.
Excellent takedown into side control there by Bongwater.
Bongwater working away.
Kawike is trying to improve his position.
Kawike on the wrong end of some ground and pound.
Bongwater trying to control the action but Kawike is working from the bottom.
You can see the frustration on Kawike's face, being in this tough position on the bottom.
Bongwater working the body and head with strikes.
Kawike takes a couple of big shots there - the referee warns him that he has to defend himself better.
That's four minutes gone in the round.
Kawike manages to work his way to half guard, despite Bongwater's best efforts.
Bongwater working some ground and pound from close in. He's looking to maintain this position and strike for a while by the looks of things... although he'll probably advance to full mount in a minute now I've said that.
Kawike tries to get to full guard but Bongwater has control of the leg.
Bongwater seems to be taking a bit of a break to think of his next move. He lands a short punch in the meantime.
Bongwater is just content to waste time from the top position. Kawike takes advantage of the situation and regains full guard.
Bongwater won't allow Kawike to sweep him here.
Kawike looking for submissions from the bottom here. Moving his hips around, possibly looking for an armbar.
Both fighters are absolutely exhausted here.
Kawike thows some rabbit punches from the bottom but they don't do any damage.
Kawike trying to keep a closed guard but Bongwater is proving a slippery customer.
Bongwater makes a bit of distance and scores with some ground and pound, still in guard.
Fantastic stuff here - a very entertaining period of action, which has drawn cheers from the crowd.
Bongwater throwing shots from guard but he's hitting more mat than opponent.
Kawike is trying to keep Bongwater in close.
Bongwater with a nice head shot there.
And thats the end of the round the fighters go back to their corners.
Bud Bongwater showed his class in that round. I'd imagine he'll take it on all the scorecards.
The cut man is working on Bud Bongwater's cut.
The fighters' corners scream their final instructions, as the referee calls time. Here we go, back to the action! Ladies and gentlemen, this is the final round!

Bongwater shoots in for a takedown from distance. He catches Kawike napping and manages to drive through into side control!
Kawike tries to buck Bongwater off but Bongwater is having none of it.
Check out the look on Bongwater's face as he threw that strike - that's one determined fighter!
Kawike takes an elbow right on the bridge of the nose and winces in pain.
Bongwater landing with strikes to the head and body from side control.
Bongwater lands a decent elbow from side control.
Kawike regains half guard.
Kawike has hold of Bongwater's hands but Bongwater slips his arm to the side and lands an elbow.
Bongwater takes advantage of the dominant position to land a couple of big hammer fists.

Kawike is rocked!
Fantastic stuff here - a very entertaining period of action, which has drawn cheers from the crowd.
Bongwater working the head and body with strikes.
Oh Kawike is still in real trouble! Will he be able to recover?!!
Ground and pound from Bongwater.
Kawike tries to roll over but Bongwater keeps him under control.
Bongwater looking to pass the half guard. Not this time.
Kawike taking some punishment here, with Bongwater in his half guard.
That's one minute gone in the round.
Bongwater working over Kawike with some ground and pound. Kawike looks like he wants out of this position, which is understandable.
Kawike seems to have got his legs back now.
Bongwater has freed up his trapped foot and advances to mount.
Bongwater takes a big intake of breath there - he's definitely tired.
Kawike tries to get back to half guard but can't.
Kawike is bucking up trying to escape but Bongwater cracks him with another couple of good strikes.
Bongwater cracks Kawike with a nasty head shot there - the crowd let out an audible gasp there, as the noise reverberated around the arena.
Kawike is trying to escape the mount.
Bongwater with good strikes from the mount here!
Bongwater wants to control the pace but Kawike is squirming around nicely.
Kawike is looking to get to half guard.
The referee warns Kawike that he has to improve his position here as he takes two more clean shots to the head.
That's two minutes gone in the round.
Bongwater looking to ground and pound his opponent to a finish here.
Kawike can't escape the position.
Bongwater tries to control but Kawike wriggling away.
Bongwater working Kawike over with strikes here.
Kawike manages to regain half guard. Good work.
Kawike tries to roll over but Bongwater keeps him under control.
Kawike on the receiving end of some nice ground and pound.
The crowd are loving this. Great action here.
Bongwater lands with a punch from half guard.
Bud Bongwater has got the better of the ground game so far.
Kawike is looking to control Bongwater's leg but it's slowly edging free. Can Kawike avoid being mounted?
Bongwater winds up and cracks Kawike with a swinging punch to the side of the head.
That's three minutes gone in the round.
Bongwater working over Kawike with some ground and pound. Kawike looks like he wants out of this position, which is understandable.
Kawike is trying to get back to full guard.
Kawike is working hard here to advance position.
Bongwater winds up and cracks Kawike with a swinging punch to the side of the head.
Kawike tries to get to full guard but Bongwater has control of the leg.
The two fighters exchange a few words. I couldn't hear what they were saying but maybe it's more fun if you make it up yourself. Bongwater connects with a nice short shot to Kawike's temple.
Bongwater looks to score some points with some ground and pound.
Kawike wants to get back to full guard but Bongwater has mounted him!
Bongwater looking to ground and pound his opponent to a finish here.
Bongwater looking to control but Kawike is working nicely, looking to advance position himself.
Bongwater pausing momentarily but resumes with a couple of decent strikes that do a bit of damage.
That's four minutes gone in the round.
Bongwater postures up and cracks his opponent a couple of times before moving back into close ground control. Kawike looks a forlorn figure.
Bongwater controlling his opponent.
Kawike is desperately trying to improve his position but Bongwater has a good base and remains in mount.
Bongwater is in the full mount, landing strikes.
Kileki Kawike has stepped it up - he knows he needs a finish here!
Kawike is wriggling around trying to escape.
The referee warns Kawike that he has to improve his position here as he takes two more clean shots to the head.
Kawike can't escape the position.
Bongwater pausing momentarily but resumes with a couple of decent strikes that do a bit of damage.
Wooooo! Give it up for these two warriors! They are putting on a show!
As the round comes to an end the crowd are showing their appreciation for a great round of action.
Kawike flailing away with punches but nothing is landing.
Bongwater drops a big elbow. That's hurt Kawike! More shots from Bongwater and the ref steps in! The fight is over!
Ladies and gentlemen, after 4:57 of round 3, we have a winner by way of TKO (Strikes). Bud Bongwater!
|
|
|
|
|
|
|
|
|
|
|
|
|
|
|
|
|
|
|
|
|
|
|
| S |
C
A |
G |
S |
C
B |
G |
|
S |
C |
G |
|
energy
A | B |
|
hype
A | B |
|
pop
A | B |
|
mgr
A | B |
|
FIGHT
RATING
75% |
|
|
|
|
|
|
