|
|
PBP Commentary |
Coming up we have a featherweight MMA rules bout between Yussuf Al Zahid (ranked 6337 p4p, 7302 weight class) and David Bowmer (ranked 482 p4p, 530 weight class). Both fighters look fresh as a daisy as they make their way towards the cage.
 |
|
 |
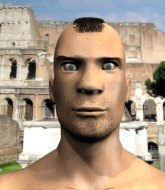
| 170 cm
25
155
0 - 1 - 0 |
|
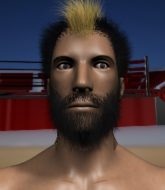
175 cm
25
155
0 - 1 - 0 |
BJJ White Belt
Excellent MT
Granite chin |
|
BJJ Blue Belt
Decent boxing
Solid chin |
|
| |
|
Ladies and gentlemen. This fight is 3 rounds, in the featherweight division.
Introducing the fighter to my left, fighting out of the red corner.
With a record of 0 - 1 - 0, fighting out of The Island, Yussuf Al Zahid!
And introducing the fighter to my right, fighting out of the blue corner.
With a record of 0 - 1 - 0, fighting out of The Island, David Bowmer!
The judges for this bout are Winston Alpacca, Michael Johnstone and David Hoff.

The bell rings for round one and we are underway!
The bell rings for round one and we are underway!
The crowd cheers as Al Zahid lands an impressive looking overhand right. Bowmer doesn't seem phased though.
Al Zahid misses with a half-hearted attempt at a head kick.
A big left from Al Zahid misses.
Bowmer comes forward and lands a shot to the body, then darts back out of range.
Al Zahid throws a sloppy head kick and Bowmer moves out of range easily.
Bowmer unleashes a big counter combination but Al Zahid bobs and weaves and avoids any damage.
Al Zahid fails with the takedown

and Bowmer moves into the clinch.
Bowmer tries to pull guard but can't drag his opponent to the mat. Al Zahid just stands there and leans against the cage.

Bowmer manages to break the clinch.
Bowmer misses with a takedown attempt. He shot from a bit too far out.
Al Zahid lands with a good body shot.
We've had a slow start to the round here - hopefully the action picks up.
Bowmer lands a lovely overhand right.
Al Zahid tries a switch kick but it misses it's target.

Bowmer changes levels and drives through with a really nice takedown into side control. Al Zahid looks really pissed at himself for not defending that better.
This has been an exciting period of action!
Al Zahid is looking for a sweep.

That's one minute gone in the round.
Bowmer staying calm.
Bowmer creates a bit of distance and throws down some hard shots.
Bowmer passes to full mount! That's big trouble for Al Zahid!
Bowmer content just to control the position here.

Bowmer goes for an armbar but he's not got it
Al Zahid turns into him and now he's in Bowmer's guard.

That's two minutes gone in the round.
Bowmer utilising some decent striking defenses from the guard, preventing the ground and pound.
Bowmer has his foot on Al Zahid's thigh. He's trying to push off and get in position for a triangle, I think. Al Zahid works his way back into a safe position though.
A real slowdown in the pace of the fight for a moment, as Bowmer holds on and takes a little breather.
Al Zahid pressing down on his opponent's thigh, looking to pass guard. Bowmer is keeping the position for now.
Al Zahid pushes down on Bowmer's leg and manages to get into half guard.
Bowmer is controlling Al Zahid's position as best he can from this difficult position.
Bowmer pushes Al Zahid off looking to stand but Al Zahid dives back in and keeps control.

That's three minutes gone in the round.
Bowmer regains full guard. Nicely done.
Bowmer looking to hit a scissor sweep but Al Zahid is one step ahead there.
We've been hearing good reports from Al Zahid's training camp. Apparently he has been rolling around with some good quality BJJ practitioners and has been sharpening his skills. Let's see if that has an impact on the fight today.
Al Zahid looking to sit in guard and control but Bowmer gets the butterfly guard and sweeps. He's now in the guard on the top.

The ref warns both fighters not to hold the cage as they work up against the meshing.
Bowmer showing good wrestling skills to control the position.
Bowmer drops back looking for a leg! Al Zahid is in trouble here! The fighters roll with the hold and Al Zahid manages to kick Bowmer off! Bowmer jumps back into Al Zahid's guard.
Al Zahid can't do much from the bottom at the moment, as Bowmer controls the pace.

That's four minutes gone in the round.
Al Zahid avoiding any damage from the ground and pound.
Al Zahid controls Bowmer momentarily but Bowmer frees himself.
Bowmer looking to pass the guard.
The crowd thankful this round is nearly over.
Bowmer slips nicely into half guard.
And thats the end of the round the fighters go back to their corners.
A close round but David Bowmer will probably get the nod.
The fighters get back to their feet, the hooter sounds and we're back to the action!

Bowmer rushes Al Zahid and pushes him back against the cage in a clinch.
Al Zahid wants to stall.
Bowmer is stalling here. The referee will be looking to step in if he doesn't pick up the pace.
Al Zahid is trying to break free.
Al Zahid tries to break free but Bowmer pushes him back against the cage.
Bowmer fails to pull the fight into his guard.
We've had a slow start to the round here - hopefully the action picks up.
A frustrated look appears on Al Zahid's face as he tries to break the clinch.
Bowmer is trying to pull guard but being pressed up against the cage enables Al Zahid to keep the fight standing.
Bowmer breaks from the clinch.
Bowmer's coach down at Armored Fitness & Sparring was telling us pre-fight that they have been working on Bowmer's balance. Obviously they view that as a key factor in the outcome of this fight.
Bowmer looks for a takedown but Al Zahid sprawls well.
Yussuf Al Zahid has stuffed three takedown attempts in the round now. That's going to take a lot out of David Bowmer.
That's one minute gone in the round.
Bowmer shoots in with a lovely double leg takedown. Al Zahid manages to land in full guard to minimise the damage.
Al Zahid is looking to stand back up but Bowmer counters by passing into half guard. Oops... bit sloppy there by Al Zahid.
Al Zahid scrambles, trying to get to his feet, but Bowmer manages to mount him!
David Bowmer has got the better of the ground game so far.
Bowmer content just to control the position here.
That's two minutes gone in the round.
Bowmer with shots to the head and body - Al Zahid looks very uncomfortable down there.
Bowmer is thinking about an arm triangle here, looking to tighten it up before moving to side control. Al Zahid can see it coming though and defends well with a couple of strikes to the head and some good arm positioning.
Bowmer controlling the pace for now.
Bowmer raining down shots from the mount!
That's three minutes gone in the round.
Bowmer controlling from the full mount.

Bowmer is standing up out of mount! Strange tactic there - he must really want this one on the feet!
Bowmer gets a double leg takedown into Al Zahid's guard.
Bowmer slips effortlessly into side control - very nice.
Al Zahid is looking to work his way out of this bad position but Bowmer is controlling him well.
That's four minutes gone in the round.
Al Zahid takes a big shot right to the temple there but he's taken it well.
Bowmer controls the position from side control.
Bowmer in side control, trying to ground and pound but not landing this time.
Bowmer just content to control the position.
The fighters are pressed up against the cage, both looking to find a bit of space to work.
Boooooooooooooooooooo!!! God, this has been a terrible round. Come on you two, sort yourselves out!
Al Zahid tries to wriggle free to get back to his feet but he's given up his back! Oops.
And thats the end of the round the fighters go back to their corners.
David Bowmer showed his class in that round. I'd imagine he'll take it on all the scorecards.
The corners get their ten second warning. Both fighters stand from their stools and stare eachother down, ready to get back to the action. This is the final round!

Bowmer throws a quick head kick that skims the top of Al Zahid's head.
Al Zahid misses with a right hand
and Bowmer counters by clinching up.
Bowmer is trying to pull guard but Al Zahid turns him against the cage and we stay in the clinch.
Al Zahid tries to break free but Bowmer pushes him back against the cage.
Bowmer is trying to pull guard but Al Zahid has him pressed against the cage.
Al Zahid is trying to break free.
Bowmer pushes off and circles away, back to the middle of the mat.
We've had a slow start to the round here - hopefully the action picks up.
Bowmer takes a head kick and keeps coming.
Bowmer is trying hard to land a takedown here. Al Zahid sprawls well and keeps this one on the feet.
Yussuf Al Zahid has stuffed three takedown attempts in the round now. That's going to take a lot out of David Bowmer.
Bowmer fakes with an overhand right and moves in to clinch with Al Zahid, pushing him back against the cage.
Al Zahid tries to break the clinch but Bowmer is controlling the position.
That's one minute gone in the round.
Bowmer jumps guard.
Bowmer wants to sweep here but Al Zahid controlling him for the moment.
Bowmer keeps trying to improve his position.
Al Zahid pressing down on his opponent's thigh, looking to pass guard. Bowmer is keeping the position for now.

Bowmer pushes Al Zahid off and scrambles back to his feet.
Bowmer takes a kick to the side of the head.

It looks like David Bowmer has been cut.
Al Zahid throws an off balance right hand
and Bowmer counters nicely by changing levels and landing a hook to the body.
Al Zahid stuffs the takedown attempt from Bowmer. Bowmer gets slowly back to his feet.
That's two minutes gone in the round.
Al Zahid misses with a body kick.
Bowmer walks straight into an uppercut. Luckily it didn't land flush.
Bowmer will have to do better than that with his takedown attempts.
Al Zahid throws a combination. Bowmer tries to block but a couple of punches get through.
The crowd are loving this. Great action here.
Bowmer dives in for a single leg takedown but Al Zahid sprawls and the fighters end up clinched against the cage.
Bowmer takes a big intake of breath there - he's definitely tired.
Bowmer takes a kick to the side of the head.
Bowmer avoids the head kick by Al Zahid.
Bowmer has a nice red mark on his side after a thudding body kick by Al Zahid.
Al Zahid keeps the fight standing with a nice sprawl.
Al Zahid is looking for a counter combo.
Al Zahid throws a series of punches but Bowmer avoids them all with ease.
Bowmer has managed to clinch.
Al Zahid is working hard here but doesn't seem to be able to control effectively, up against the cage.
That's three minutes gone in the round.
Bowmer lands a right hand.
Al Zahid gets underhooks to prevent Bowmer's takedown attempt.
Bowmer drops down looking for an ankle pick but Al Zahid pulls his leg out and moves away.
Al Zahid lands a leg kick. The shin dug right into the meat of the thigh.
Al Zahid throws a jab, cross combination which is slipped
and Bowmer counters with a left and a right that stings Al Zahid.
Al Zahid lands a jab, followed by a cross and another cross, as Bowmer backs up against the cage.
Bowmer fails miserably with a takedown attempt.
Bowmer has closed the distance and engaged Al Zahid in a clinch.
That's four minutes gone in the round.
Bowmer tries to score a body lock takedown but Al Zahid shows good agility there to stay on his feet.
Al Zahid is trying to break the clinch but Bowmer is controlling him.
Bowmer working some nice short punches in the clinch.
Bowmer breaks the clinch and we're back to striking at distance.
No joy there for Al Zahid, who threw a few shots but didn't land.
Wooooo! Give it up for these two warriors! They are putting on a show!
Al Zahid throws a sloppy head kick and Bowmer moves out of range easily.
A nice combination there by Al Zahid.
Bowmer takes a nice looking leg kick right on the meat of his thigh there.
Bowmer shoots and misses
and Al Zahid counters with a big head kick but Bowmer shrugs it off.
Yussuf Al Zahid has stepped it up - he knows he needs a finish here!
David Bowmer is fighting for a decision - hopefully he's judged it right and he's actually winning the fight.
Bowmer shoots in looking for a double leg takedown. Al Zahid defends it nicely.
And that's the end of the fight!
Yussuf Al Zahid showed his dominance in that final round.
I think Bowmer has won this one but let's see whether the judges agree with me. Over to the ring announcer for the scorecards.
Ladies and gentlemen, after 3 rounds of action, we go to the scorecards for a decision.
Judge Winston Alpacca scores the fight 28:29
Judge Michael Johnstone scores the fight 28:29
Judge David Hoff scores the fight 28:29
In favor of your winner, by unanimous decision... David Bowmer!
|
|
|
|
|
|
|
|
|
|
|
|
|
|
|
|
|
|
|
|
|
|
|
| S |
C
A |
G |
S |
C
B |
G |
|
S |
C |
G |
|
energy
A | B |
|
hype
A | B |
|
pop
A | B |
|
mgr
A | B |
|
FIGHT
RATING
41% |
|
|
|
|
|
|
