|
|
PBP Commentary |
Coming up we have a middleweight MMA rules bout between Konrad Logo (ranked 4809 p4p, 4778 weight class) and Henry Adams (ranked 0 p4p, 520 weight class). We have two fighters making their debuts here, so let's see who comes out of this one with their first professional victory.
 |
|
 |
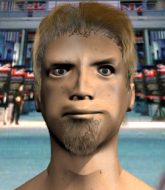
| 172 cm
23
185
0 - 0 - 0 |
|
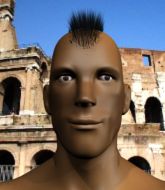
196 cm
23
195
0 - 0 - 0 |
BJJ White Belt
Excellent boxer
Cuts easily |
|
BJJ Blue Belt
Decent boxing
Granite chin |
|
| |
|
Ladies and gentlemen. This fight is 3 rounds, in the middleweight division.
Introducing the fighter to my left, fighting out of the red corner.
With a record of 0 - 0 - 0, fighting out of Tokyo, Konrad Logo!
And introducing the fighter to my right, fighting out of the blue corner.
With a record of 0 - 0 - 0, fighting out of Tokyo, Henry Adams!
The judges for this bout are Ren Mimura, Tatsuya Matsuyama and Shirou Masuda.

The bell rings for round one and we are underway!
The bell rings for round one and we are underway!

Adams drives through and clinches with Logo against the cage.

Adams breaks the clinch and we return to the middle of the mat.
Nice takedown defense from Adams. No joy for Logo on that attempt.

Adams looks for a takedown. He's got it. We're now in half guard.
Logo tries to get to full guard but Adams has control of the leg.

Adams decides he's had enough of the ground and stands up.
Logo throws a lazy head kick
and Adams moves into the clinch.
Logo wants to strike at distance but he can't break free of the clinch.
We've had a slow start to the round here - hopefully the action picks up.
Adams's corner calls for him to break the clinch, which he does.
Adams looking to score a takedown here. Logo is defending well but Adams drives through and ends up in Logo's guard.
The crowd cheering loudly, showing their appreciation for the quality fight we're seeing here.
Adams's corner is telling him to maintain position.

Logo looking for subs off his back but Adams has passed one foot through into half guard.

That's one minute gone in the round.
Adams keeping composed on the top, looking to control the action.
Let's hope that Adams has the urge to step up the pace any second now because for the last 15 or 20 seconds he's just been holding on tight.
Adams throwing punches and elbows but they're not doing any damage.

That's two minutes gone in the round.
Well. There's a bit of a lull in the action here and the crowd are starting to get restless.
Adams decides to stand up and try his luck on the feet.
Logo tries to close the distance and clinch but Adams swats him to one side with an open hand palm strike and circles away.
Excellent takedown into side control there by Adams.
Adams is staying tight to Logo's torso, preventing him from escaping.
Logo knows he needs to get back to his feet asap. He's simply no match for Adams on the ground.

Adams wants to work for a kimura but he's foiled early by Logo, who protects the arm well.
Adams wants to work for a kimura but he's foiled early by Logo, who protects the arm well.

That's three minutes gone in the round.
Adams taking a breather here.
Adams throwing strikes but missing, from side control.
Adams working hard here to secure a kimura but he's not really in the right position for it.
Adams throws a knee to the body but it doesn't do much damage.

That's four minutes gone in the round.
There's not a lot going on here and the crowd are letting the fighters know they're not willing to tolerate a lack of action.
Adams stands up and we're back to a striking position.
Adams defends well against a solid takedown attempt from Logo.
Adams displaying good standup as he scores with a three punch combination.

It looks like Konrad Logo has been cut.
Adams has closed the distance and engaged Logo in a clinch.
Logo wants to break free but Adams has control.
Adams breaks the clinch.
Adams defends well against a solid takedown attempt from Logo.
Adams only half commits to the counter leg kick.
That's three failed takedown attempts in the round for Konrad Logo. That's going to take a lot out of him.
Logo is breathing heavily.
The crowd thankful this round is nearly over.
Adams closes the distance and gets a double leg, slamming Logo to the mat! Logo manages to get full guard.
Logo can't do much from the bottom at the moment, as Adams controls the pace.
And thats the end of the round the fighters go back to their corners.
Henry Adams dominated that round.
The cut man is working on Konrad Logo's cut.
That's time! Back to the action!

Logo has his takedown stuffed
and Adams counters by moving into the clinch. Good anticipation by Adams.
Logo wants to strike at distance but he can't break free of the clinch.
Adams manages to get underhooks and slows down the pace for a moment.
Adams manages to break the clinch.
Adams gets to the clinch - let's see what his plan is here.
Adams breaks from the clinch.
We've had a slow start to the round here - hopefully the action picks up.
Adams cracks a nice hook into Logo's ribs.
Logo dives in and grabs Adams's left leg, looking for a takedown. Adams pushes down on Logo's head and hops out.
Adams drops down and drives through with a powerful takedown into guard.
The fighters are pressed up against the cage, both looking to find a bit of space to work.
Adams throwing elbows and punches but not connecting, as Logo works some decent striking defense from the bottom.
Both fighters are absolutely exhausted here.
That's one minute gone in the round.
Adams looking to control the position here, rather than advance.
Logo is looking for a triangle here but Adams uses the submission attempt to pass into side control.
Logo might be looking to lock onto one of his opponent's long limbs for a submission, whilst we're on the ground.
Logo gives up the full mount - oops, sloppy defensive grappling there!
Logo is in a horrible position here, under a barrage of strikes, he's managing to avoid any damage.
Adams controlling from mount.
That's two minutes gone in the round.
Adams working to secure an arm triangle but it's not happening for him just yet.
Logo avoids a series of strikes thrown by Adams.
Adams thowing strikes but they're hitting the gloves, not doing any damage.
Adams goes for an armbar but he's fallen flat on his backside there and now Logo is on top in guard.
Logo got a little sloppy there for a moment and Adams has worked his way into a loose triangle - can he finish it?! No, Logo has managed to get both his arms back between Adams's legs - danger averted.
Henry Adams has got the better of the ground game so far.
Adams has his foot on Logo's thigh. He's trying to push off and get in position for a triangle, I think. Logo works his way back into a safe position though.
That's three minutes gone in the round.
Adams manages to sweep nicely, so he's now on top. Logo manages to get himself to full guard.

Adams content to stall in guard here.
Adams drops back for a leg! It's a sloppy attempt though and Adams jumps back into guard quickly, to retain the dominant position.
Adams stands up from guard. Let's bang!
Logo misses with a few strikes there.
That's four minutes gone in the round.
Adams lands a nice leg kick that just misses Logo's sensitive parts.
Logo shoots for a double leg takedown but Adams sprawls well. He's pushed Logo's face into the mat and manages to get back to his feet relatively easily.
That's three failed takedown attempts in the round for Konrad Logo. That's going to take a lot out of him.
Logo fails with a takedown attempt from distance.
Logo gets tackled into the cage by Adams. Adams maintains the clinch.
Adams lands a shot to the body.
Adams has been the more effective fighter overall so far.
Adams content to slow the pace in the clinch.
Nice elbow from Adams.
Adams gets through Logo's defenses to land a nice punch to the side of the head.
Adams looking to throw knees to the head but Logo is blocking nicely.
Adams jumps into guard, dragging Logo to the mat.
The crowd are loving this. Great action here.
The crowd thankful this round is nearly over.
Logo looking to sit in guard and control but Adams gets the butterfly guard and sweeps. He's now in the guard on the top.
Adams is frustrating his opponent with some stalling tactics from top position.
And thats the end of the round the fighters go back to their corners.
Henry Adams showed his class in that round. I'd imagine he'll take it on all the scorecards.
The cut man is working on Konrad Logo's cut.
That's time! Back to the action! This is the final round!

Adams closes the distance and presses his opponent up against the cage.
Adams presses Logo against the cage and delivers a mid-strength body shot.
Adams is working on a single leg takedown against the cage. Logo can't fight it off and eventually Adams manages to take the fight to the floor. Logo looks annoyed but at least he's managed to land in guard.
Logo is working an open guard so Adams takes the opportunity to get back to his feet.
We've had a slow start to the round here - hopefully the action picks up.
Adams shoots in for a takedown! He's got it and he's managed to land in side control! That's better than Adams was expecting from the takedown attempt, I'm sure!
Logo wants to get back to his feet but Adams is dominant here and he's now got Logo's back!
We've seen a great period of action over the last minute or so - credit to both fighters for going all out!
I would not like to be Logo right now.
That's one minute gone in the round.
You can see the frustration on Logo's face
He knows he is in trouble unless he improves his position sooner rather than later.
Both fighters are breathing heavily.
So, who will make the next big move? In this position it could be crucial.
Logo wants to control his opponent's hands but Adams gets his hands free.
Adams is staying calm and holding on to the back position, whilst working on a rear naked choke. Logo is defending well though. Adams let's go of the attempt for now.
Logo covering up well under a barage of strikes.
That's two minutes gone in the round.
A lull in the action here being met with boos from the crowd.
Adams is throwing strikes from the back here. Oh that last one was to the back of the head. Adams gets a warning from the referee. He throws another strike to the back of the head straight away though and the referee has seen enough. He breaks up the two fighters and stands them back up. Adams gets a real talking to here and is lucky not to get a point deducted. Adams apologises and we restart here on the feet.
Logo tries for a takedown but Adams circles away easily
and Adams counters with a shoot takedown into half guard.
Logo wants to stand back up but Adams manages to pass into side control.
A lull in the action here as Adams stalls from top position.
Adams throws a knee to the body but it doesn't do much damage.
Adams takes a little break here. Logo wants to take advantage but he is being controlled well.
That's three minutes gone in the round.
Adams working hard here to secure a kimura but he's not really in the right position for it.
Adams creates some space and throws a big elbow, but Logo sees it coming and moves his head just enough to avoid the strike.
That's four minutes gone in the round.
The crowd are showing their displeasure at the lack of action as loud boos ring out around the arena.
Sloppy strikes there by Adams.
Adams controlling the position from side mount.
Logo tries to bench press Adams off him but Adams keeps the position.
Adams controlling from side mount.
Adams decides to take the fight back to the feet.
The crowd thankful this round is nearly over.
Logo looking to throw a kick but he's pulled out of it.
Adams unleashes a big counter combination but Logo bobs and weaves and avoids any damage.
Konrad Logo has stepped it up - he knows he needs a finish here!
Henry Adams is fighting for a decision - hopefully he's judged it right and he's actually winning the fight.
Adams feints and then dives in with a takedown. That was a long way out but the feint bought him enough time to close the distance and complete the takedown. Now we'll play guard for a bit and see who can get the better of that position.
Logo is looking to stand back up but Adams counters by passing into half guard. Oops... bit sloppy there by Logo.
And that's the end of the fight!
Konrad Logo showed his dominance in that final round.
Well Adams has outworked and out performed his opponent in all aspects of the game today. He was simply too good and the decision should be no more than a formality. Over to the ring announcer for the scorecards.
Ladies and gentlemen, after 3 rounds of action, we go to the scorecards for a decision.
Judge Ren Mimura scores the fight 28:29
Judge Tatsuya Matsuyama scores the fight 28:29
Judge Shirou Masuda scores the fight 28:29
In favor of your winner, by unanimous decision... Henry Adams!
|
|
|
|
|
|
|
|
|
|
|
|
|
|
|
|
|
|
|
|
|
|
|
| S |
C
A |
G |
S |
C
B |
G |
|
S |
C |
G |
|
energy
A | B |
|
hype
A | B |
|
pop
A | B |
|
mgr
A | B |
|
FIGHT
RATING
38% |
|
|
|
|
|
|
