|
|
PBP Commentary |
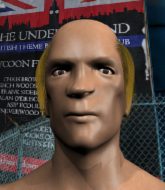
Coming up we have a super heavyweight MMA rules bout between Carlton Kerhley (ranked 0 p4p, 0 weight class) and Jay Zol (ranked 0 p4p, 0 weight class). Carlton Kerhley is staring across the cage at his opponent, tweaking his nipples... Tweaking his own nipples that is.
 |
|
 |
| 175 cm
30
278 lbs
15 - 9 - 1 |
|
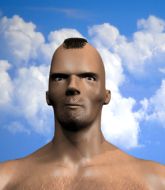
170 cm
32
148 lbs
16 - 16 - 1 |
BJJ Red Belt
Excellent boxer
Insanely flexible |
|
Olympic wrestler
Excellent boxer
Good gas tank |
|
| |
|
Ladies and gentlemen. This fight is 2 rounds, in the super heavyweight division.
Introducing the fighter to my left, fighting out of the red corner.
With a record of
15 - 9 - 1, fighting out of Las Vegas, Carlton Kerhley!
And introducing the fighter to my right, fighting out of the blue corner.
With a record of
16 - 16 - 1, fighting out of Amsterdam, Jay Zol!
The judges for this bout are Albert Achterberg, Aafke Stam and Radbod Blank.

The bell rings for round one and we are underway!

Kerhley is looking for a takedown here. He's shot in and has managed to get it, finishing up in Zol's half guard.
Zol is trying to stand back up but Kerhley is controlling him
Zol is using up a lot of energy trying to get back to his feet. Perhaps he should improve his position first.

Zol manages to create a bit of space in order to work his way back to his feet. Kerhley keeps hold of his opponent and drives him back against the cage.

Kerhley is fighting off a takedown attempt but Zol is just too persistent for him and manages to trip Kerhley to the mat. Kerhley regains guard as soon as the fighters hit the mat.
Kerhley is working an open guard here, looking to improve his position. No doubt that will leave him open to counters but at least he's being more offensive.
Kerhley keeping moving, preventing Zol from controlling successfully.
Kerhley looking to control.
Zol controlling from the top position.

Kerhley working for a triangle but Zol defends it easily.
The fighters are pressed up against the cage, both looking to find a bit of space to work.
Zol trying to control the position from guard on top but Kerhley is wriggling around, looking for whatever he can.

That's one minute gone in the round.
Zol showing good wrestling skills to control the position.
Kerhley looking for a sweep. Not yet Kerhley, not yet.
Zol stays in close to Kerhley's body and controls the position.
We may be looking at a referee standup if the pace doesn't pick up soon.
Zol wants to control from the top but Kerhley keeps moving.

The referee has stepped in and called for a break in the action. We'll restart on the feet.
Zol closes the distance and scores a nice trip takedown into half guard. Kerhley did well to prevent Zol getting side control.
Zol wants to control but Kerhley is keeping him busy.

That's two minutes gone in the round.
Kerhley is looking for a sweep. Zol is wise to his cunning plan and keeps the top position.
Zol trying to control the pace.
Kerhley's coaches at Hells Balls Grappling Academy have been working on his defensive grappling in preparation for this fight so let's see if he can get out of this tricky position.
Kerhley is looking to sinch up a guillotine here but Zol pulls his head out easily.
Kerhley looking for submissions from an awkward position here.
Kerhley tries to roll over but Zol keeps him under control.
Zol is just sitting in half guard, waiting for something to happen.
Zol trying to mount his opponent but Kerhley defends it.

That's three minutes gone in the round.
Kerhley is trying to get back to full guard.
Kerhley trying to control here.
Kerhley is looking to regain full guard. Not this time though.
Kerhley trying to control from the bottom.
The referee decides to stand the fighters back up.

That's four minutes gone in the round.
A lull in the action here being met with boos from the crowd.
Zol shoots in and drives through. Kerhley sprawls well.
Kerhley scores a trip takedown into side control. Nice.
Kerhley is looking for a kimura. He might have it! No, Zol has escaped the position, nice work there.
Kerhley thinks about going for a far side armbar but bails out and retains the dominant position instead.
Zol is trying to get back to his feet.
Kerhley wants to control but Zol is keeping him busy.
Zol pushes Kerhley away and creates a bit of space to escape. He's almost out here... but no, Kerhley gets a good hold of his legs and remains firmly in side control.
The referee must be thinking about standing these guys back up.

That's five minutes gone in the round.
The ref stands the fighters back up due to a lack of activity.
Jay Zol seems to be the more aggressive standup fighter in this bout.
Zol is trying hard to land a takedown here. Kerhley sprawls well and keeps this one on the feet.
A momentary lapse in concentration from Kerhley enables Zol to shoot in and score with a neat double leg. Kerhley manages to secure a closed guard as the fighters hit the mat.
Kerhley pulls Zol in close to prevent any damage.
Zol wants to control from the top but Kerhley keeps moving.
Zol looking to sit in guard and control but Kerhley gets the butterfly guard and sweeps. He's now in the guard on the top.

Kerhley trying to control but Zol is working from the bottom.
Zol wants to get back to his feet but Kerhley is in a dominant position and won't allow it.
Kerhley trying to pass the guard but can't manage it just yet.

That's six minutes gone in the round.
Kerhley advances to half guard.
Zol is defending against the submission attempts here by Kerhley.
Kerhley wants to pass to mount but Zol is defending the position.
Kerhley stops Zol from getting back to his feet.
Kerhley is trying a forearm choke
I don't think that's going to do much at this level of the game.
Zol tries to kick Kerhley off but Kerhley keeps his base steady and stays in half guard.

That's seven minutes gone in the round.
Kerhley is trying a forearm choke
I don't think that's going to do much at this level of the game.
Zol wants to get back to his feet.
It looks like the ref is thinking about a standup.
Kerhley is thinking about going for an arm triangle but he can't free his leg.
Zol is trying to stand up here but Kerhley is controlling him well.
The referee has motioned to the fighters to stand back up. He just wasn't happy with the level of activity.
Kerhley shoots in for a takedown and gets it. Let's see what he's got on the mat.
Zol wants to stand up but Kerhley is controlling him.

That's eight minutes gone in the round.
There's not a lot going on here and the crowd are letting the fighters know they're not willing to tolerate a lack of action.
Kerhley thinks about going for a leg but decides against it, in order to maintain the position.
Zol uses the cage to get back to his feet.
Zol shoots in and gets a takedown into Kerhley's guard.
Zol trying to pass the guard but can't manage it just yet.
Zol wants to control from the top but Kerhley keeps moving.
Zol passes Kerhley's right leg, so he's now in half guard.
Kerhley is looking to improve his position.
Zol moves nicely into side control.

That's nine minutes gone in the round.
Kerhley is trying to get back to half guard.
Kerhley is looking to slip a leg under and get half guard but Zol is one step ahead and moves to full mount!
Kerhley wants to hold on but Zol pushes him away.
Zol trying to control but Kerhley is having none of it.
Kerhley tries to reverse the position but Zol maintains control.
The crowd thankful this round is nearly over.
Kerhley wants to hold on but Zol pushes him away.
Zol content just to control the position here.
And thats the end of the round the fighters go back to their corners.
A close round but Jay Zol will probably get the nod.
That's the end of the interval. I'm sure that seemed a lot quicker than a minute for our two fighters! Back to the action. This is the final round!

Kerhley misses with a takedown attempt. He shot from a bit too far out.
A telegraphed takedown attempt from Zol is defended easily by Kerhley.
Nice takedown defense from Kerhley. No joy for Zol on that attempt.
Kerhley bobs and weaves into range and then changes levels and scores with a nice takedown into side control.
Kerhley wants to work for a kimura but he's foiled early by Zol, who protects the arm well.
Zol pushes Kerhley away and creates a bit of space to escape. He's almost out here... but no, Kerhley gets a good hold of his legs and remains firmly in side control.
We've had a slow start to the round here - hopefully the action picks up.
That's one minute gone in the round.
Kerhley trying to control the action but Zol is working from the bottom.
The referee has decided to stand the fighters back up, so we'll restart on the feet.
Kerhley misses with a takedown attempt - Zol sprawls well and throws a nice strike on the way out which just misses.
Kerhley will have to do better than that with his takedown attempts.
Zol tries a counter takedown but it's more of a dummy move, and he uses it to push himself away.
That's three failed takedown attempts in the round for Carlton Kerhley. That's going to take a lot out of him.
Zol shoots in and drives through. Kerhley sprawls well.
Kerhley looks frustrated there after his takedown attempt is stuffed easily.
Kerhley fails with the takedown.
Kerhley shoots in looking for a double leg takedown. Zol defends it nicely.
That's two minutes gone in the round.
Kerhley keeps the fight standing with a nice sprawl.
Zol tries to score a power double leg takedown but Kerhley sees that one coming and sprawls well. That will dishearten Zol somewhat.
Kerhley feinted with a counter takedown.
Zol shoots in for a takedown. "Ole!" shouts Kerhley as he jumps to the side.
Zol feints and as Kerhley raises his hands in defense, Zol changes levels and drives through with a takedown into guard.
Zol wants to pass the guard but Kerhley is keeping the position.
The ref warns both fighters not to hold the cage as they work up against the meshing.
Zol postures up.
That's three minutes gone in the round.
Zol advances to half guard.
Jay Zol has got the better of the ground game so far.
Kerhley is trying to get back to full guard.
Kerhley is refusing to be controlled, as Zol sits in half guard.
Zol trying to control the pace.
Zol wants to lay and pray for a moment but Kerhley keeps working.
That's four minutes gone in the round.
The crowd are starting to boo a lack of action.
Kerhley works his way to full guard. Good work.
Zol wants to control from the top but Kerhley keeps moving.
Kerhley pulls Zol in close to prevent any damage.
Zol pressing down on his opponent's thigh, looking to pass guard. Kerhley is keeping the position for now.
The referee decides to stand the fighters back up.
A telegraphed takedown attempt from Kerhley is defended easily by Zol.
Zol fakes an overhand right and shoots for a takedown. Kerhley sprawls well initially but Zol persists and gets the takedown into half guard.
That's five minutes gone in the round.
Zol trying to control from half guard but Kerhley is working away.

Zol is trying for a guillotine from the top but the pressure isn't in the right place so Kerhley is just riding it out for now. Zol eventually gives up the hold.
Kerhley is looking to control Zol's leg but it's slowly edging free. Can Kerhley avoid being mounted?
Kerhley is going to have to think about doing something other than just controlling because Zol is managing to avoid having the position dictated to him.
Kerhley gets back to full guard.
That's six minutes gone in the round.
A lull in the action here being met with boos from the crowd.
Kerhley looking to control.
Zol controlling from the guard. I say controlling but really, he's stalling.
Kerhley had isolated an arm as going for a kimura. Zol defends it easily.
Zol wants to control from the top but Kerhley keeps moving.
Kerhley tries to land a sweep but no joy.
We must be close to a standup if these guys don't pick up the pace.
Carlton Kerhley has stepped it up - he knows he needs a finish here!
That's seven minutes gone in the round.
Zol trying to pass the guard but can't manage it just yet.
The referee has decided to stand the fighters back up, so we'll restart on the feet.
Zol looks for a takedown but Kerhley sprawls well.
Kerhley feints and as Zol raises his hands in defense, Kerhley changes levels and drives through with a takedown into guard.
Kerhley pressing down on his opponent's thigh, looking to pass guard. Zol is keeping the position for now.
Zol is looking to get back to his feet but can't, whilst Kerhley is controlling him.
Kerhley wants to pass the guard but Zol is keeping the position.
Kerhley trying to control but Zol is working from the bottom.
Zol wants to get back to his feet but Kerhley is in a dominant position and won't allow it.
That's eight minutes gone in the round.
Zol keeping full guard, as Kerhley tries to pass.
Zol wants to get back to his feet but Kerhley passes into half guard.
Kerhley tries to pass to full mount but Zol defends it.
Kerhley is trying to control the action in half guard but Zol is working away on the bottom, looking perhaps to get back to full guard.
Zol pushes Kerhley off and gets back to his feet.
Kerhley fails with the takedown.
Zol shoots for a double leg takedown but Kerhley sprawls well. He's pushed Zol's face into the mat and manages to get back to his feet relatively easily.
Zol stuffs the takedown.
That's nine minutes gone in the round.
Kerhley shoots in looking for a takedown. Zol tries to sprawl out of it but Kerhley keeps driving through. The fighters are pinned against the cage. Zol manages to get underhooks and after a bit of a struggle, circles away and we're back to standing.
Both fighters are absolutely exhausted here.
Zol shoots in but Kerhley avoids the takedown attempt easily.
Zol fails miserably with a takedown attempt.
Zol darts in looking for a takedown but Kerhley gets double underhooks and turns Zol into the cage.
Kerhley tries to shoot in for a takedown. He's got hold of a leg but Zol swivels and escapes.
Kerhley decides to change it up a bit and drives through with a nice takedown into half guard.
Kerhley is looking for an arm triangle, whilst trying to pass to side control. Zol doesn't seem that keen to cooperate though. No luck this time Kerhley.
Kerhley prevents Zol from standing back up.
And that's the end of the fight!
That was a close round. You could make an argument for either fighter but I would give it to Carlton Kerhley.
I have no idea who won that fight. Let's wait and see whether the judges are as confused as me! Time for a split decision perhaps?!. Over to the ring announcer for the scorecards.
Ladies and gentlemen, after 2 rounds of action, we go to the scorecards for a decision.
Judge Albert Achterberg scores the fight 20:18
Judge Aafke Stam scores the fight 20:19
Judge Radbod Blank scores the fight 20:19
In favor of your winner, by unanimous decision... Carlton Kerhley!
Carlton Kerhley decided to thank the fans in attendance for making a great atmosphere. It seemed to go down pretty well.
|
|
|
|
|
|
|
|
|
|
|
|
|
|
|
|
|
|
|
|
|
|
|
| S |
C
A |
G |
S |
C
B |
G |
|
S |
C |
G |
|
energy
A | B |
|
hype
A | B |
|
pop
A | B |
|
mgr
A | B |
|
FIGHT
RATING
29% |
|
|
|
|
|
|
