|
|
PBP Commentary |
Coming up we have a light heavyweight MMA rules bout between Frederick Barbarossa (ranked 0 p4p, 0 weight class) and Henderson Cormier (ranked 0 p4p, 0 weight class). Frederick Barbarossa has the edge in experience - let's see if he can make that count tonight.
 |
|
 |
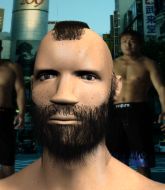
| 186 cm
27
200 lbs
14 - 8 - 0 |
|
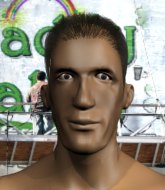
180 cm
21
223 lbs
4 - 3 - 0 |
BJJ Blue Belt
World class boxer
Insanely flexible |
|
Good wrestler
Decent boxing
Granite chin |
|
| |
|
Ladies and gentlemen. This fight is 3 rounds, in the light heavyweight division.
Introducing the fighter to my left, fighting out of the red corner.
With a record of
14 - 8 - 0, fighting out of London, Frederick Barbarossa!
And introducing the fighter to my right, fighting out of the blue corner.
With a record of
4 - 3 - 0, fighting out of London, Henderson Cormier!
The judges for this bout are William Gold, Richard Clark and James Atkins.

The bell rings for round one and we are underway!
Cormier shoots in for a takedown - he's clinched up with Barbarossa but Barbarossa pushes him off and we're back to square one.
Barbarossa scores to the head and body with a nice combination!

It looks like Henderson Cormier has been cut.
Cormier on the wrong end of a decent looking cross there.
This has been an exciting period of action!

Cormier looking to score a takedown here. Barbarossa is defending well but Cormier drives through and ends up in Barbarossa's guard.
Barbarossa wants to get back to his feet but Cormier is in a dominant position and won't allow it.
The ref warns both fighters not to hold the cage as they work up against the meshing.
Cormier in full guard, throwing the ground and pound. No damage this time.
Cormier throws a strike but Barbarossa rolls with it and manages to sweep. Now he's in guard on top.
Barbarossa wants to get up but he can't break Cormier's closed guard. He needs to be careful trying to break the legs open, as he's open to submissions here.
Cormier looking to control the pace of the fight rather than finish it.
Cormier wants to sweep here but Barbarossa controlling him for the moment.

That's one minute gone in the round.
Barbarossa wants to stand but Cormier has a closed guard, so he can't escape.

Barbarossa stands up from guard. Let's bang!
Barbarossa gets caught flat footed, as Cormier shoots in with a quick takedown into guard.
Cormier won't allow Barbarossa to sweep him here.
Cormier postures up to throw the ground and pound strikes but they don't connect.

Cormier drops back, looking for a kneebar! Barbarossa looks panicked! The fighters roll across the mat, one looking to finish, one looking to escape. Barbarossa looks to have wriggled free... Yes, he's got his leg free and he's dived into side control! Good work there from Barbarossa!
Cormier can't do much from the bottom here.

That's two minutes gone in the round.
Cormier tries to improve position but can't.
Cormier is persisting with the attempt to improve his position.
Barbarossa decides to stand back up. Barbarossa steps back and let's Cormier get back to his feet.
This is a great period of action - very entertaining stuff!
Cormier avoids a punch combination nicely.
Cormier tries to move into range but Barbarossa moves to the side and lands with a nice right hand.
The crowd cheers as Barbarossa lands an impressive looking overhand right. Cormier doesn't seem phased though.
Frederick Barbarossa is looking to keep the fight on the feet at all costs.
Barbarossa looks to score with a combo but nothing lands.
Barbarossa stuffs a takedown. It's all about dictating where the fight takes place and Barbarossa wants it to stay on the feet.
A jab from Barbarossa finds it's way through Cormier's defenses.
A right-left combo lands from Barbarossa.

That's three minutes gone in the round.
A punch combination from Barbarossa misses.
Cormier closes the distance and gets a double leg, slamming Barbarossa to the mat! Barbarossa manages to get full guard.
Cormier looks winded!
Cormier drops back for a leg but he's not going to get it - he lets go and Barbarossa dives on top into guard.
Barbarossa tries to stand but Cormier is controlling from the bottom.
Barbarossa stands up from guard. Let's bang!
Barbarossa bobbing and weaving, closes the distance and lands a hook to the side of Cormier's head.
Cormier takes a punch to the jaw and another one to the bread basket.
We've seen a great period of action over the last minute or so - credit to both fighters for going all out!

Barbarossa clinches up with Cormier and pushes him back against the cage.
The fighters are starting to get sweaty, which will make takedowns a bit more tricky.
Cormier has clasped his hands together around Barbarossa's back... aaand, he's got a takedown into side control. Nicely done.
Cormier working the strikes but Barbarossa uses the opportunity to regain half guard.

That's four minutes gone in the round.
Barbarossa is looking to escape.
Cormier thows a wild elbow that connects with the canvas.
Cormier sitting in half guard, looking to land shots. Barbarossa defending well though.
Barbarossa regains full guard, whilst avoiding punches from Cormier.
Cormier throwing strikes but missing.
Cormier loading up with the ground and pound but he's missing more than he's landing in this flurry.
The crowd are going absolutely nuts as the round comes to an end - what a fantastic round of action!
Cormier throws a big right hand that misses.
Barbarossa has momentary wrist control but Cormier slips an elbow through the middle.
And thats the end of the round the fighters go back to their corners.
Frederick Barbarossa dominated that round.
The cut man is working on Henderson Cormier's cut.
The minute break is over - no more time for sponges and pep talks - back to the action!

Some wild striking there from Barbarossa.
Barbarossa with a jab.
Barbarossa throws a combination but comes up with nothing but fresh air.
Barbarossa tries to clinch but Cormier moves out of range.
Barbarossa throws a right and a left that Cormier avoids nicely.
Barbarossa lands a nice shot to the body.
Barbarossa misses with a series of wild punches.
Barbarossa misses the jab.
Barbarossa lunges in with swinging rights and lefts but Cormier circles away quickly and effectively.
Cormier shoots in for a double leg but Barbarossa sprawls well. That's going to sap some energy.
Barbarossa with a nice cross.
This is a great period of action - very entertaining stuff!
Barbarossa displays good takedown defense there as he swats away a double leg from Cormier.
Cormier is breathing heavily.
Barbarossa rushes forward with a series of wild hooks but Cormier moves out of range and avoids them all easily.
That's one minute gone in the round.
Barbarossa fails to land with a series of punches.
Frederick Barbarossa is winning the standup battle so far.
Cormier closes this distance looking for a takedown but Barbarossa circles away.
Frederick Barbarossa has stuffed three takedown attempts in the round now. That's going to take a lot out of Henderson Cormier.
Cormier shoots in for a takedown. He's persisting with it as Barbarossa sprawls well. Barbarossa wins this battle and keeps the fight standing. Cormier gets slowly back to his feet.
Barbarossa lands a nice shot that snaps Cormier's head back.
Barbarossa misses with a jab and misses with a cross straight after too.
Cormier dodges the punch combination from Barbarossa.
Barbarossa swinging wildly here.
Cormier on the wrong end of an overhand right that came out of nowhere.
Barbarossa rushes forward with a series of wild hooks but Cormier moves out of range and avoids them all easily.
Barbarossa uses good footwork to get in and out, landing a nice hook.
We've seen a great period of action over the last minute or so - credit to both fighters for going all out!
Cormier will have to do better than that with his takedown attempts.
That's two minutes gone in the round.
Barbarossa fails to land with a series of punches.
Barbarossa feints a jab promting Cormier to slip. Barbarossa then demonstrates his capabilities by jabbing again. Cormier slips again and ducks right into an uppercut.
Barbarossa is really head hunting here, hardly looking to strike to the body at all.
Cormier shoots in for a double leg but Barbarossa sprawls well. That's going to sap some energy.

Barbarossa lands a left and a right that send Cormier crashing to the mat, dazed. Barbarossa thinks about following him to the mat but decides to wave him back up to his feet!

Cormier is rocked!
Cormier shoots in with a takedown attempt and he has Barbarossa pinned against the cage. Barbarossa gets the underhooks and manages to circle away.
Cormier is still on wobbly legs! Can Barbarossa finish him?
Cormier loses concentration momentarily and Barbarossa pounces with a three punch combo! Right, left, right! Cormier crashes face first to the mat, out cold! Barbarossa finishes this one with a fantastically precise combo! Great stuff.
Ladies and gentlemen, after 2:30 of round 2, we have a winner by way of KO (Punches). Frederick Barbarossa!
A very excited looking Frederick Barbarossa made sure he remembered to thank all the fans both in the arena and on the internet. He said all the coolest people spend all day on MMA websites, which got a big reaction.
|
|
|
|
|
|
|
|
|
|
|
|
|
|
|
|
|
|
|
|
|
|
|
| S |
C
A |
G |
S |
C
B |
G |
|
S |
C |
G |
|
energy
A | B |
|
hype
A | B |
|
pop
A | B |
|
mgr
A | B |
|
FIGHT
RATING
100% |
|
|
|
|
|
|
